


It’s starting to seem like Monday’s Cold Starts are just becoming updates on the progress I’ve made with my 2CV, and I think that’s a good thing because it (A) means I’ve made some progress and (2) I don’t have to scramble for an idea Monday morning. This weekend brought some good 2CV progress, again thanks in large part to local 2CV maven Til, who helped me sort out that absurd rat’s nest of wiring that had been intimidating me. Progress was made, but I’m not there yet, as there’s still a strange issue I need to figure out. Or, more likely, ask smarter people to figure out for me.
The main goal of the weekend was to get the wiring harness in some sort of basic order, so I can really see how bad it is and if I need to replace the harness, or if what I have can me made to work, at least for a while. Getting things shipped to the US is tricky right now, and I really want to know what works and what doesn’t!


So, Til and I methodically tested and checked each wire, and, incredibly, we figured out what they all did, and finally the electrical system started to come back to life; I had lights and indicators and dash warning lights. Wipers, too!
That’s the mess of wires, but now all repaired and labeled. It’s still not pretty, but it’s at least working better and a bit less incomprehensible.

As you can imagine, it was magical. Look at the glory of this indicator!

Majestic, isn’t it? Sure is. And these dash warning lights, that tell me two whole things! That’s technically plural!

The upper one is the brake warning lamp (I’m pushing the test button to make it illuminate), and the lower one is the oil pressure warning light. Oh, I guess the hazards have their own blinky light, so this dash has a lavish three warning lamps.
Some of that was short-lived, because when I was replacing headlight bulbs, I tested the sidelights, and the one I replaced came on, then went out, and now my headlights and brake lights and hazards don’t work again. The turn signals still do? I need to see what happened.

I was also finding that I kept popping the “blue” fuse (second from bottom) and wasn’t sure why, until we found that a terminal on the alternator was bent and grounding to the housing. A quick twist with some needlenose pliers and that solved that. And yes, I checked to see if it was a fuse causing the running lights to stop working, and it doesn’t seem like it is that.
But still, that can wait, as what I really want is to get this thing driving. Last week I had it running for a bit, feeding fuel from a gas can. Now I want to get the fuel tank reconnected and make sure it’ll run from the tank, as it should. I also wanted to get the cooling fan back on and button up all the other stuff I took apart last time when I was cleaning the points.

The guiding philosophy of the 2CV was that if you can get rid of a part, great, because a part can’t break if it doesn’t exist. This also means that whatever is left is necessary, even if it seems tiny and trivial. A good example of this is that rubber sheet thing that you install behind the fan, under the oil cooler, which is crucial for directing cooling air properly. Our own Stephen Walter Gossin found that Cadillac CTS fender bolts fit this part, so that’s what’s holding it in place now.

I also did this when installing the fan – which uses an odd reverse-threaded bolt – but I was able to extract the socket after just a few moments of mild panic.
Eventually, I was able to get everything reconnected, and was rewarded with this triumphant display of idling:
It sounds so good! Two determined cylinders, happily sliding back and forth in that numinous dance we call the Otto Cycle! It idled fine, but then after five or so minutes stopped, which confused me.

The coil felt pretty hot – hotter than I think coils like to be, so I connected this spare coil that very fortunately came with the car, because I don’t think Autozone stocks these weird double-ended coils. It seemed to run with the spare coil just fine, and that one wasn’t getting so hot, so I swapped it out properly, instead of just laying it on top like you see there.
But then later attempts at running the car – I was still hoping to take it around the block – didn’t quite work out. After a few minutes of idling with the carb choked, the engine would run rough and the choke flap (shown) would kind of cough and then the engine would cut out.
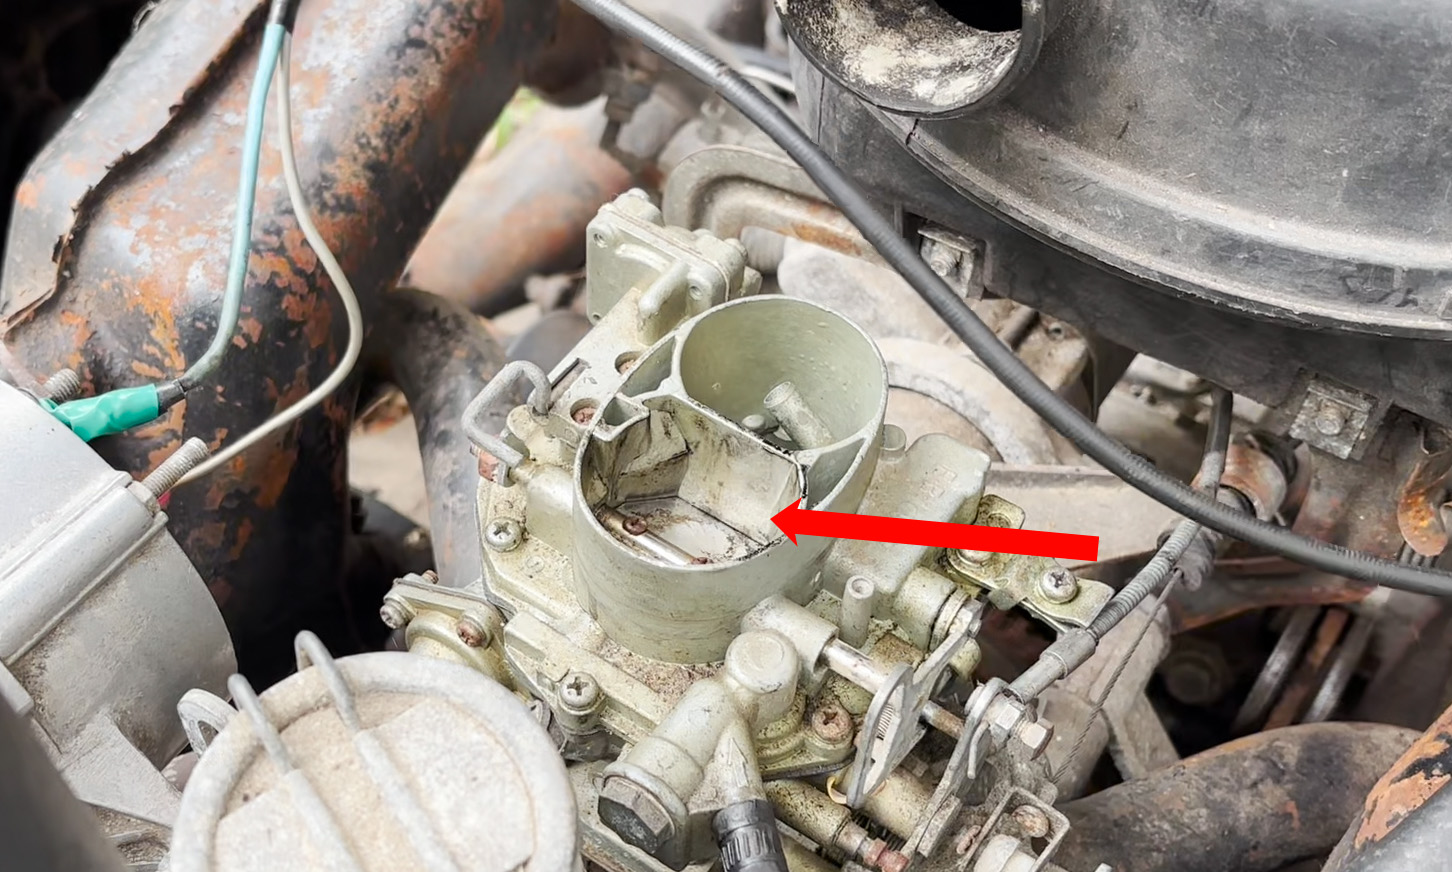
It’d be hard to start again after that, too. This thing did sit in a field for a good number of years; I’m not really sure what condition this carb or its jets are in. It could be dirty or clogged in there? This feels like a fuel/carburetion sort of issue, but I’m not certain. Any thoughts or advice would be appreciated!
A more positive development is that my son Otto, who is now the tallest Torchinsky ever recorded, had figured out that he could drive the car even with the front seats removed using this method:
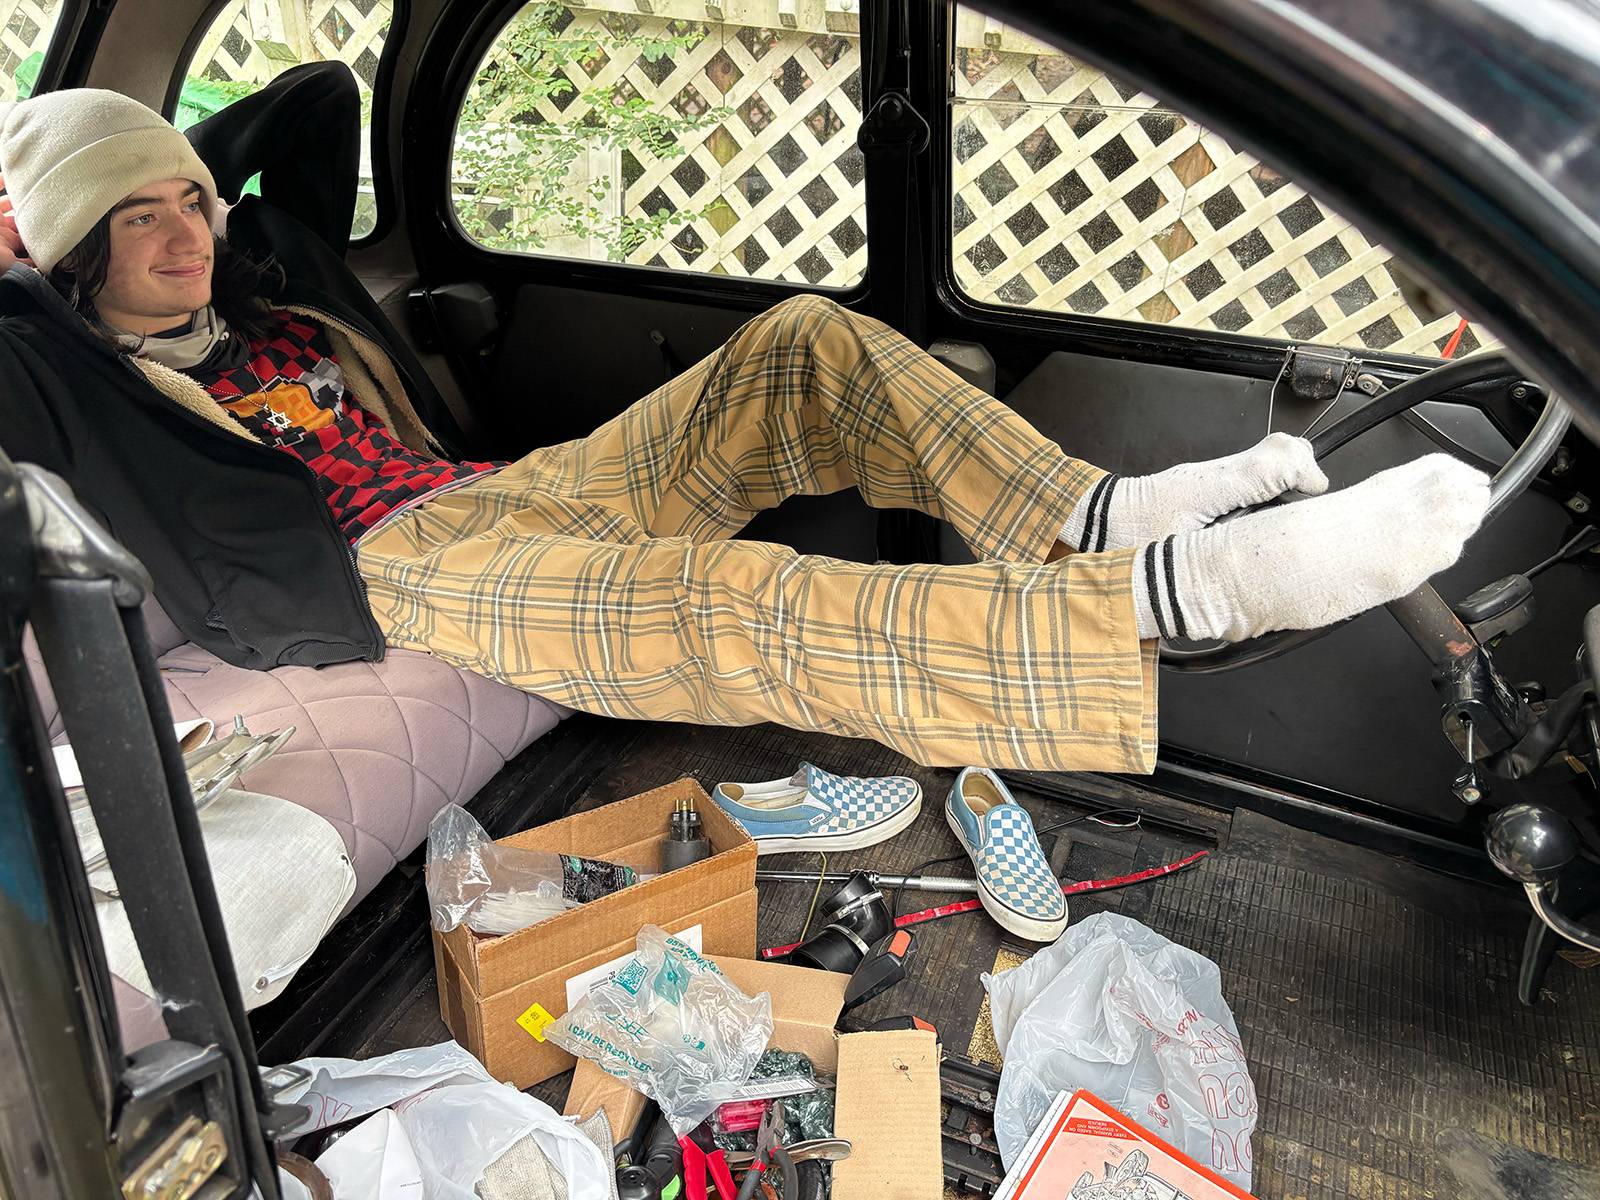
So that’s good to know.
Man, I want to get this thing on the road! It’s closer, but I’m not there yet.


I thought you said Otto rode a cycle…
“…a bit less incomprehensible.” *shows pictures of labels with handwriting that would make a doctor blush*
That idle in the video was more like full power…. No wonder it complained. When 2cvs idle, it sounds like a sewing machine with the material going round a tricky corner, not a full scale sheet hemmer.
There was a British TV manufacturer whose owner was famous for going down to the testing area with a pair of wire cutters and cutting random components out. If the TV still worked, he’d demand they leave it out of the design.
I think you mean Earl William “Madman” Muntz. He ran a car company for a bit too, but his money came from the TVs.
It was funny until he cut the high voltage flyback. Then it became hilarious.
I had plaid pants like that in the early 70’s
I did not have a 2CV like that in the early 70’s
As far as the indicators go…check the ground wires from the indicators…
After you’ve been messing with the spaghetti of wires, it’s very easy to loosen or jog a ground.
Even if it looks “connected” disconnect it and clean up the contact of the wire AND the chassis with sandpaper. sand it clean as a shiny new penny…
Ask me how I know (long time Alfa / British car guy…)
If the coil is getting hot and it runs for a while then quits I’d be suspicious of the points or condenser doing something funky, and the hotter the funkier. I’d replace the condenser before trying anything else.
AR on the shifter map! Just in time for Talk Like A Pirate day this Friday!
Now I know nothing about 2CVs but on many cars that have points there is a current limiting resistor in the power feed to the coil. Some cars like old Chrysler products used a ceramic Ballast resistor while others like GM used a resistor wire. This limits the current through the points and coil. That is done to prevent them from overheating. For better starting their is a bypass wire that gives full battery power (which is lower during cranking) while starting. With all that wiring mess I do wonder if someone replaced a section of resistor wire with standard wire. That can cause the coil to overheat and will also shorten the life of the points considerably. Again I have no idea how the ignition wiring in a 2CV is set up but probably worth finding and consulting a diagram to ensure that a resistor didn’t go missing somewhere along the line.
Very good point[sic] here!
That’s good stuff, Scoutdude.
Re: coils and points – the old motorcycles I work on use a 5-ohm coil for the points ignitions and a 2.2-2.8-ohm coil for the electronic ignitions.
Using the wrong resistance can also result in the coil overheating.
Those indicators look like the are blurring out some naughty bits underneath!
My rule of thumb with carbs is it’s most likely them. Especially after sitting unused for more than one winter. Rebuild it, and replace any rubber you can before the carb (fuel lines and filter). Until you eliminate the possible contribution issue from the carb, you will always question it. Great news, otherwise!
https://a.co/d/dECusqB
Is that it??
I am just at this moment remembering that I don’t think I ran out the carb in my snowblower at the end of last winter…
I am just remembering at your mention of just remembering, that I also forgot to drain the gas on my snowblower. I DID run the carb dry (always shut the fuel off when I’m done for the day and let it run until it stalls) so I’m hoping I’m not totally screwed.
I don’t think I did either!!!
In my case, I stopped using the snowblower when it stopped moving forward under it’s own power, and I have not yet fixed that mechanism, nor do I think I plan to, due to some other circumstances. It just might be at the end of my driveway this week with a free sign on it for the scrappers. It was free to me anyway, and I kept it alive much longer than it requested.
I’d rather shovel than try to deal with a carbed snowblower on a cold day. Even when I had put it away properly.
Wiring is so bizarrely mysterious. Had I made it out there I would have been zero help. Possibly negative help. Every wiring job I have ever done was cringy.
But you have potential. If you keep yourself grounded and remain positive, your skills will be current when they’re needed.
I hate to sound negative but these puns are generating a lot of groans. Perhaps you should switch it off for a bit.
Where’s the switch to change the active suspension between carrying/not carrying eggs? 😉
The carb will have three basic types of jets:
With the choke engaged I believe it’s bypassing the idle jets. Once the car is warm and comes off the choke, it won’t idle because the idle jet is blocked.
I recommend disassembling the carb and assiduously cleaning all the jets with carb cleaner; you can get a big can of Berryman’s carb dip at your local auto parts store and use the included basket to give the carb a good soak.
Resist the temptation to poke steel wire through the jets to dislodge crud: steel is harder than the brass jets and can adversely affect the metering holes. Use brass wire if you have it (e.g. from a brass brush) or a nylon bristle from a scrub brush.
100% this.
Serious wisdom here.
Yup, it’s amazing how quick you can sort out a carb with some spray carb cleaner, compressed air and a couple brass brush bristles.
If the carb is small (and I’m sure it is), toss it in a ultrasonic cleaner for 30 minutes or so with a bit of orange cleaner added. I’ve saved many a carb this way.
“It ran fine after I cleaned the carb but then started having trouble again”.
“Ok, go clean the carb again. And again. And again, until you know every bit of grime is out of the fuel system” – basically my recommendation on every old moped/motorcycle that’s sat for years.
Man, I’m sure I remember ‘will it baby’ posts when Otto was a baby. Time just slips by without you realizing, then you see Otto now, and have a hard jolt into reality…
Darn it I’m old now.
My baby who was a baby during “Will it Baby” can now wear my clothes.
This takes ‘hand-me-downs’ to a new level. More ‘hand across’ and hand that back’ please…
Before coil plugs 4 cylinder and a few 2 cylinder motorcycles used coils like that. Could be an alternate source.
GM used them also on the original W bodies, single coils with dual leads. A six cylinder had 3 of them on a heat sink. Also a waste spark system.
Looks like the C2V will baby!
Yes, but will it teenager with all the seats in?
Wow… sure seems like Otto hit that growth spurt! What a great kid!
I have to wonder how tall the men on his mom’s side are since he clearly didn’t inherit what Jason calls the “shtetl hobbit” gene. Other than maybe the prehensile toes.
2cv carburettor problems
Also this, At one point in life I had more than twenty 2cvs! People gave them away!
I sold mine, but only for £300.
Un troupeau de chevaux?
“It seemed to run with the spare coil just fine, and that one wasn’t getting so hot, so I swapped it out properly, instead of just laying it on top like you see there.”
I swapped a TPI motor from an IROC Camaro into an El Camino. The coil on the Camaros was mounted in a little cutout in the firewall. Of course, the El Camino did not have this cutout so to get it running, I just laid the coil on the intake manifold near the passenger side valve cover.
And that’s where it stayed for 15 years or so before I ended up getting a new coil and attaching it to the firewall with a rubber-coated P-clip.
https://www.youtube.com/watch?v=9QOVTNmeZsQ
This might help.
I keep reading Til’s name as “Today I learned” which is fitting if you think about it.
That kid’s definitely got some Took blood in him…
Will Otto get even taller? Will he need to shave off his beard before his Dad gets the 2CV sorted? Stay tuned.
Seriously, though, progress is progress. And seeing Otto more grown up makes me feel even older.
You definitely gotta go through that carb. Even if it isn’t THE problem, it’s going to be A problem after sitting that long.
Normally I tell people that carburetor is a French word which means “leave it alone” but in this case you’re right. After sitting that long tearing it down and drenching it in carb cleaner ain’t a bad idea. Make sure the floats float and the needles need and any diaphragms diaph.
Buy a kit and replace any gaskets and elastomers. Clean the rest.
When I re-did the HiF carbs on my MGB, I bought an ultrasonic cleaner to do the job.
Zero regrets. It was my second carb rebuild ever (I’m a diesel tech) and it purred like a kitten. Unlike the Honda CT70 I did as my first. I accidentally bored out the jets trying to clean them (I used Oxy torch tip cleaners).
Thanks for reminding me that the mystery tool I had been using for working on guitar nuts is really an oxy acetylene torch tip cleaner.
I lost it a few weeks ago and couldn’t remember what or where I got it. Must have been my dads, there hasn’t been an acetylene torch kit around here in 20 years.
I didn’t even know guitars had nuts! Are they higher pitched when you remove them?
+1 on the ultrasonic cleaner. I got one when I did the carbs on my Moto Guzzi and it worked great. It’s on deck to do my Honda Dream carb next.
I need to get one of those ultrasonic cleaners myself.
Mine was a screaming deal. When it arrived from the chinese reseller (a place out in Cali), it had cost me $280 (Canadian exchange, boo).
However, it didn’t work. After some back & forth, instead of having to pay shipping, they opted to refund me and told me to keep it.
Once the refund processed, I opened it up to see if I could find the issue.
Lo and behold, the connector to the control board wasn’t fully seated. I plugged it in and it worked perfectly.
I’ve cleaned many parts in my free cleaner!
I had a few of these larger tool items that arrived (from China) with damage or inoperable, that after some back & forth the seller refunds & just tells me to keep/donate/trash, but with some more in-depth troubleshooting & tinkering (more than I’d bother to try on a new item I had paid to have working), I can get functional & still use for many years, or at least the project it was ordered for.
That’s awesome!