
Hi, I’m A. Barth. You might remember me from the comments section here or on the Autopian Discord, but a quick introduction may be helpful. Even though I’ll be building things, I am not an engineer. A long time ago I was an engineering student, but I literally only learned just enough to be dangerous. I am also not a designer, which will become obvious when you see the results of my project; our Goth uncle’s role here is completely safe.
I like to take components and raw materials and build something new that solves a problem. Over the years I’ve acquired some skills in areas like wrenching, wiring, and painting, and have even managed to use a welder to stick two pieces of metal together. (Welding definitely feels like a superpower). Some of those skills were acquired by having a good example, and some were learned the hard way — like when you’re tightening the positive cable clamp on a riding mower battery, be careful not to ground the wrench to the frame!
I’m also trying to keep costs down. It’s easy to throw money and expensive tools at a problem, but I think finding interesting and innovative solutions is much more challenging.
So What’s Today’s Problem?
For this journey, we’re going to look at an emergency situation: a car (or truck) has electrical issues and there are no lights at the rear of the vehicle. Driving in this condition can be dangerous, especially at night, so let’s see what we can do.
This idea was inspired in part by an episode of Vice Grip Garage in which the host, Derek Bieri, rescued a 1940 Chevrolet hot rod. The big-block beast actually still had its original taillights installed but the wires leading to them had been cut. Fortunately the Chevy’s battery had already been moved to the trunk, so Derek just needed to repurpose some random wire and connect the taillights directly to the power source – boom, running lights. That’s a good result, but how can we have brake lights in this situation? After some initial thinkery, I developed a list of requirements.
- The emergency brake lights need to operate independently of the vehicle’s electrical system; ideally the whole assembly will be self-contained and can be moved from one vehicle to another.
- They need to be red (because brake lights).
- For safety, they need to be bright enough to be visible during the day as well as at night.
- There needs to be some way to attach the lights to any vehicle form factor – car, truck, SUV – in a temporary yet effective way without damaging the vehicle’s paint.
- Perhaps most importantly, the lights need to be switched so they illuminate only when the brake is applied.
That’s quite a list
Let’s start at the top. Because we’re operating in the vehicular space, it made sense to target lights in the 12-volt direct current (12VDC) area. DC is fairly flexible, and power sources are abundant. Modern 120VAC household wiring includes three wires: a hot, a neutral, and a ground. In contrast, DC generally has only two leads – one hot and one ground – so connections are simpler, and DC devices can often work within a range of voltages. They can also be switched on either the hot side or on the ground side.
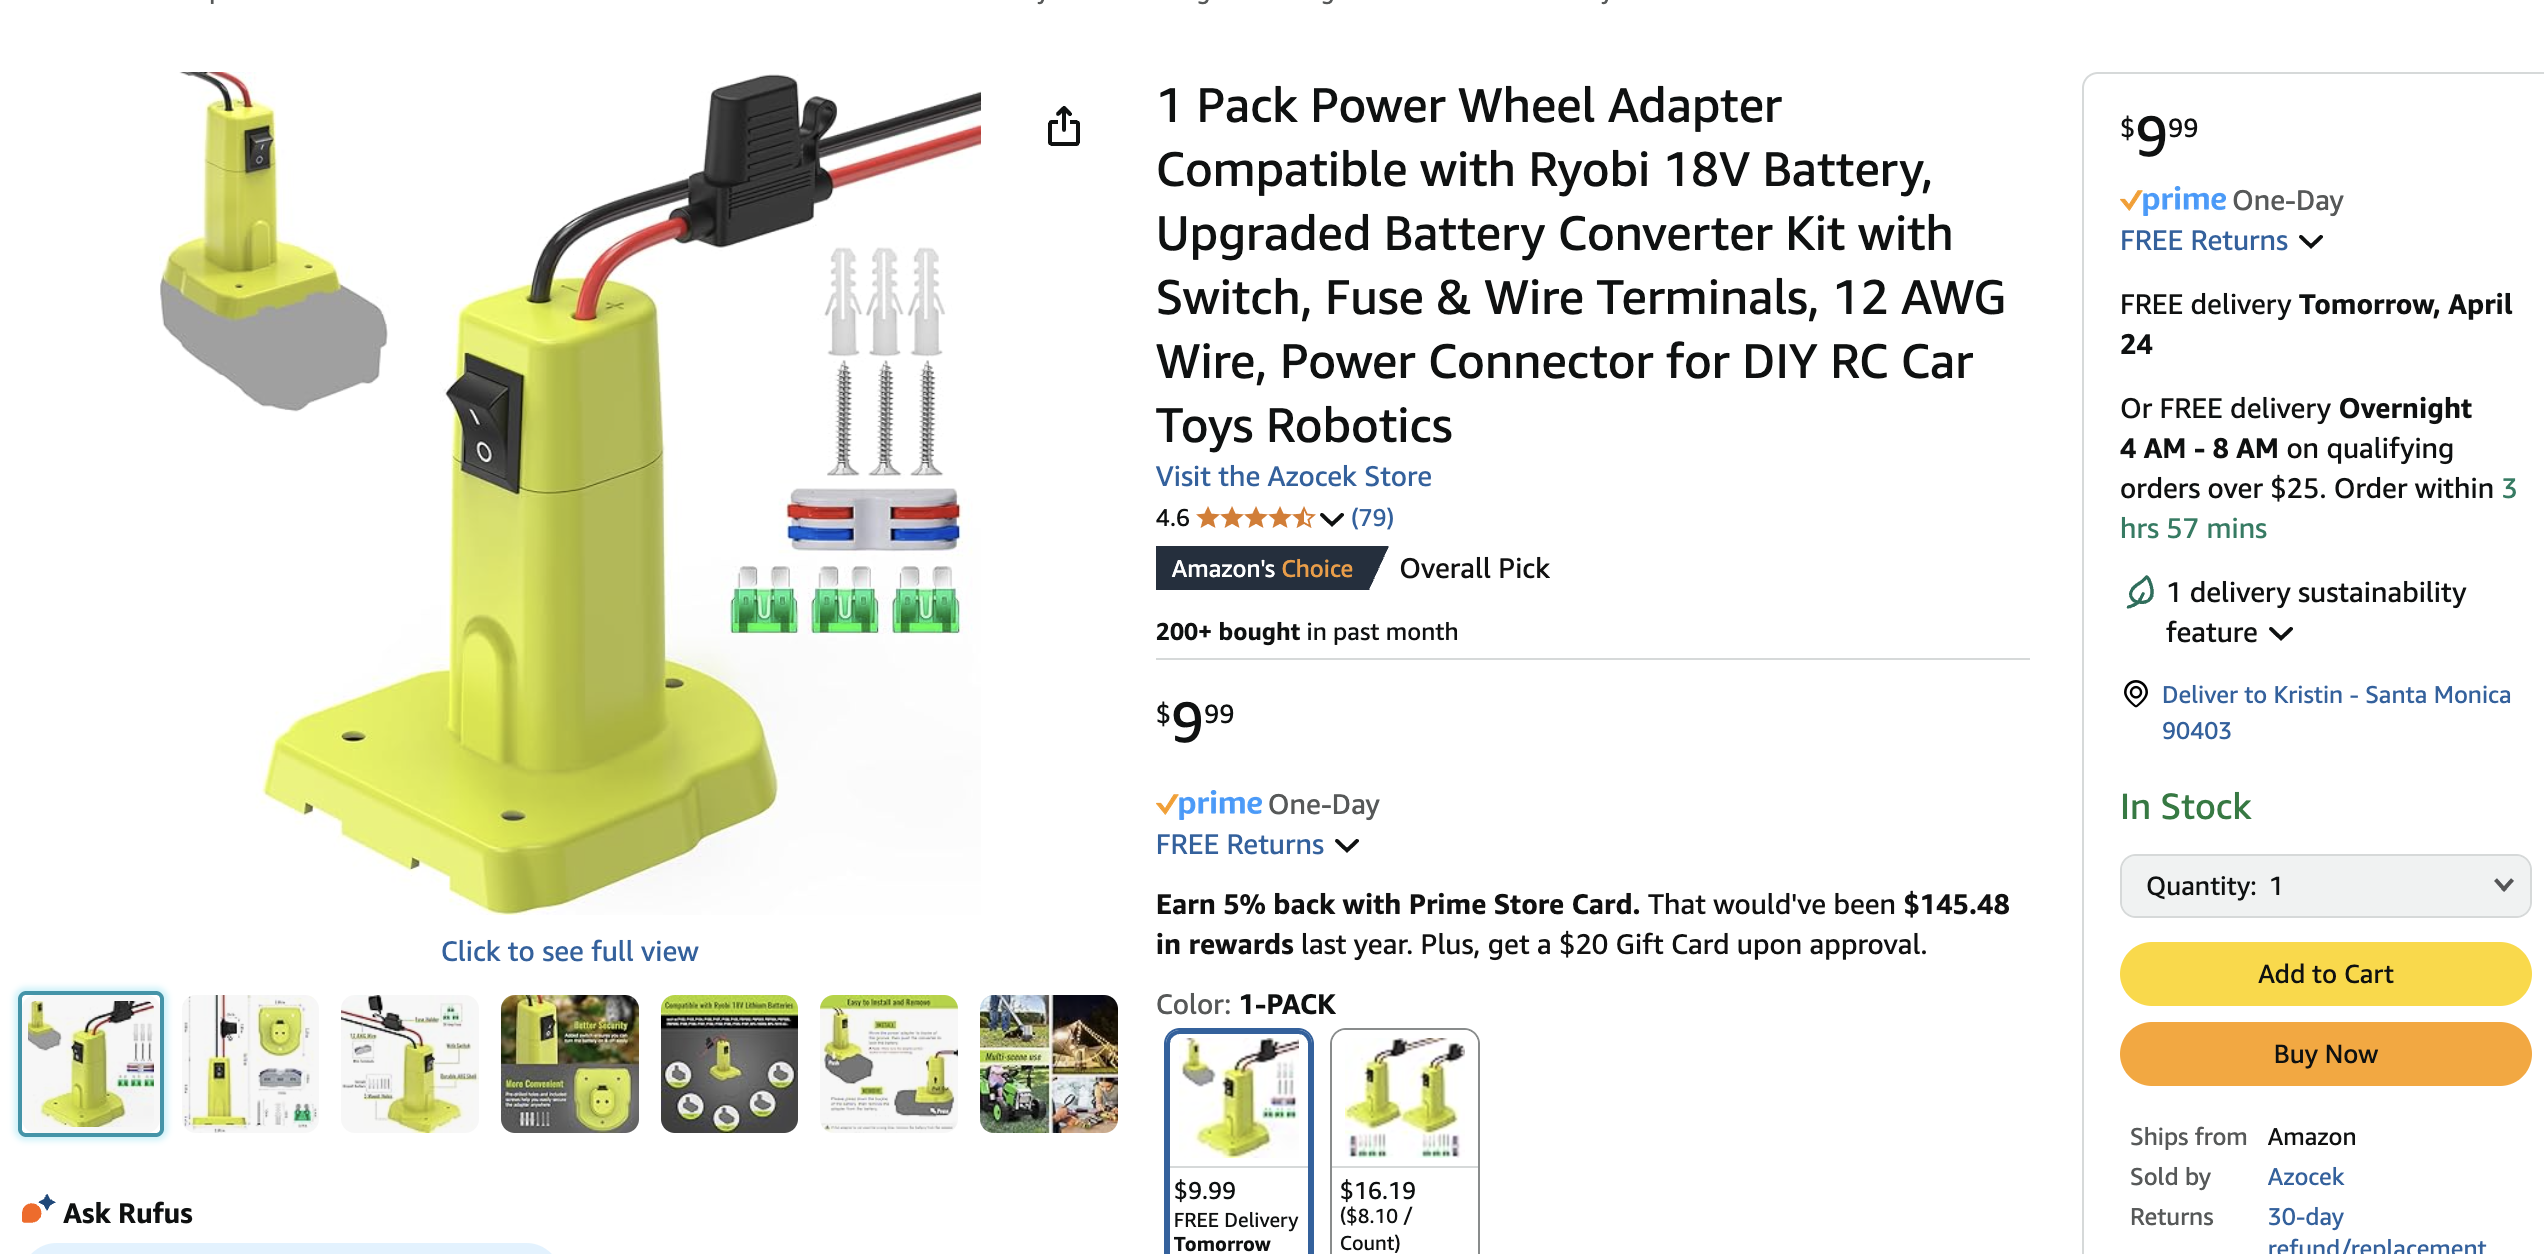
Initially I considered using a traditional lead-acid or AGM motorcycle battery to power our auxiliary lights, but I wanted the power source to be slightly more rugged, slightly less heavy, and something that can be charged easily. I decided on the rechargeable 18V battery from the Ryobi line of power tools, mostly because I already have a bunch of them, but the packaging also makes sense for our purposes. Please note that this build should work with any similar power tool battery from other manufacturers as long as the voltage remains in the 10V-20V range.
While poking around on that big retail web site named after a South American river, I discovered that other people are also using Ryobi batteries to power non-Ryobi things. Originally I had planned to wire the lights directly to the battery, but the hobbyist market has delivered an interesting item: a plastic housing that fits over the battery and clicks into place using the OEM latches. It has wires for positive and negative connections, an on/off rocker switch, and an inline automotive-style 30A fuse on the positive wire. At about $9 it seemed like a useful part, so I grabbed one.
Now we can turn our attention to the lights themselves. The same river-oriented site that supplied the battery cap also supplied a set of red LED off-road driving lights. They were on sale for approximately $20; the normal price is about $24, which is still pretty budget-friendly. These are branded ‘Nilight’ but there are lots of options available. I chose these because they are self-contained (compared to surface-mount lights), allegedly waterproof, and the mount points can be adjusted to change the angle of the beams.

The operating range for these lights is 9VDC to 30VDC. Happily our battery falls right into that range, so we should be good. There are some additional calculations that can help us to determine how long the Nilights will last on the 18V power tool battery… but I am probably not going to do them. Remember these are brake lights, so they will not be on much unless there is a massive traffic jam: a tool battery should be able to run them for a long time. Let’s start by connecting one light.
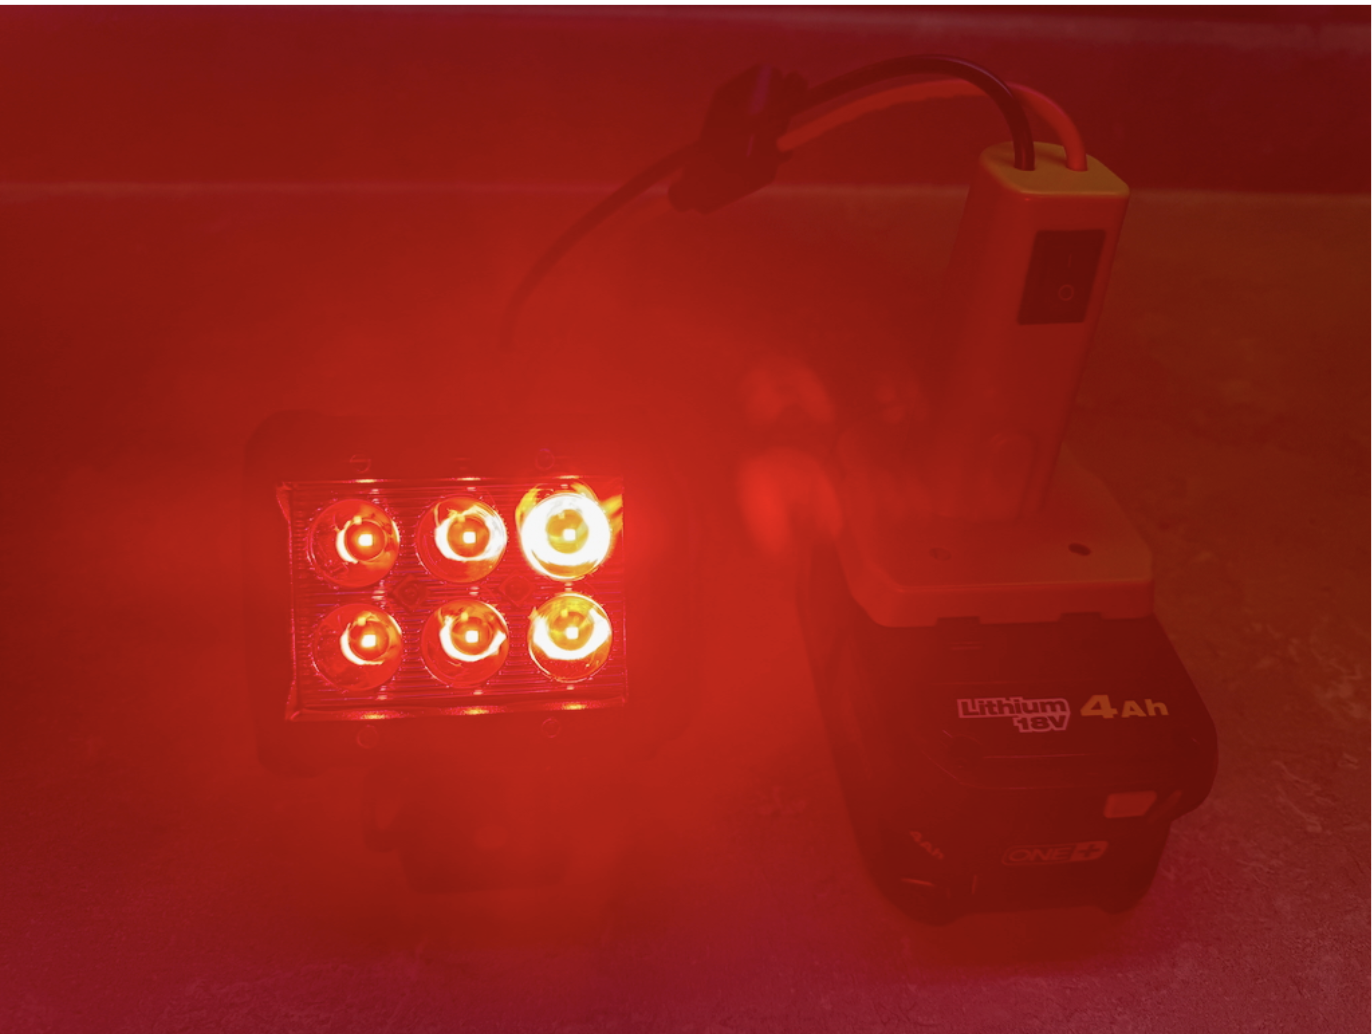
Confession time: These lights are really, really bright. Some quick googling revealed that automotive brake lights tend to be in the 300-500 lumen range. The Nilights are described by the manufacturer as producing 652 lumens each. (Sadly I do not have a light meter to verify this.) The original design called for the lights to point directly backward, but because this is a safety measure it seems a bad idea to blind the motorists behind us. The new plan will be to mount the lights on the included brackets in such a way that they point downward slightly. They will remain highly visible but should not adversely affect anyone’s vision.
We’re going to insert about seven feet of wire between the two lights so we can easily place them where we want them; ideally we will be able to mimic the factory brake light locations on most vehicles. The wire is a basic spool of 16-gauge copper-clad aluminum stranded conductor with two wires running in parallel. One side is red for positive and the other is black for negative, or ground, which makes it easy to keep track of whether a wire is potentially hot. Of course we are going to break that convention slightly before we’re finished, but there is a good reason for it as we will see. The spool contains 100 feet of wire – more than enough for this project, even if I screw up a few times – and cost approximately $15.
Switching Things Up
We’ve established that the lights are more than bright enough to be seen during the day, and possibly from space, so let’s get to work on the switch. I went through about ten different designs while trying to build my own switch for the emergency brake lights. The requirements were fairly simple:
– The switch must be nearly flat.
– It needs to work with a two-wire connection (one in, one out).
– It needs to be at least slightly industrial so it can withstand being used in a vehicle.
The big need, however, is that the switch must be momentary, meaning that it will be on when pressed and off when released – the same way that a car’s brake light switch works. The switch I used cost approximately $10, which seemed like a bargain compared to making one from scratch. That does mean I threw a little bit of money at the problem, but going this route saved a lot of time and likely offered a much better result, so I’m happy with it.
For our purposes, we need only one wire into the switch and one wire out. Recall that DC devices can be switched on the hot or on the ground. We’re going to use the ground here, meaning that our momentary switch will be located between the lights and the ground (negative) terminal on the Ryobi battery.

This allows us to deploy the switch in the vehicle’s cabin without running a live wire up to the driver’s footwell and then back to the rear of the vehicle. Original versions of the design called for finding a place near the driver’s feet to ground the connection, but I decided not to go this route for a couple of reasons. First, we will need to run at least one wire into the cockpit regardless, so using a two-conductor wire imposes no additional burden; and second, depending on the model and age of the vehicle, finding a usable ground where we need it could be difficult. We might as well use the ground we brought with us – the negative terminal on the battery – especially if we want the lights to remain independent of the vehicle’s systems.
Remember when I said we would be breaking the red-black wiring convention? We are doing that by using one side of our two-conductor wire to go to the momentary switch, and using the other side to go back to the ground. In other words, one side will be the wrong color but that’s okay.
We also need to mount the switch physically. The best way to do that, in my mind, is to place the flat momentary switch directly on the vehicle’s brake pedal. This way when the driver presses the brake, the switch will be engaged and the auxiliary lights will illuminate; when the driver releases the pedal, the lights will go out. Because the switch must be mounted firmly but not permanently, and because it is intended to be moved from one vehicle to another, we’re going to use strips of Velcro. (It’s actually the brand-name stuff.)

The switch came with four rubber feet that are held to the bottom of the frame with screws. My first thought was to remove the feet and use only the screws (with washers) to hold the Velcro straps in place. On further reflection, I realized that the rubber feet could help to keep the momentary switch from moving around on the vehicle’s brake pedal. On even further reflection, I decided to remove the feet and to replace them with a rubberized coating instead. The coating will keep the switch more or less in place on the brake pedal, and without the feet the switch is about a half-inch thinner than before.
This works pretty well! The switch is easy to install and shouldn’t move around too much.
Magnets: How Do They Work?
At this point we have all the necessary elements for a set of emergency brake lights: a power source, wiring, a switch, and of course the lights themselves. They are meant for short-term use only, so we need a way to attach them firmly – without damaging the paint on the body panel – while ensuring they are removable. The lights will need to stay in place at highway speeds, so I decided against using suction cups and chose to go with magnets instead. There are some vehicles that have aluminum or plastic body panels, but in general we can expect to find a trunk, hatch, or liftgate made of stamped steel, making magnets a viable option. They will also work on dirty or rusty cars, where suction cups likely won’t.
The type of magnet we’ll be using is pictured above; we will need two of them. They were purchased at a discount tool emporium whose name rhymes with Barber Mate and cost about $6 each. I chose them because they have a sturdy metal housing with a convenient hole for a fastener and because they are quite strong: the manufacturer indicates the lifting strength is 95lb. That should keep the lights from yeeting themselves into traffic.
Because we don’t want to scratch anyone’s paint, we should cover the magnets in a thin layer of a rubberized coating. There is another function for this material: depending on how thick the layer is, we can reduce slightly the attraction of the magnet to the car. Magnetism is governed by an inverse-square law: this means that if the distance between the magnet and the surface doubles, the attraction will drop to one-fourth. As with gravity, there is no way to insulate against magnetism, so all we can do to reduce the attraction is to increase the distance between A and B. A layer (or two) of a rubberized compound will reduce that potential 95lb strength of the magnets in our application.
Originally I was planning to use Plasti-Dip, putting a nice schmear across the bottom of the magnet, but had concerns that the layer would not be very flat. However, in the pantry I had a spare silicon baking mat – as one does – so I decided to cut pieces out of that and affix them to the magnet with cyanoacrylate adhesive, i.e. the super type of glue. This also gave me the option to have the cushioning layer extend beyond the dimensions of the magnet for additional paint protection.

Not pictured above: the silicone mat cushion for the magnet. Fun fact: cyanoacrylate glue does not actually adhere to silicone – “super” glue, my arse. Oh well, now I have two silicone coffee coasters. Hey, maybe I should use Plasti-Dip!
Success! The lights adhere to metal surfaces firmly but not aggressively, and can be removed by pulling the light bracket directly away from the surface. The rubbery layer should keep them from sliding around, even on bumpy roads, while ensuring they don’t scratch the paint.
But Do the Brake Lights Actually Work?

They certainly do! My car has aluminum (or possibly aluminium) body panels, so I enlisted the assistance of a nephew and his car. When I texted to ask him to operate the foot pedal while I shot the video, he replied “My big brake!”. Love that kid.
Conclusion
This build really didn’t take long – maybe five hours of actual hands-on work. There was a lot of thinking and rethinking, but most of the parts went together fairly easily. Let’s take a look at the costs:
Ryobi 18V battery $ 0 (Kind of cheating here, since I already had it)
Battery cap $ 9
Off-road lights $20
Spool of wire $15
Waterproof connectors $11 (Used in the wiring harness)
Momentary switch $10
Magnets $12 (2 @$6 each)
__________________________________________
Total $77
That’s not too bad! There’s no line item for “shop supplies,” but in this build we had shrink tubing, connectors, non-super glue, some Plasti-dip, and a little bit of Velcro.
It should go without saying that if you live in a place that requires safety inspections for vehicles, these lights probably aren’t going to pass. They may even look strange enough to get you pulled over, but again they are for temporary use. My opinion: It’s better to have unorthodox brake lights than to have no brake lights at all.


Seems as if Chevy Bolt EUV owners could benefit from something like this, given the inane location and function of the supplied brake lights.
I once had a car the key to which broke off in the ignition and would not come out. I ended up putting a toggle switch under the dash for the ignition and a pushbutton momentary switch for the starter. Fortunately, I had a second key so I could still deal with locks. I drove it that way for at least 30,000 miles.
Counterpoint for the even more frugal:
Hobo freight sells magnetic trailering lights for $33 (KENWAY 12V Magnetic LED Towing Light Kit).
It includes a trailer wire harness, so you save (20+15+12)-33=$14 on materials. You still need the switch, power source, and adapter cap. Alternatively since you have all this extra wire and an excess of butt connectors, grab a set of alligator clamps that can run to the vehicle battery regardless of location. Hobo has a set for $3 that would be suitable, knocking the cost down $20 to a total of $57.
We covered this already 🙂 https://www.theautopian.com/how-i-built-my-car-a-sketchy-set-of-brake-lights-using-a-power-tool-battery/#comment-647903
tl;dr – the HF towing lights did not meet the requirements
The HF tow lights are not nearly as directional as the amazon specials you have, so you only need to get them within 45* of pointing straight to the rear. They’re not designed for dedicated trailer use, but literally when towing cars on a dolly, flatbed trailer, or flat towing behind another vehicle (such as behind a motorhome). They also include wire (which you spent $15 on).
I give you credit on the DIYness but you’re walking the line between DIY and DIwhy when cheaper but serviceable component assemblies are easily available. The power source and pressure switch are the real wins here.
Additionally, these have the capability of running lights for those late-night roadworthy rescues.
Heck yea, I love something diy like this. I like how you went the hard route, headlights would have been too easy.
If you have access to junk computer parts, you will find that desktop (3.5″) hard drives have a pair of extremely powerful magnets inside. They’re normally attached (epoxied?) to steel brackets, and you won’t separate them (except maybe with solvent?), but you can cut the bracket down a bit if needed.
They can pinch your finger pretty bad if you’re not careful.
Guess how I know that…
I remember in high school when I lost all tail and brake lights on my ‘67 Impala…this would have been super helpful…
That’s a fantastic McGuyvering way to get a broken car home! Nice work!
I had a similar issue last year that my brake lights worked, but somehow both taillights didn’t. I used two rechargeable red LED bike lights (like you’d see under a bike seat, pointed backwards) as temporary taillights to complete an after-dark journey. It got the job done, but wasn’t pretty.
I wire up my custom bicycles with 12V lighting because it’s much brighter than bike-specific stuff for a lot cheaper and with far more options in terms of form, size, and aesthetics. I use small li-ion packs that are pretty cheap and use 5.5 DC power connectors, so that’s another option to power a pair of small, intermittent lights. My tail lights run nearly forever and those are constantly on and run as the brighter brake light setting on the rocket bike. (See-the-street headlights are not so long-lived, but long enough most of the time.) It’s also easy to get a bigger battery pack to fit in a car. However, I charge them outside or attended and near a window they could be tossed out of with a tool so I don’t need to pick them up by hand.
$77-plus, ouch. Ha, yeah, that happens all too often, it adds up quickly when DIY-ing something, hence the meme joke “why buy it for $7 when you can make it yourself with $92 of craft supplies?” Lol. Sometimes it’s about doing/creating something yourself, some people don’t get the point of that.
The momentary switch looks very much like the foot switches used on some of the presses at the dry cleaners where I occasionally do industrial maintenance (e.g. repairs & upkeep of equipment.) They’re a weird mix of robustness and fragility so I do wonder about putting one on the brake pedal… Opening up such a switch reveals that it’s actually just an assembly of a rather insubstantial spring and a disconcertingly small micro-switch actuated with a tiny piece of bent sheet metal. The dry cleaners’ presses occasionally need to have these foot switches repaired or replaced, as lint and moisture from the humidity of the steam get inside and wreak a bit of havoc. Sometimes I can just clean them out and re-bend the aforementioned tiny piece of bent sheet metal.
All in all, I find myself awfully dubious about sandwiching such a switch between a car’s brake pedal and one’s likely boot-clad foot especially under heavy braking.
Yeah, quite the challenge, coming up with a solution that can be transferred from vehicle to vehicle without doing any permanent modifications. And people who use Scotchlocks, especially cheap ones, when adding towing lights can go kick rocks barefooted *after* stepping on Lego bricks also barefooted. (Yeah, too damn many times I’ve had to rectify problems on vehicles caused by such wiring bodges.)
Might want to switch out that fuse for something smaller, especially if the wire you’re using is smaller than the wire provided with the battery adapter. (Even that wire looks small for a 30A fuse, but it’s hard to tell)
Great article and it features a Chevy Cruze? Monday’s off to a good start!
They can also be switched on either the hot side or on the ground side.
I remember realizing this way back when I was a kid and was given a little electrical kit. It explained the setup as a circuit—a.k.a. a circle. The current goes around and around on a one-way loop and won’t work if there’s a break anywhere. Ah-ha! Made sense.
I like the switch solution, I’d probably use a hose clamp with a worm gear to keep it from moving.
I’m not sure what regulations in the States are, but here in the land of Maple syrup, you technically only need one rear mounted brake light.
I’d save you the external running and just mount your brake light(s) in the rear window with some suction cups. Right at the level where the high mount brake light would normally sit.
This keeps everything inside the vehicle and saves the issue of non ferrous metal on the outside not accepting magnets.
Cars definately need to be sold with at least 3 brake lights, but how that’s regulated afterward probably varies state by state.
NY has some laws on the subject (which may or may not be enforced on the road or during an inspection, for a multitude of reasons) but in general the requirement is that a safety related system original to the car (a light or a mirror are great examples that there are multiples of an any car) must be present and functional.
On the mirror front, for example, a box truck that wasn’t built with an interior review mirror doesn’t need one to pass safety inspection but a passenger car has to have one because it originally did.
Likewise on the lighting front, you definately need all brake lights in working order (this setup might get your by, but you definately need a CHMSL) and motorcycles need to have a running light unless they are old enough that they didn’t originally and those bikes are exempted.
Up here, what’s required to pass a safety inspection and the minimum legal requirements for the Highway Traffic Act are two different things. The standards to get the car initially registered are much more stringent than those to keep it legally on the road.
Which is helpful when getting a jalopy home, on a temp permit.
You know you can buy sets of magnetic trailer lights with the magnets and lights and wires already put together, with brake AND tail lights for about $20?
And that switch? I’m pretty sure that if you slammed on the brakes, and for some reason hit something in spite of that, the insurance companies would claim that putting that thing on the brake pedal was the cause. Or worse.
Oh, look at this!!
https://a.co/d/dwHJmCR
We used to use a mercury switch taped to the back of the pedal for similar purposes on the farm, but I’m pretty sure mercury switches have not been available in this century.
In New York all lights have to work. If they don’t work some of them can be removed to pass inspection. IE if you have broken tail lights and auxiliary tail lights, you need to remove the non functioning lights.
There is some sort of weird exception for snowplows.
When I had my ’37 Plymouth P4 which was manufactured with only one tail/brake light (the other side was an added-cost option), I bought and carried this aftermarket emergency tail light:
https://live.staticflickr.com/7071/7063418747_90a60baa72_c.jpg
It was nothing more than a flashlight with a red lens and a permanently attached clamp for the bumper. It wouldn’t have acted as a brake light, of course, but I still figured it would have been better than nothing for getting home had the tail light ever failed at night in a way that would have required more than just changing the bulb. I no longer have the Plymouth but I still have the light.
You do you, but I’d have started with a $33 set of LED magnetic towing lights from the same store you got the magnets from. Add the battery and the switch and you’re done.
Yep. This gives you FMVSS compliance (avoids the too bright issue) as well as wiring and the mounting magnets. One minor concern might be running these off an 18v nominal battery vs 12v, but hopefully there’s an internal driver that maintains stable output despite the higher voltage. Alternately a lot of older tools run on 12v batteries and batteries + adapters should be readily available.
Thanks for the suggestion! I did look at those early in the project; unfortunately they do not meet the requirements. They are not adjustable for angle, so they are quite limited in where they can work (which makes sense as they are intended for use on something like a flat utility trailer).
The lights I used were $20 and the magnets were $12 (plus tax on both), so for about $34 I got brighter lights, stronger magnets, and mounting brackets that are made of metal. (The HF tow lights are plastic.) Seems like a bargain. 🙂
That switch is scary though. Use this
https://a.co/d/dwHJmCR
Why do we call it “the river oriented site” when we could also call it the site named after a “tribe of women warriors of whom the most famous is Diana Prince”
Because we’re into the whole brevity thing. 🙂
Oh c’mon! Set a new trend!
Are the tribe of women not from the rainforest and/or river area? Or was I making an assumption on that?
The women warrior tribe is Greek mythology, so they aren’t from a river basin in South America.
The single breasted archers?
In the category of use-whata-got-until-you-get-around-to-the-proper-fix. The brake lights on my ’64 F100 coach-built crewcab were wonky when dad had it. He installed a pair of round bolt-through-the-bumper lights to replace them. I didn’t like them, but they worked. Then the tail lights went wonky. Looking around I dug out a pair of rear lights from a ’64ish VW bus I had hanging around. Attached them to a length of Boeing Surplus aircraft seat track aluminum extruded material. Added a hook from some random pieces of metal (probably a coat hanger). I hung the assembly over the tailgate, hooked up the wires all the way to the engine bay where I found a headlight wire to provide power and a ground wire to the body in there somewhere as well. A few years ago I finally replaced all the wiring to the rear end and all is well and working, well, except for the two holes in the bumper.
As an aside, Jason or Mercedes, a full-depth post is desperately needed on the variety of options that were available way-back-when to provide power to trailers for vehicles renting trailers that had no trailer light connections. A replacement light bulb with an extra wire poking out that was routed through the light fixture housing to open air was just one. This one falls into the Venn diagram of tail-light fetish and RV trailer tech where Jason and Mercedes would logically merge.
U-Haul’s solution was to use insulation displacement connectors (scotch lock) on running & brake light wires and a 2 wire bullet connecter for each side on the trailer. When I set my Impala up with a hitch, Hoppy had a breakout for a flat four trailer connecter that plugged into a connector in the trunk. I still had to buy a thing from U-Haul to light up a 2 wheel car dolly to tow my son’s Honda.
Buuuut – they don’t look like Sushi.
So no wasabi from me.
If they weren’t so bright, maybe they would look a bit like very large, very carefully arranged roe.
The intro gave me real Troy McClure vibes.
I knew A Barth when he was just a voice in the crowd.
D’oh!
I mean, uh, that was a complete accident.
A fun article, thank you!
A word of caution about Nilight products. I bought a pair of LED spotlights for the front of my TJ that lasted a total of 18 months (the lights, not the TJ). I bought 20 or so Nilight 12-volt switches. Each failed after several days of use in a dusty environment. Moral of the story is Nilight’s products are built to a price and are appropriate for temporary use.
That’s good to know – thank you!
I, too, have learned a lesson along these lines the hard way but it’s worth mentioning that the greater lesson is to disconnect the ground first and reconnect the ground last.
Learned that on a tractor. It’s amazing what an 8D size battery can do to a wrench that shorts it out. 1000 amps really takes a bite out of it. I touched the wrench to the positive lead of the solenoid. My ears were ringing for an hour.
This article needs a “BRAKING NEWS” tag.
*golf clap*
I had a Nissan Frontier that had no-op brake lights. This would have been perfect to use while I diagnosed what the problem was.
Well hello friend! Didn’t expect to see you pop up on here today. That’s fun! Did you decide to do this just for the heck or it or was there a need for it that I missed above?
Hey there, amigo! This was strictly a for-the-heck-of-it project.
Some people ask “why?”; I ask “why not?” 🙂
I figured that was the case. Cool project regardless. Maybe I should add one to my car so that when the massive trucks blind me with their stupid lights, I can blind them right back with my brake lights!