
Repairing your own car is a rewarding and sometimes cathartic activity. Yes, it’s still fun even after the skinned knuckles and the invention of curses that you’ve never used before! What’s not so fun is running into a part that either requires a special tool to remove or the existing tools that exist are not suitable for the task. Or, maybe you want to do a modification for your car, and the parts to do so don’t exist. It’s time to work those folds in your brain and get creative. Have you ever created your own tool or car part?
Most of my creative antics happened back when I was much poorer and had only one Smart Fortwo. Yes, that was a long time ago! I wasn’t even old enough to drink alcohol back then. I worked at McDonald’s and put most of my money into my car. Sadly, the American aftermarket for the Smart Fortwo has usually been on the pricy side, which sucks when your paychecks are just hundreds of dollars. Thankfully, replicating the parts seen in the aftermarket sometimes isn’t too hard.
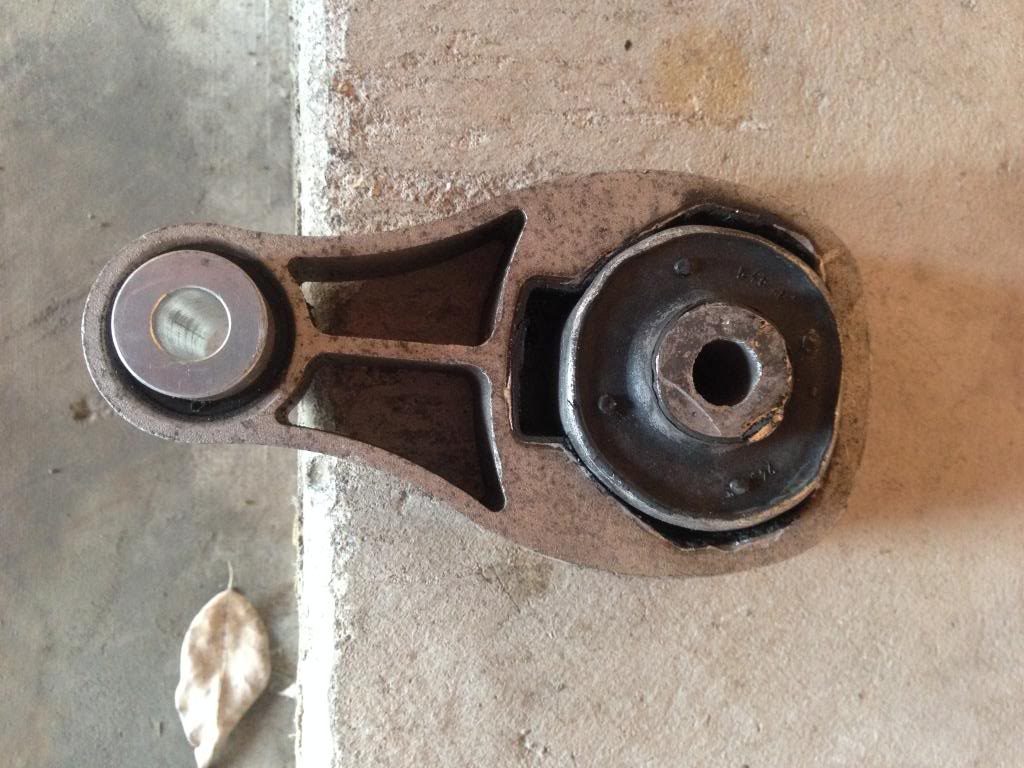
One of my first custom modifications was to my Smart’s lower motor mount. The stock one, pictured below, is soft and rubbery. It’s great for daily driving, but it’s one of the reasons why old Smarts feel so sluggish. The powertrain cradle gently rocks with each gearshift, amplifying the “bucking” feel that some journalists complained about.

Smart tuners found out that if you replace the soft rubber mount with a hard rubber one, you get more vibrations into the cabin, but the car feels much sharper. A hard rubber mount, pictured below, costs $100 to $130 or so, depending on who you buy it from. That’s not a lot of cash, well, unless you’re living on McDonald’s wages in 2013.
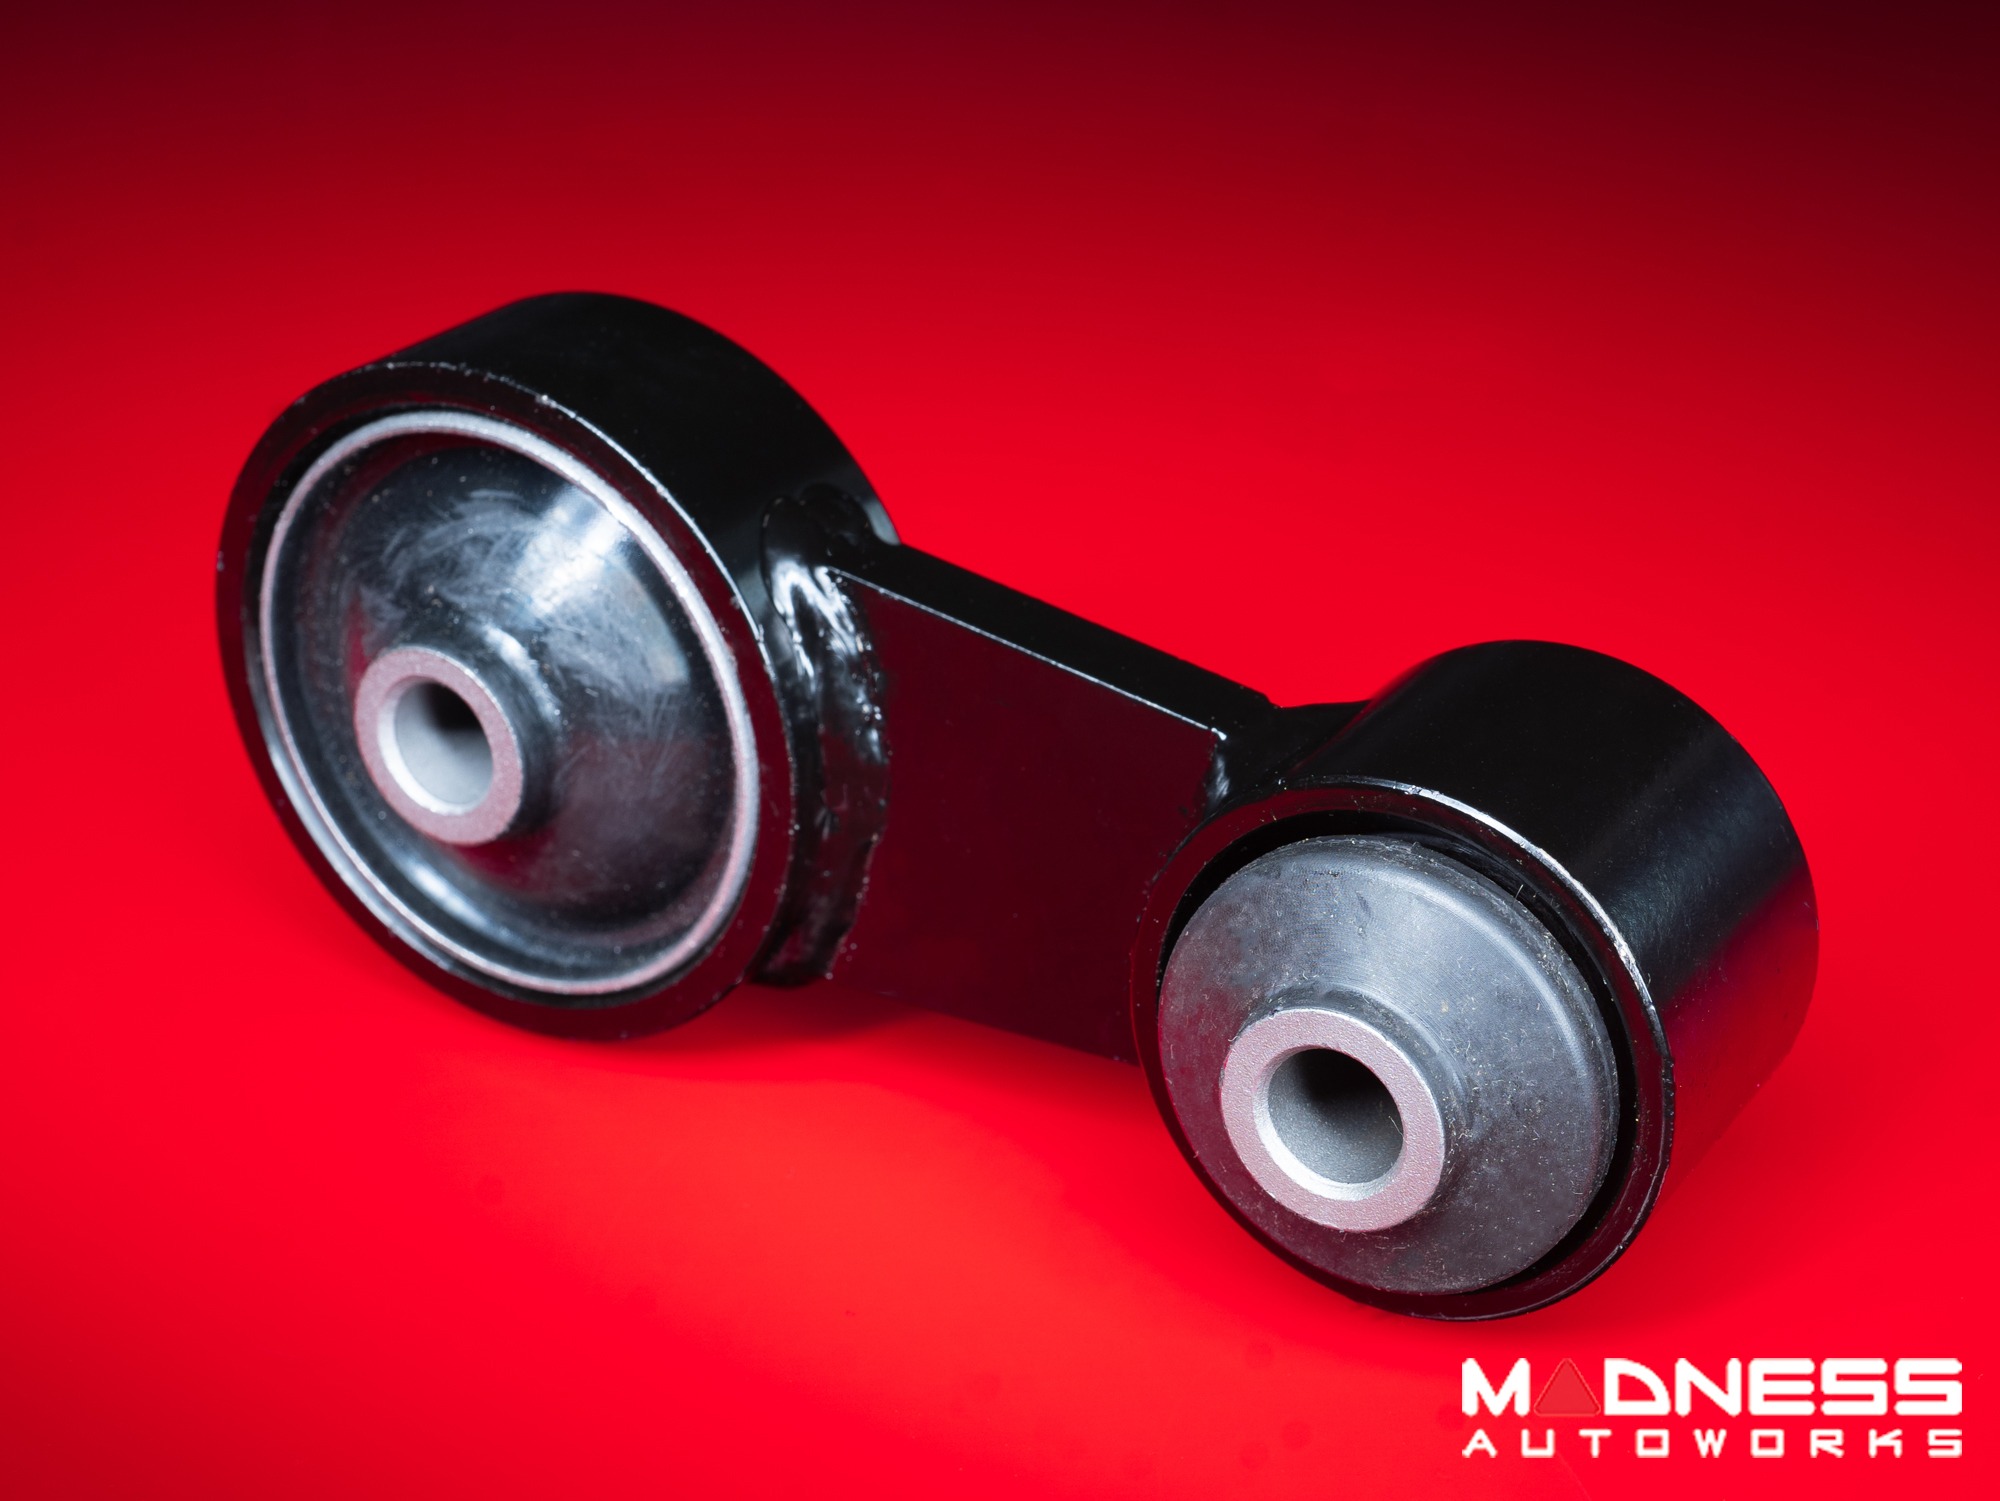
So, I created my own. I used a knife to cut the soft rubber out of the original mount. Then, I bought a hard rubber suspension bushing for a few bucks on eBay.
Once it arrived, I grabbed a cheap sledgehammer from Harbor Freight and bludgeoned the bushing into the mount for the factory engine mount. I then used the motor mount bolt to align the bushing. I spent maybe $30 on the whole project, and my car felt just as sharp as the cars with the fancy $130 mounts. My car is still using the mount today, over 120,000 miles later.
Back in 2020, I bought a 2008 Smart Fortwo for just $1,200 to take on Gambler 500 adventures. There has been a 1-inch lift kit commercially available for the Smart Fortwo since basically forever. But it didn’t sit well with me that the lift kit for Smarts, which largely consists of rubber suspension spacers, is $300 on the low end or over $400 depending on the time of year.
Some Smart owners figured out that you can get most of the effects of the lift kit by buying a set of hockey pucks for about $15, drilling holes into them, and then installing them on top of your rear springs and on top of your front struts. Geometry isn’t as good as the proper lift, but that doesn’t matter if your goal is to beat the car up off-road. Sadly, I couldn’t install my pucks because my struts were too rusted out to be messed with, so I took the car off-road with a stock suspension.
Here’s where I turn things over to you. Have you ever made your own car parts or tools before? Why did you do it?
Top graphic images: Mercedes Streeter


Does using a screwdriver to short across a starter solenoid count?
Almost forgot I used string when the throttle cable broke on my twin-carb Honda CB350. Ran each end to a carb over the seat. Lifting up increased throttle, rotate hand balanced or unbalanced the carbs. Ridem cowboy!
Back in my poor, early 20s, I made a special “Anti-Theft Key”.
I soldered a paperclip onto the end of a flathead screwdriver. That way I didn’t have to lean so far under the dash of my 1983 Chevy Cavalier to start it, since I was too poor to replace the faulty ignition switch.
Vice grip + dime = screwdriver
In college I rigged up a lawnmower throttle cable and a battery post connector to build a manual choke for a ’78 Buick Skyhawk I was having issues with.
Speaker wire only works to hold up an exhaust system on an ’85 Duster Turismo for about three miles.
When in a desperate pinch, aluminum foil can be molded into a round shape in order to replace a lost copper-washer for a busted brake soft-line on the side of the road.
The right-sized 12-point socket and a cheap sledge make the perfect tool for taking wheel-lugs off of an ’87 Corvette when the lug-key is missing.
A hammer and a crack in the outside concrete allowed me to make some custom-bent Mercedes diesel valve-adjustment wrenches I needed that afternoon.
Finally, not really a tool or part per-se, but I discovered that the curve of the top of a 70’s GM truck fender almost perfectly matches the curve of the bottom of a ’69 Cadillac front fender. Cut, weld, voila!
I designed and printed some ABS pieces to hold bolts into an ABS plastic lip spoiler. I didn’t want to spend the money on a new spoiler for a $2500 car. It worked after several iterations.
I made a brake bleeder assistant by taking a junkyard master cylinder cap and adding a brake bleeder screw to it (drilled a hole, heated it up with a lighter, threaded it in, applied a generous dollop of RTV), attached a 20′ or so vacuum hose and viola! Go to whatever brake you want, open the cock, apply about 20 lbs of air pressure to the vacuum hose, and out comes your old fluid until it runs clear. Worked like a charm for maybe $8 invested!
Dad screwed in a sheet rock screw into the door frame so the cab light would have something to push and he installed garden hose pieces for the hood to fender cushion.
Sort of.
I was changing the oil on my wife’s old car for the first time since I decided to save money by doing it at home. The spin on filter had clearly been put on with a power tool, and I could not get it to move no matter how hard I twisted. I didn’t have a filter wrench and didn’t even know that they were a thing. Out of desperation/rage I drove a pair of lag screws into the filter to give my locking pliers something to grip. I finally got the damn thing off that way.
Obviously this was a terrible idea and I could easily have done serious damage to the car with those screws. When my wife told her dad about it he gave me a filter wrench.
There’s been more than once, I’ve hammered a flathead screwdriver through an oil filter, in order to get enough grip to torque it off.
I’ve had a filter so stuck that I destroyed the filter entirely by doing the ol’ screwdriver trick. Ended up chiseling the base that was finally left over around.
Same. 1974 F700 ( I think) box truck. I was almost excited to use the screwdriver trick. Those filters were long & flimsy. I think I finally got vicegrips on a shard and hammered.
I bet I have at least 5 different filters wrenchs from the ensuing decade
I tried putting a screwdriver through it first, but the filter was recessed too far inside the oil pan/bottom of the engine for anything to go in sideways.
Tool making is a sign we might be as smart as crows! I’ve made tools and parts, but the parts weren’t reproduction standard pieces, they were either modified to work/work better or an added accessory kind of thing. I even had to make a simple tool for a bike—the unique (I think) bottom bracket used by Iver Johnson requires a flat screwdriver kind of tool about 1″ wide with a cutout in the center to clear a bolt end that extends through the slotted nut the tool is meant to remove.
2004 Honda Odyssey. One of the sensors on the B pillar for the sliding door lost it’s backing so would randomly not make contact. I took a plastic knife and cut it to shape then attached it to the back of the sensor module so it had just enough give to keep the entire kit stable. That was 5 years ago and it still does it’s job.
Yes, and yes.
Among tools I’ve made are a hook for pulling a pin inside of the Ford 6F50 transmission, various test leads, a pair of testing probes to reach the pins inside of Ford Fusion/Mercury Milan ABS pumps, a BMW NOX sensor wrench, my own special tool to facilitate changing the heated PCV valves that BMW keeps recalling, and a Dodge Ram rear axle tool that I made from an old CV axle nut and a random socket I found.
Parts I’ve made include multiple throttle cable brackets (sometimes by modifying one I found or making one from scratch), spacers for accessories or motor mounts (including 3/4″ spacers for the motor mounts on my Mustang II to allow an 8qt Milodon oil pan to fit), seat brackets to make seats from one car or truck fit another, air intake parts, and exhaust hangers.
Now, I have a 3D printer, and have printed some tools like funnel adapters, ratchet/extension organizers, tire deflaters, and parts like the nipples that like to break off the air intake plumbing of 3.5L Ecoboost F150s, but since I didn’t create the files any of those are printed from, I don’t take credit for them.
Since I’ve learned how to build solid models in CAD (Fusion360), it’s opened up a whole world of parts design and making. My 3D printer had gotten a ton of use making parts for my GT6. For metal stuff, I’ll use SendCutSend. Lots more stuff planned.
And as of last weekend, I have a 3D scanner. It’s a learning curve, but I think it’s going to open up the possibilities even more!
Trail Fixes are almost always some bodged part using whatever extra parts someone brought or accidentally left in the vehicle when doing some other modification. I recall using a tree branch on a Pathfinder to prop up the front suspension when the poor little IFS did not survive a rocky trail. Made it home almost 150 miles. though it was sketchy none the less.
Certainly as things wear out on oddball stuff I have, I am more and more often modifying parts from similar, but not completely the same vehicles. Colorado/Hummer 5.3’s have some bespoke parts that are nearly unobtanium, like power steering reservoirs. and even lower rad hoses. seems stupid, but you have to do what you have to do sometimes to make things work.
Not for vehicles, but I’ve made a tool once or twice to work on guns. Usually something simple like notching a screwdriver to twist something around a firing pin or whatever.
Similar with small parts. I made a firing pin spring for a .22lr revolver by cutting and slightly reshaping a spring out of a pen.
I have made a couple things for car parts. Made an exhaust tip for my Citation after I knocked the muffler off and had to settle for an almost correct replacement. I think that’s one of very few that stayed on the car instead of just getting me to a permanent replacement.
I’ve used pen springs for electric strikes to get them functional again. Folger Adams had some really poor designs in the late 90s early 00s. Also used a chunk of 3 foot zip tie to fix the linkage from the solenoid to an actuator in a turnstile once. Actual manufactures replacement part was something like $50 (15 or so years ago) but the zip tie was something like $3. May have gotten the official part and replaced the bodge, but I’m not convinced the bodge wouldn’t have worked as well.
An SCCA friend asked me to 3D print something he designed. He had a MINI Cooper that was set up for B Spec racing & could also be street driven. I printed a little doohickey that slipped onto the side window cranks to use a socket ratchet to raise/lower the windows.
we 3D print a fair number of more effective shift knobs and light duty mounting brackets, but the socket on the window cranks is a new one for me. nice
Like everyone else here, definitely have modified tools for specific jobs, but my favorite makeshift solution is the hardware-store c-clamp holding on the idle air control valve after the mounting bolt broke on an Chevy Blazer (the small one). Sometimes a mechanic working on the car would comment, but for the most part it stayed on the car for as long as I and the next person (a friend) had it.
Do zip ties count? If so I’ve made various fasteners and light duty brackets over the years.
I have some pretty Heavy Duty zips that I have used to hold a spring in place when a short arm rear suspension flexed past the limit strap when that bolt fell out. It held long enough to get it to a trailer.
No, but when the day finally comes that I have the time and space for a project car, I expect I’ll also buy a 3D scanner and 3D printer to remake whatever busted dashboard piece that can no longer be found, or make a cupholder that clips into the glovebox or whatever.
With Superfast Matt as my inspiration, I’ll just assume I can fabricate anything and hope for the best…
(edit: typos)
I had to replace the fuel pump in my B5 S4. It requires a expensive special too. Made my own for $5.
When Suzuki did a complete redesign on its aging GSX-R 750 in 1996, they gave it a truly excellent motor, chassis, and suspension. What wasn’t so great was all the rest of the bike. Mine has a front fairing stay which is pieced together from an early bike (metal) and a later one (plastic), and I made new carb vacuum line junctions since the stock ones are so flimsy they often break while still in the packaging
Does using a hole clamp to temporarily replace the broken end of a throttle linkage on the side of a country road count?
If so, yes.
I made a front main seal remover for an N52 BMW from scratch. Still have the seal attached to it for giggles.
I work in vehicle development.
So, yes.
Most of my vehicles are quite old. Some are steam powered, the workshop is, er, mostly older than the machines it helps. There is a simple pleasure to be had by lining a traction engine just right, big belt around the flywheel, belt to lay shaft (bevel gear dohicky in between, the whole building shudders and then sort of shrugs and quivers. The tools are very basic at first glance, belt driven from the aforementioned layshaft, but they have vernier twiddly handles, these are works of art!
Could I fix a Smart car? Nope, a combination white metal and phosphor/bronze bearing for a Sentinel lorry? Would next Tuesday suit?
I have owned 5 jeeps built from the 1970-2012 I have totally made tools and parts. One of my favorite is a tractor trailer mud flap into a gas tanks skid plate.