
It’s starting to seem like Monday’s Cold Starts are just becoming updates on the progress I’ve made with my 2CV, and I think that’s a good thing because it (A) means I’ve made some progress and (2) I don’t have to scramble for an idea Monday morning. This weekend brought some good 2CV progress, again thanks in large part to local 2CV maven Til, who helped me sort out that absurd rat’s nest of wiring that had been intimidating me. Progress was made, but I’m not there yet, as there’s still a strange issue I need to figure out. Or, more likely, ask smarter people to figure out for me.
The main goal of the weekend was to get the wiring harness in some sort of basic order, so I can really see how bad it is and if I need to replace the harness, or if what I have can me made to work, at least for a while. Getting things shipped to the US is tricky right now, and I really want to know what works and what doesn’t!
So, Til and I methodically tested and checked each wire, and, incredibly, we figured out what they all did, and finally the electrical system started to come back to life; I had lights and indicators and dash warning lights. Wipers, too!
That’s the mess of wires, but now all repaired and labeled. It’s still not pretty, but it’s at least working better and a bit less incomprehensible.

As you can imagine, it was magical. Look at the glory of this indicator!

Majestic, isn’t it? Sure is. And these dash warning lights, that tell me two whole things! That’s technically plural!

The upper one is the brake warning lamp (I’m pushing the test button to make it illuminate), and the lower one is the oil pressure warning light. Oh, I guess the hazards have their own blinky light, so this dash has a lavish three warning lamps.
Some of that was short-lived, because when I was replacing headlight bulbs, I tested the sidelights, and the one I replaced came on, then went out, and now my headlights and brake lights and hazards don’t work again. The turn signals still do? I need to see what happened.

I was also finding that I kept popping the “blue” fuse (second from bottom) and wasn’t sure why, until we found that a terminal on the alternator was bent and grounding to the housing. A quick twist with some needlenose pliers and that solved that. And yes, I checked to see if it was a fuse causing the running lights to stop working, and it doesn’t seem like it is that.
But still, that can wait, as what I really want is to get this thing driving. Last week I had it running for a bit, feeding fuel from a gas can. Now I want to get the fuel tank reconnected and make sure it’ll run from the tank, as it should. I also wanted to get the cooling fan back on and button up all the other stuff I took apart last time when I was cleaning the points.

The guiding philosophy of the 2CV was that if you can get rid of a part, great, because a part can’t break if it doesn’t exist. This also means that whatever is left is necessary, even if it seems tiny and trivial. A good example of this is that rubber sheet thing that you install behind the fan, under the oil cooler, which is crucial for directing cooling air properly. Our own Stephen Walter Gossin found that Cadillac CTS fender bolts fit this part, so that’s what’s holding it in place now.

I also did this when installing the fan – which uses an odd reverse-threaded bolt – but I was able to extract the socket after just a few moments of mild panic.
Eventually, I was able to get everything reconnected, and was rewarded with this triumphant display of idling:
It sounds so good! Two determined cylinders, happily sliding back and forth in that numinous dance we call the Otto Cycle! It idled fine, but then after five or so minutes stopped, which confused me.

The coil felt pretty hot – hotter than I think coils like to be, so I connected this spare coil that very fortunately came with the car, because I don’t think Autozone stocks these weird double-ended coils. It seemed to run with the spare coil just fine, and that one wasn’t getting so hot, so I swapped it out properly, instead of just laying it on top like you see there.
But then later attempts at running the car – I was still hoping to take it around the block – didn’t quite work out. After a few minutes of idling with the carb choked, the engine would run rough and the choke flap (shown) would kind of cough and then the engine would cut out.
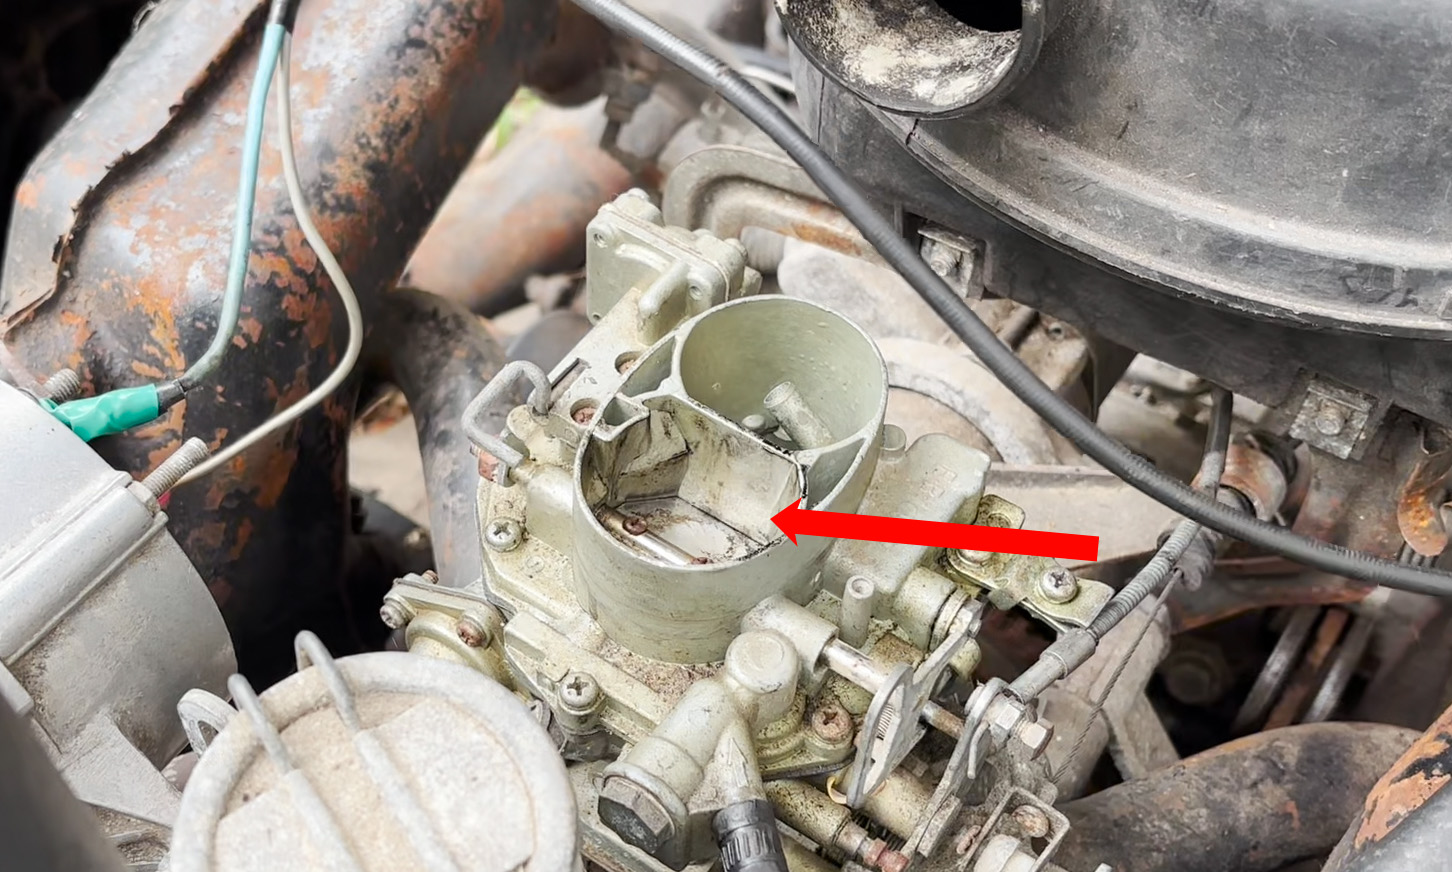
It’d be hard to start again after that, too. This thing did sit in a field for a good number of years; I’m not really sure what condition this carb or its jets are in. It could be dirty or clogged in there? This feels like a fuel/carburetion sort of issue, but I’m not certain. Any thoughts or advice would be appreciated!
A more positive development is that my son Otto, who is now the tallest Torchinsky ever recorded, had figured out that he could drive the car even with the front seats removed using this method:
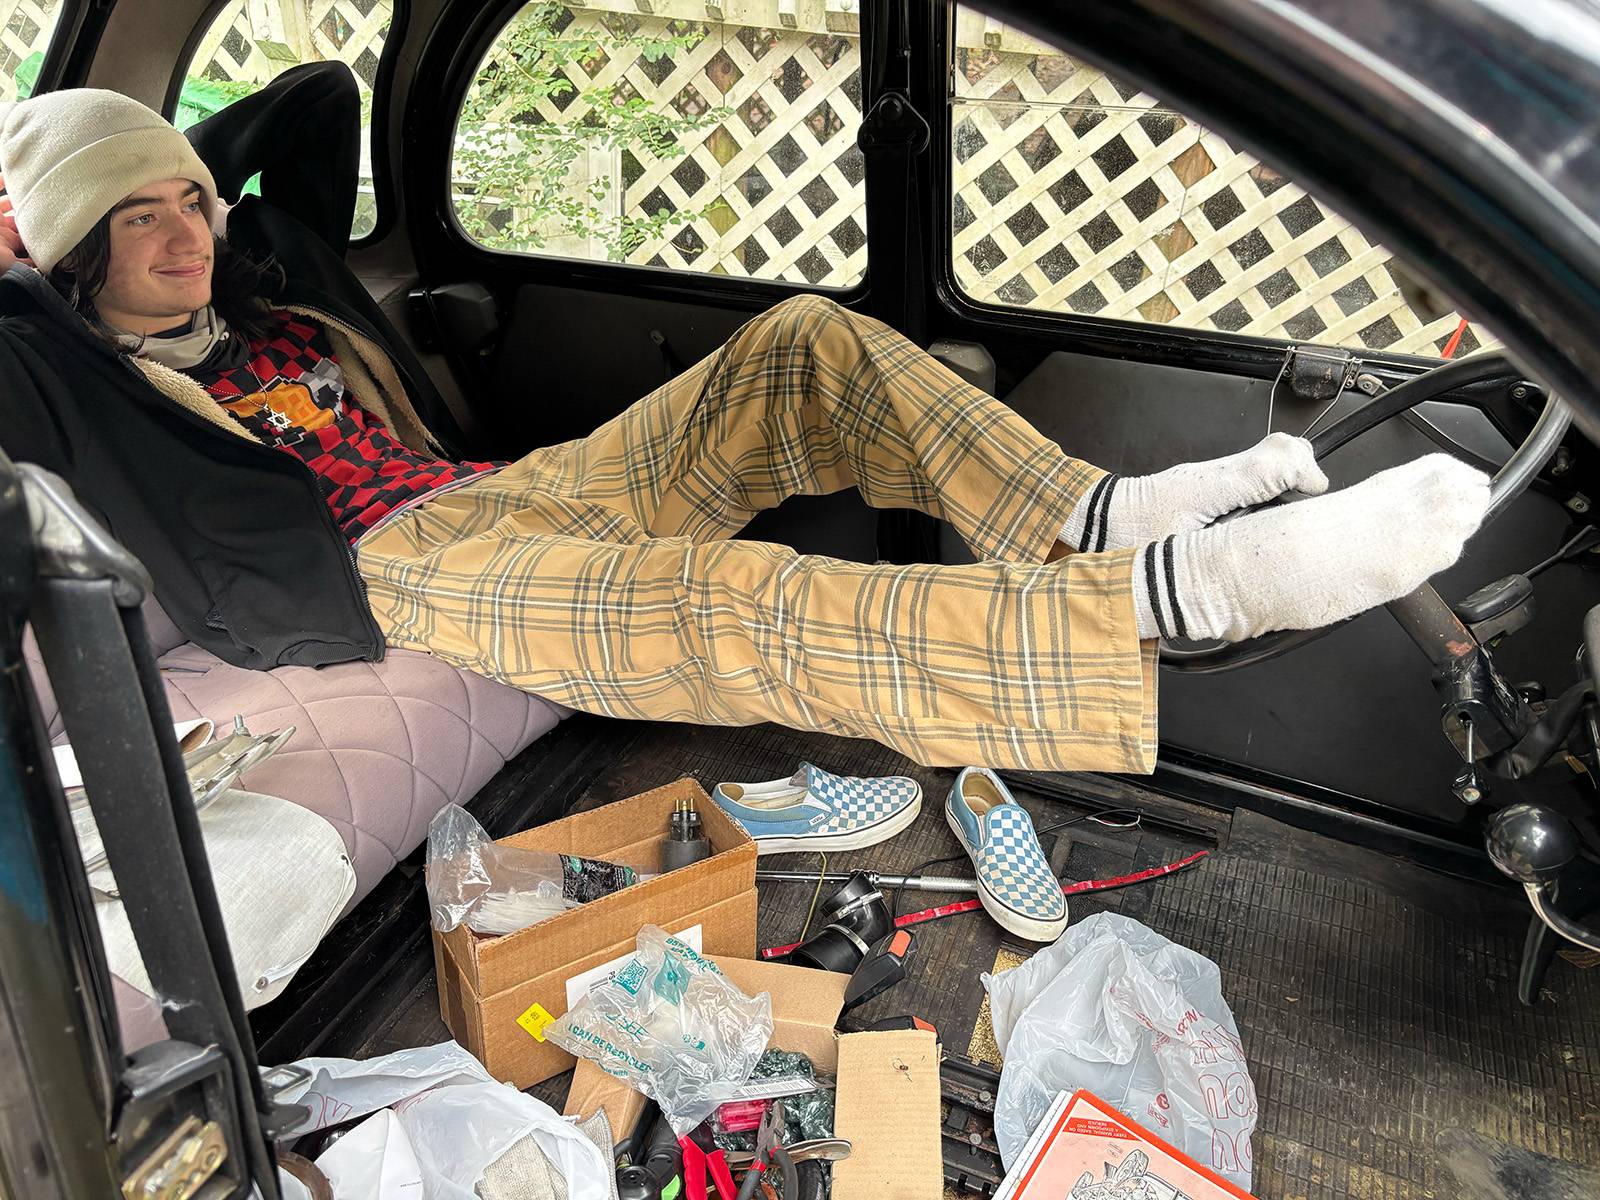
So that’s good to know.
Man, I want to get this thing on the road! It’s closer, but I’m not there yet.


Having spent a lot of time in various incarnations of a 2CV, I can smell the interior pics Jason posted. Thanks for bringing back some memories.
A hot 2CV coil is a sign it needs to be replaced. They usually get warm – which is why they are placed in a location which gets some airflow while driving. If you leave the key on with the engine not running, the coil can heat up to the point it explodes – but most of the electronic ignition systems should prevent this from happening.
The 2CV’s multi-function headlight switch (which also works as the horn button) are also a possible source of electrical issues – but they can be disassembled with all the wires attached and the contacts “brightened up” with some fine brass wool or emery cloth and contact cleaner.
If you take the wires off the switch – be sure to label them well as the switch is complex.
Nearly all the parts for a 2CV are available from a guy here in the Seattle area, btw.
I’m sure DT enjoys seeing the look of those (shower) spaghetti wires, ha ha
For the carburetor, you can find very good new Solex models copy (SherryBerg on AliExpress for example) for cheap.
Rebuild kits aren’t always sufficient; there can be play in the shafts, and the metal can be damaged over time.
You can also find TERRIBLE copies. I would 100% start with a rebuild kit. I used a rebuild kit earlier this year on my 2CV and that plus a good carb-dip can and a lot of careful cleaning turned my 2CV into one that was very iffy to idle and hard to keep running to one that just plain starts right up every time.
Where did Otto get those awesome pants?!?
If the coil is getting hot and it runs for a while then quits I’d be suspicious of the points or condenser doing something funky, and the hotter the funkier.
That pic of Otto makes me feel old. I remember “Will It Baby” from the old site.
Wiring is just logic. Just get a diagram and put it together circuit by circuit. Take your time and you can do it no problem.
For the double ended coil masybe try a local motorcycle shop.
For the wiring harness, since its working, get it blessed and stuff it into some split loom for now.
That carb will need to come apart before she’ll be right.
Get a gasket kit and some carb cleaner and take cell phone pictures as it comes apart so you can remember where stuff went. Old gasoline is mean, but it mostly leaves deposits and clogs shit up.
Love the slip on checkerboard Vans and plaid pants that Otto is rocking there!
Been many a decade since I had plaid pants. Still do slip on Vans tho!
It would look a lot better if you got a $25 Brother P-Touch label maker.
Anyway, on a vehicle so analog, compared to what we can/have to buy today, this stuff shouldn’t be that hard to sort out.
On the other hand, I don’t know what this poor thing has been through. So, I should just shut my mouth, other than to say Good Luck!
Here’s to many more updates and Monday morning Cold Starts.
Does Otto own a bike and if so, do you call it the Otto cycle?
That wiring, to be charitable, would be classified as “janky” at best. For my $0.02, a completely new harness would be worth the investment and peace of mind.
Sadly, the main purveyor of parts for 2CVs, other than Kenji in Seattle (who doesn’t stock EVERYTHING, and will at some point run out of things) is Burton in The Netherlands and they have recently halted ALL shipments to the US because of the de minimus tariff changes 🙁
I’m not sure I understand that. If someone orders it, and is willing to pay the tariff, why not make the sale? I guess there must be some logistical issue with just shipping one harness that makes it not worth the time.
It’s basic wiring on a simple car… Literally just remake it from spools of multicolored automotive grade wiring. Just one at a time, find where a wire goes, cut it at one end near the plug, use the old wire to pull the new wire through, solder the new wire to the old connectors (or even better, new spade or bullet terminals or even weather pak ones depending on how readily available they are and ambitious you are), rinse and repeat.
Just draw up a wiring diagram with the new colors as you go so you have something to reference later on. It’s not magic, just logic
I’ve heard good things about Club Mahari, but shipping will still be a problem
As far as the carb is concerned, you need to remove it from the car, disassemble it, find someone with an ultrasonic cleaner and clean out all the passage ways in it. After sitting so long you have dried up fuel remains clogging some of the passage ways. Kind of looks like plaque on teeth. If none of your mechanic friends has a cleaner, they sell them at Amazon or Harbor Freight. Just remember to use the wire basket for your parts. Putting the parts directly in the metal tub will destroy the machine. The ultrasonic vibrators are mounted on the underside of the tub and have enough power to vibrate the water but not enough to vibrate the parts. That is the reason for the basket.
Ok, maybe the bar was not exactly high (no pun intended). His shoes and driving techinque are absurdly cool tho.
All the best with the Citro!
You really need to replace your wiring harness.I’ve been searching the net and found a place that will make a harness for a Citroen for not much money, something you guys like.
https://www.keepitcleanwiring.com/products/wire-harness-kits/
So, with your car in pieces, that means there’s another Citroen 2CV in Carrboro. That fellow who you interviewed years ago, from Carrboro with the Citroens didn’t have any 2CVs parked at his house. I just remember the DS versions.
There are at least four 2CVs in Chapel Hill / Carrboro. Jason’s, mine, Til’s two and Til’s Mehari. All other than Jason’s are currently running/drivable.
So, do you park your’s outside so someone could look at it from, say, the street? That guy who used to live in Carrboro with the DS station wagons in his backyard were fun to oogle from East Poplar Ave. Only got strange looks from the kids playing in the street.
Thanks for the name! He didn’t move very far from his last house. Though Google Street View shows the two DS’s and what looks like a MG Midget. I do like this site for the vague area descriptions. My Autotopian hobby is trying to discern where things are, from Jason posting a picture of going to fetch David from RDU while snowing, to Mr Gosslin describing his abode near the Wilmington volcano. Jason’s picture was on 54 in front of The Exchange at Meadowmont.
(retired nighttime mainframe operator from biomedical lab company in Burxxxx, lots of time to perfect searching skills)
As for Otto driving the 2CV from the back seat, one wonders whether Andre the Giant, given his Gallic origins, ever drove a 2CV thusly. (Fun fact: Samuel Beckett, of Waiting for Godot fame, had a farm near Andre’s hometown. As the town was quite small and didn’t have a school bus schoolchildren would often walk to school; Beckett would sometimes give Andre, his siblings, & other schoolchildren a lift to or from school in the back of his farm truck.)
When the Icelandic giant Jóhann K. Pétursson, who was 7′ 8″ or 2.34 m tall, died in 1984 at the age of 71 one newspaper account noted that Pétursson had been living in Florida and drove a VW Beetle convertible with the front seat removed and the top kept down. Always wondered if that was one of the inspirations for the singularly tall (and slightly impoverished) Ian driving the Beetle that Nelson laughs at whereupon Nelson is immediately dealt with in karmic fashion by Ian in the Simpsons episode “22 Short Films About Springfield” (perhaps best known for the “steamed hams” meme.)
Ian is based on Ian Maxtone-Graham, a 6’8″ writer for the Simpsons. The basis for the character is discussed in the commentary track for the episode you mentioned.
I don’t know if a 2CV made enough power to carry Andre.
Seconding those in the comments who advised cleaning the carburetor, since modern gas, especially if blended with ethanol, can wreak so much havoc with carburetors (& other fuel system components, particularly mechanical fuel pumps.) A pox on ethanol, its benefits notwithstanding!!
Also it’s usually a good idea to double-check, no, triple-check, wait, quadruple-check *all* the grounding connections, especially with all the confounding spaghetti putatively and ostenisbly serving as that hapless 2CV’s electrical system. In fact, at least one grounding connection might be missing altogether. Furthermore, wires could have breaks internally along their length or within their connections especially if the terminals have insulation covering up any breaks. A multimeter with continuity functions is supremely helpful!! In fact, just yesterday I was trying to figure out an issue with the headlights on my nephew’s 1989 Chevy K1500 and found one headlight’s terminals actually had the wires broken *inside* the terminals. Ordering new terminals today…
Also, a good cleaning of all connections would be a good idea. Some emery paper, a dental pick, and some contact cleaner spray often do wonders. The WD-40 brand has a surprisingly good contact cleaner spray for a decent price that’s usually more widely available than the superior but more pricey DeoxIT. I’ve had such good results with the WD-40 contact cleaner spray that I stockpiled a few cans since availability isn’t always a given..
Bonne chance!!
Gah, meant to add the qualification about modern gas (especially when blended with ethanol) that it’s fine if it’s fresh and used up on the reg; it’s mostly when it’s been sitting for months or even weeks (or mere days!!) that it wreaks the aforementioned havoc. If left sitting for too long modern gas, thanks to the ethanol content, will actually cause some serious corrosion, especially with zinc pot metal from which a lot of vintage carburetors, vintage mechanical fuel pumps, and other vintage fuel system components are made. I’m having to do so much more work on my Panhard Dyna Z & my VW bus precisely because of the damn corrosion, gah. Lesson learned: keep driving every & each vehicle regularly and don’t let ’em sit with old gas!!
Anyway, the omission of said qualification is what I get for posting before I’ve finished my morning coffee, ha, and also I was having a lot of trouble with this website on my phone. I don’t know if it’s just me but lately oftentimes when I’m reading the Autopian, especially if I’m trying to type a comment, my phone will slow to a crawl or even freeze up while the phone gets really hot. I have to keep restarting my phone in order for the website to function more or less normally and to allow me to type comments. It’s a fairly new phenomenon so dunno if it’s just my old phone (Android using Firefox) or if something is going on with the website itself…
I actually run my 2CV on Ethanol-free 93 Octane I can buy 20mins from my house (and could provide Jason when I refill my cans)
That wiring harness is going to drive you batty. Time to collect all the wiring diagrams and pictures/screengrabs you can from the internet and figure out what it’s supposed to look like. And if you can’t find a proper replacement at a reasonable price, the 2CVs electrical system is so simple that it shouldn’t be too hard to create a much better one yourself — with proper connections and wiring run through cable loom.
Yeah, even if you decide not to replace the wiring now, getting some split wire loom will clean it up so much!
Came here to say the same thing. With the realization our audience is Chainsaw Torch, Jason would probably save time by taking a deep breath and rewiring this thing with proper, marine-grade wire or where appropriate, jacketed five-conductor trailer wire and marine solderless terminals.
As for the fuel system, drop the tank and inspect it with a borescope, replace all of the fuel hoses and fuel pump if it has one, and rebuild the carb.
I feel like Torch is more likely to just barely getting it running and immediately drive it to Montana offroad the whole way
I’m surprised he hasn’t taken a chainsaw to the battery yet…
And color code those wires, for Jove’s sake.