
You may think of your freezer and grill as places where only food goes, and where nasty, oily car parts very much do not belong. But, having now rebuilt a transmission, transfer case, and engine, I can tell you that this is just not true. A grill and a freezer are must-have wrenching tools; here’s why.
Let me just get straight to the party trick.
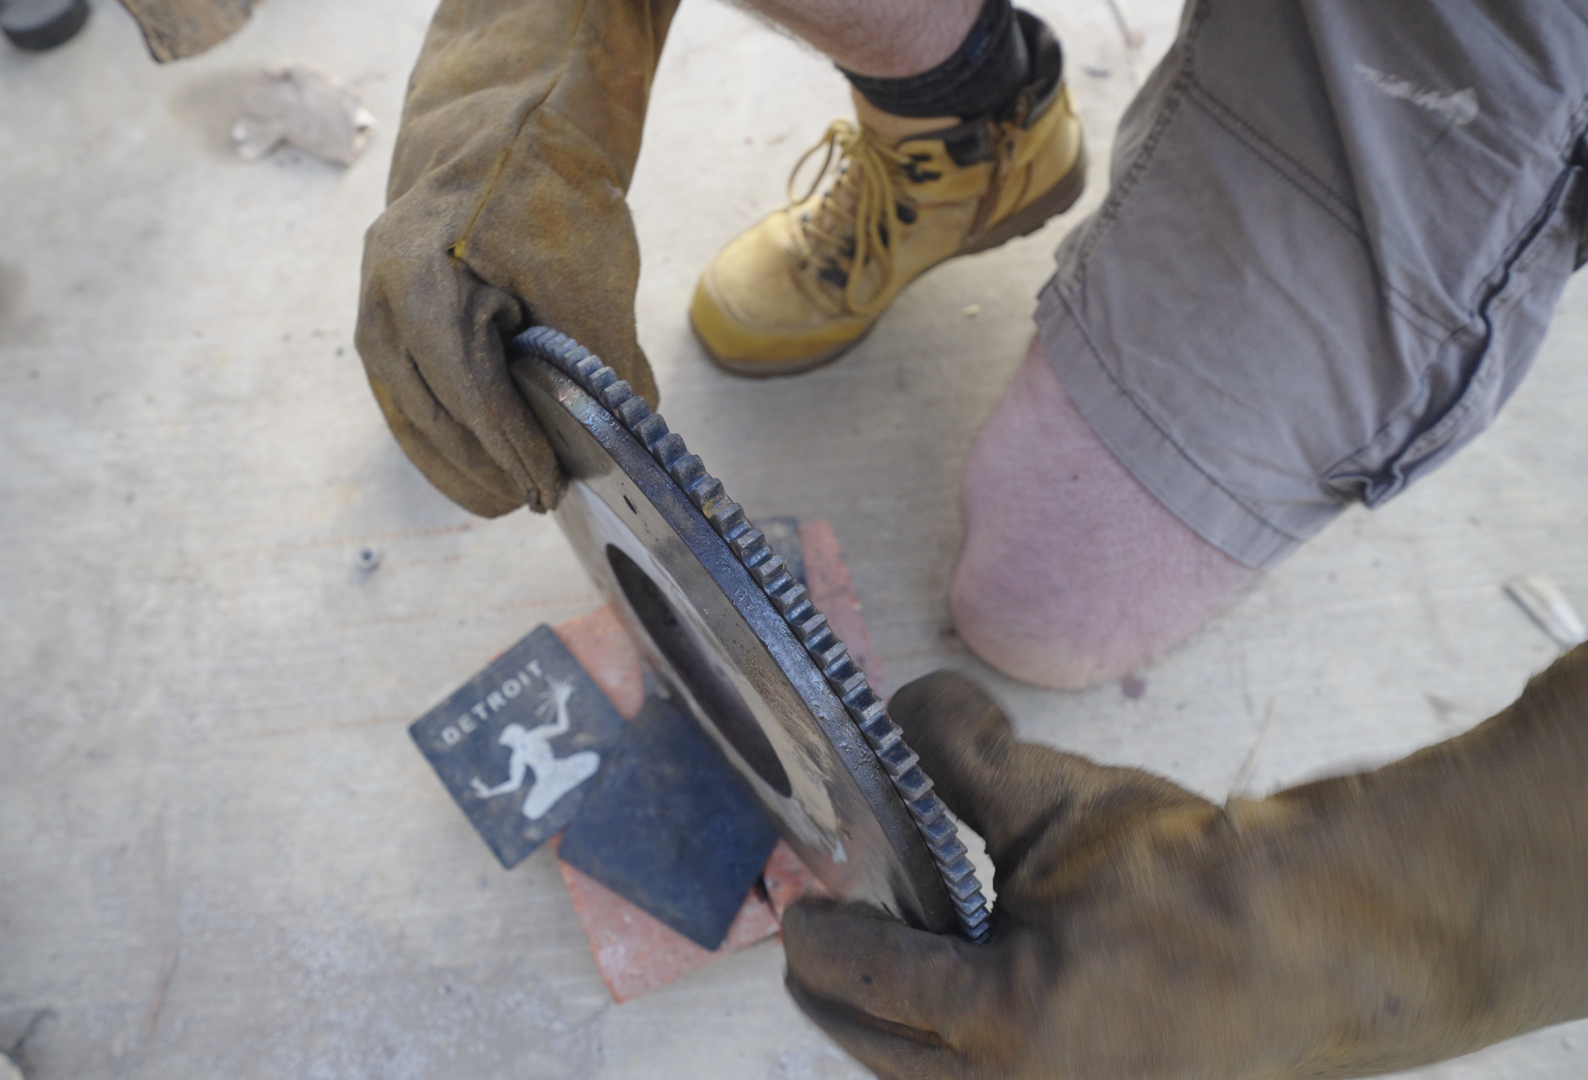
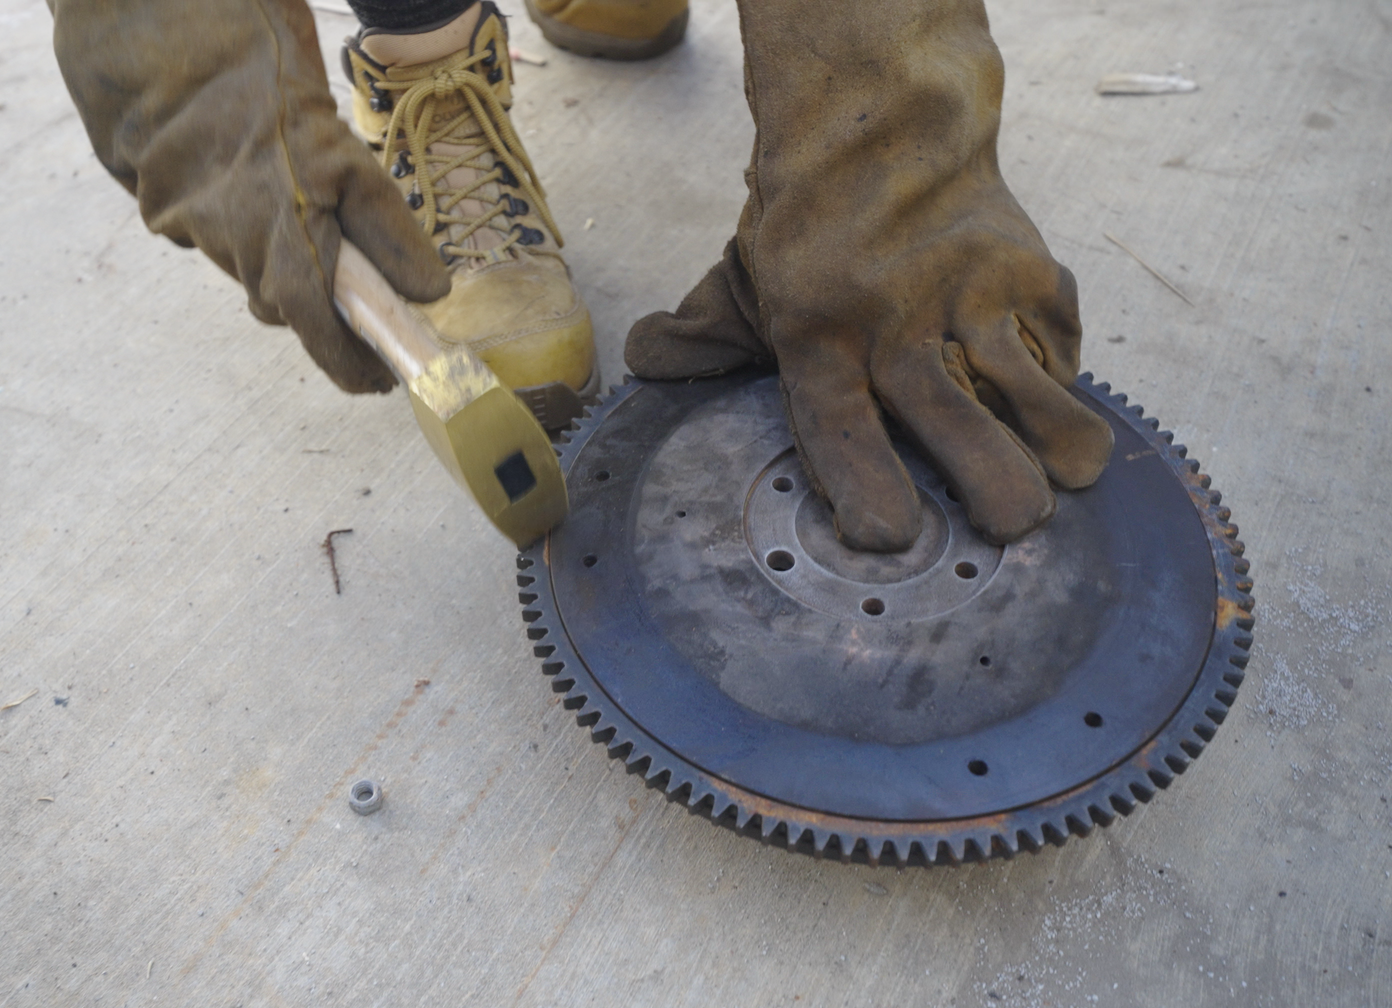
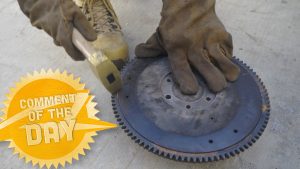
Watch as Laurence takes a flywheel ring gear off the grill and simply drops it onto a flywheel we had placed in the freezer:
View this post on Instagram
I had just brought my flywheel back from the shop, who had machined it nice and flat. They had offered to remove the ring gear and install the new one I’d purchased on eBay (see below), but I decided I wanted to try something I’d read about on online forums.

For years, I had known that installing a ring gear required heating that gear up, so I Googled it, only to find that people had just used their grills to get the ring gear up to temp. So my Australian friend Laurence did just that:

We had banged my flywheel’s old ring gear off with a punch, and then we’d placed the heavy flywheel in my auxiliary freezer in the garage, with Laurence’s placement of the heavy flywheel only slightly denting the freezer’s interior. The new ring gear was on the grill at around 400F.
With a huge delta in temperature, the contraction of the flywheel and the thermal expansion of the ring gear made it so that Laurence could simply drop the ring gear onto the flywheel:

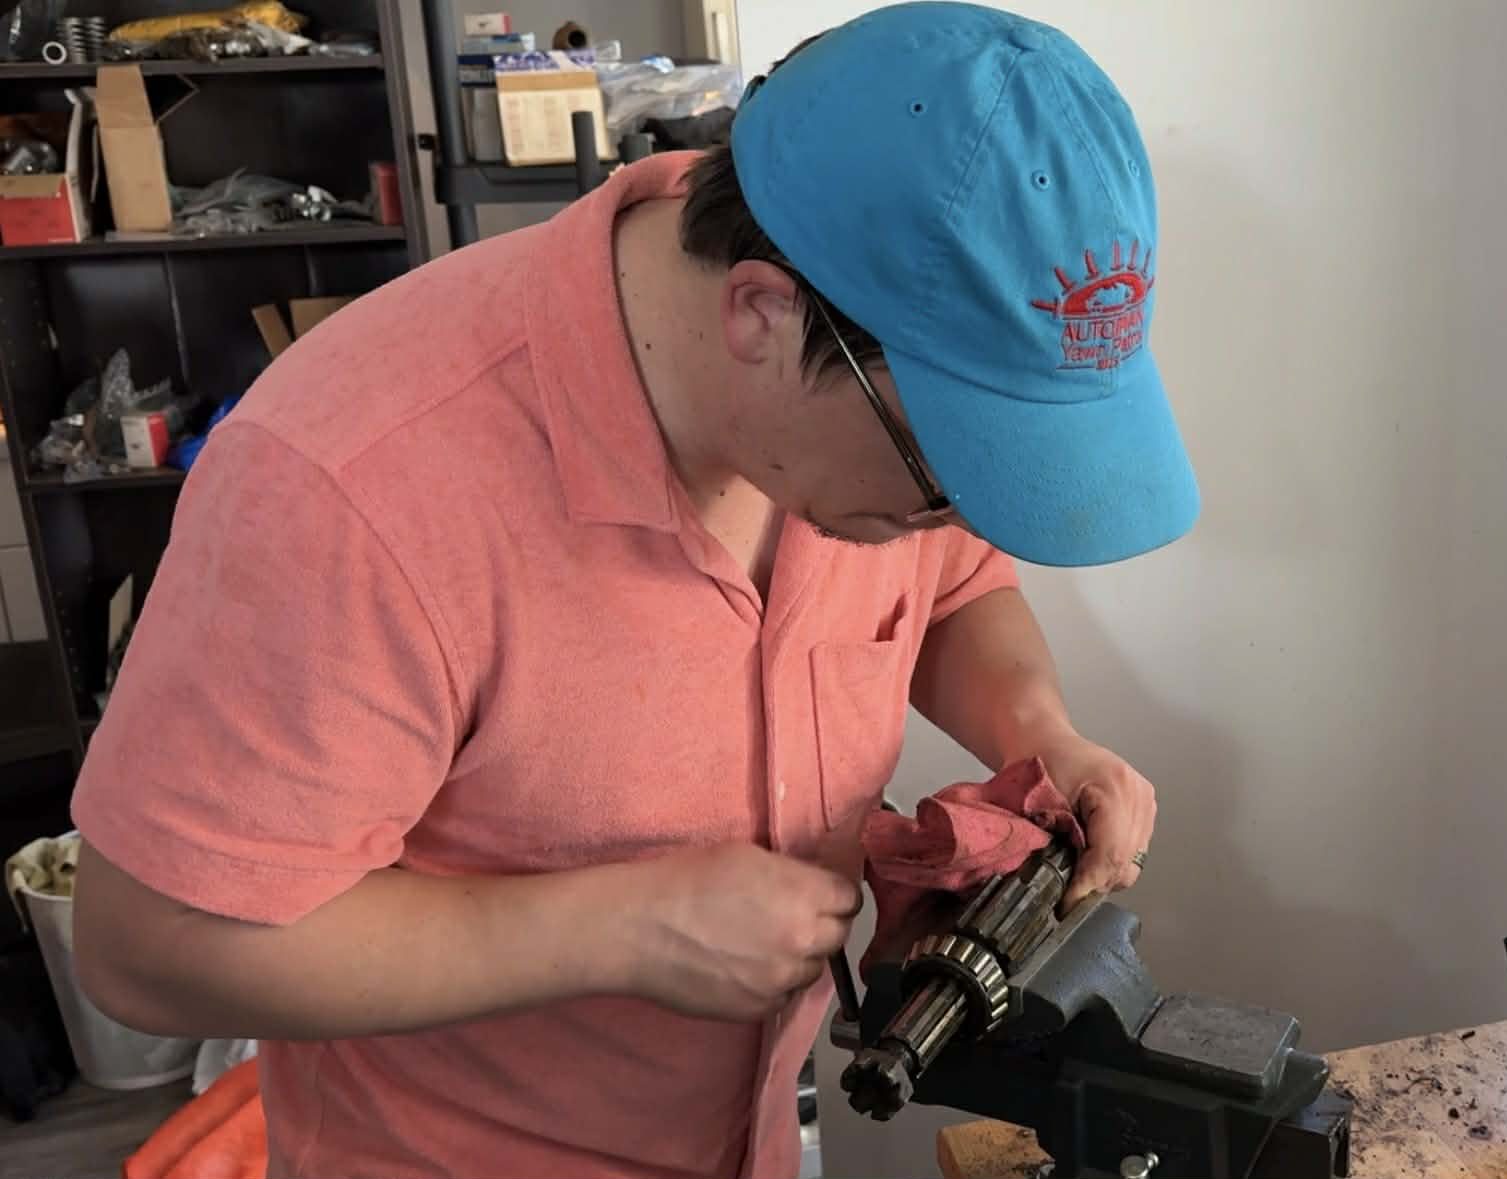
This is just one example where thermal expansion came in handy. It was also useful when my friend Brandon and I rebuilt the Jeep’s transmission — specifically when banging a new bearing onto a shaft: 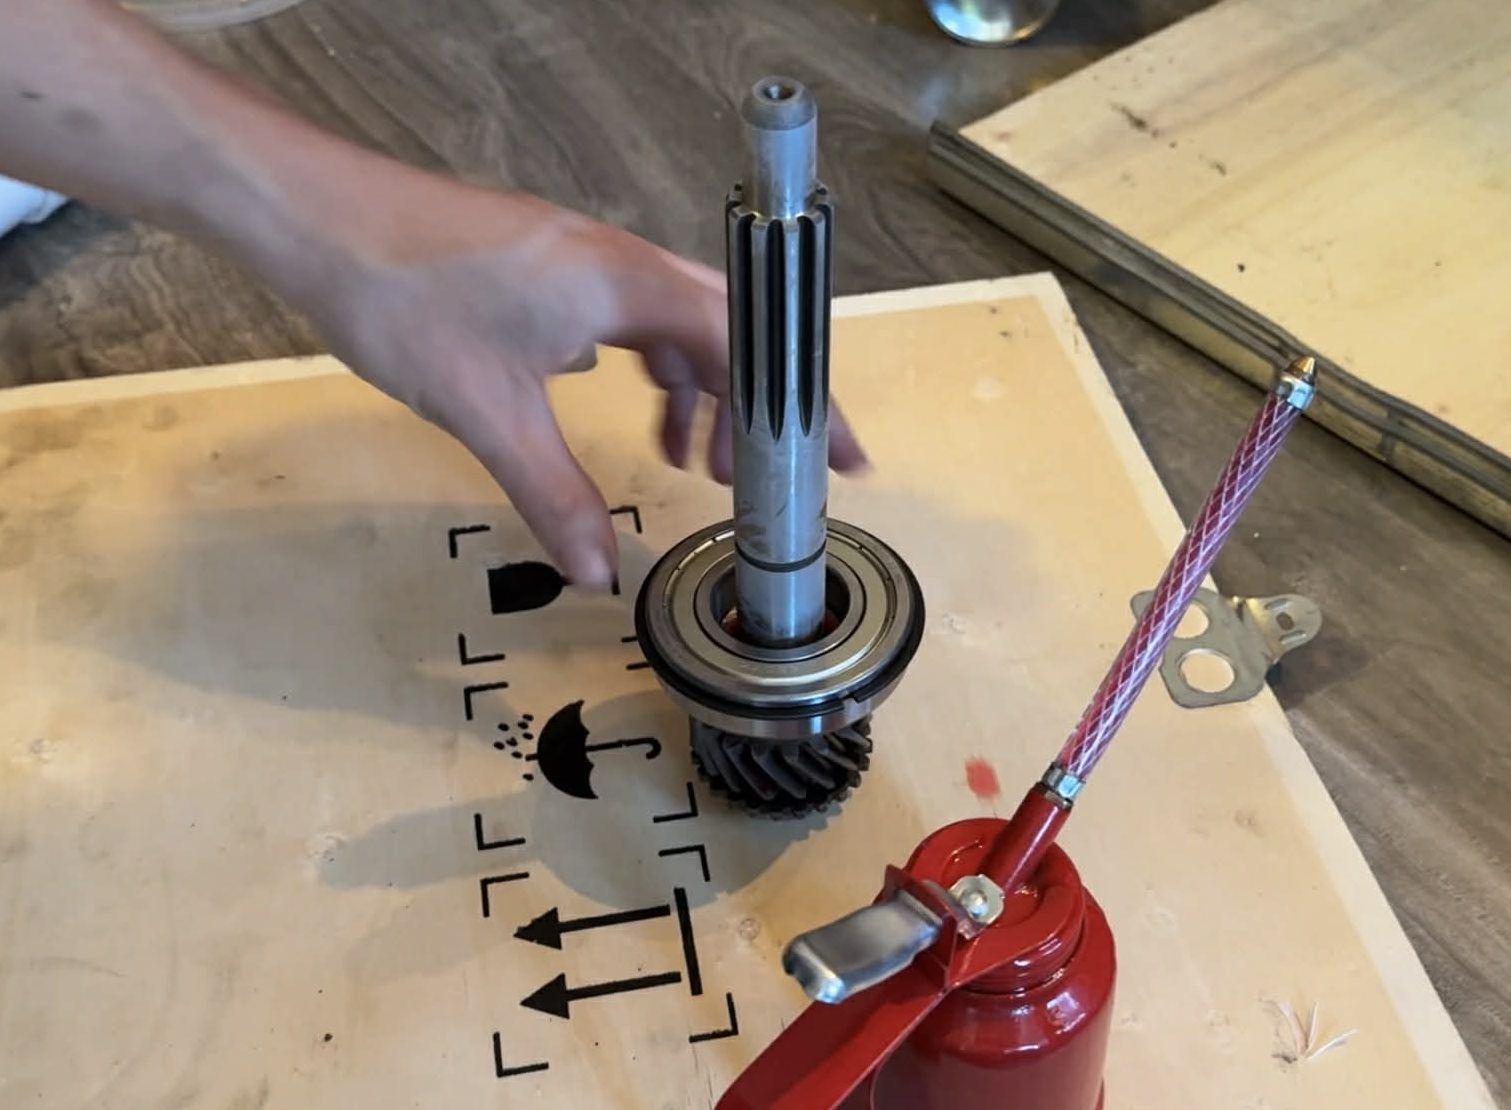
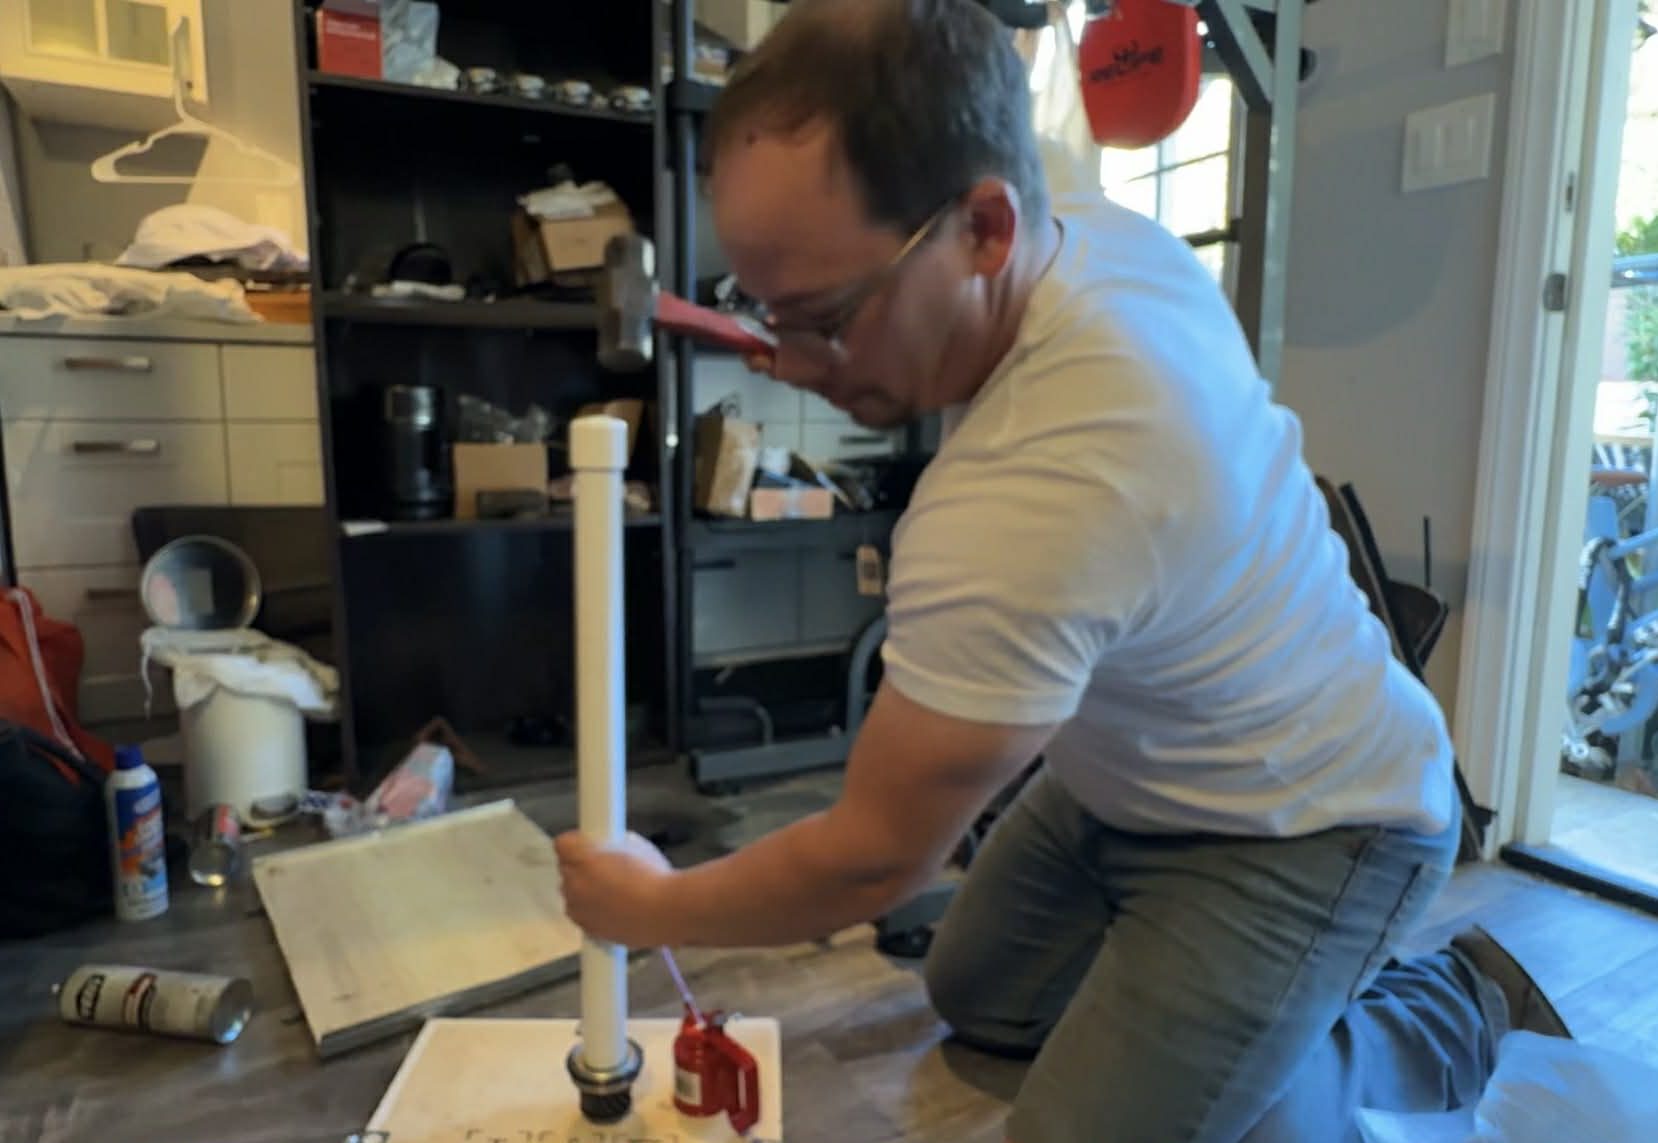
I also froze the transfer case main shaft to get a new bearing on:
I froze my piston wrist-pins so that they would more easily slide through my pistons and into my rods (which feature a slot that you can wedge open a bit wider using a flathead):


And I froze my steering box’s new bronze bushings before pressing them into the casing:

If you’re curious about the material science behind thermal expansion, here’s how Caltech defines the phenomenon:
Thermal expansion occurs because a material’s atoms vibrate more as its temperature increases. The more its atoms vibrate, the more they push away from their neighboring atoms. As the space between the atoms increases, the density of the material decreases and its overall size increases.
Back in engineering school, I did a lot of thermal expansion-related math problems in my Material Science and Strength of Materials classes — specifically, using this equation:
Change in Diameter = Initial Diameter * Alpha * Change in Temperature
Alpha is a material property called the coefficient of thermal expansion, which for steel is typically around 11 or 12 x 10^-6/C, and for Bronze (a common bushing material) is around 18 x 10^-6/C.
For fun, let’s just say I have a one-inch (0.254 meters) steel rod onto which I have to press a bronze bushing, with the bushing being about 0.001″ smaller to maintain a press fit. If it’s 77F outside (25C), and I heat the bushing up to 450F (232C) and freeze the rod to 3F (-16C) then I can calculate how much smaller the rod gets by plugging into the equation above:
Change in diameter = 0.0254 meters * (12×10^-6/C)*(-16C-(25)) = -1.25*10^-5 m. That’s about 0.5 thousandths of an inch of shrinkage.
And I can calculate how much the 0.999-inch bushing expands when I heat it up to 450F (232C):
Change in diameter = 0.0254 meters * (18×10^-6/C)*(232-25) = 9.6*10^-5 m. That’s about 4 thousandths of an inch in expansion.
That’s gone from being a 1-thousandths-of-an-inch press fit to a 4.5 thousandths-of-an-inch slip fit. When both materials reach room temperature again, they’ll be joined together with that initial 1-thousandths-of-an-inch press fit, but at the moment the bushing leaves the grill (or torch or whatever) and the rod leaves the freezer, there’s 4.5-thousandths of gap that will make slipping that bushing onto that shaft an absolute breeze.
This is the power of thermal expansion — a mechanic’s best friend.
[Ed note: David mentioned the idea of building a brand new WWII Jeep to the team at eBay, and they loved the idea so much they said, “How can we help?” Their financial support and David’s Jeep-obsession are the fuel behind this crazy build. – MH]
Top graphic images: David Tracy; Superutensil


Get an induction heater tool. Best money I’ve ever spent in regards to breaking rusty stuff free but would also be a lot easier than grilling a flywheel ring.
Not as fun (or dangerous!) as having an open flame from a torch on those rusty bolts!
one inch is 0.0254 meters, not nearly a quarter of a meter.
“For fun, let’s just say I have a one-inch (0.254 meters) steel rod[…]”
For fun, let’s do a bunch of math! NO!!! THAT’S NOT FUN! If I wanted to do math all the time, I would be in engineering…
Oh. Wait.
Nevermind.
YaY MaTh!
Have done this a bunch of times with bearing jobs. In many cases I’m just chilling the part I want to make smaller and that’s good enough. Need to be careful when heating, as others have noted. If the heated part is small I’ll grab a saucepan when my wife isn’t looking and heat it in oil on the stove.
Brings back fond memories of my Dad putting VW valve guides in the freezer back in the early 70’s (Don’t tell Mom) Dad was a machinist .He knew things .
This is why I like this site so much. Good sharing of information without snarky comments.
Materials engineer here. I approve.
I’ve used liquid nitrogen to make interference fits often, but you need either access to a big liquid nitrogen tank or a dewar for transporting LN2. If you have a real dewar (think a big Stanley Thermos bottle, but no threads at the top and a cork instead of a lid), most welding supply shops will sell liquid nitrogen to civilians.
Need something colder than your freezer, but don’t want to hassle with liquid nitrogen? Put dry ice in a small cooler and add isopropyl alcohol. The alcohol freezes at around -40 to -80F depending on water content. Do it outside, though. The vapor that comes off the mixture is alcohol vapor and will burn your house down.
And Elise (NHRN) didn’t mind the smell of a car part among the food?
“This casserole is redolent of SAE 90”
In college we made a bong using this technique , but instead a CO2 fire extinguisher and a propane torch. Used that bong for nearly 20 years before the brake line we used eventually rusted into nothingness.
You coulda just went with a soda bottle ,a straw and some tin foil …
Dude, where’s the fun in that? Besides, the brake fluid residue must be better for your lungs than the plastic vapors, right?
Okay I have heard and seen this done. I just don’t understand when you heat the outside item up why does the access area get larger rather than smaller as it is expanding away from the material on the outside? I mean if you inflated a inner tube it grows in every direction and the inner hole gets smaller right?
It expands in every direction equally, yes, but that ring is nearly 30 inches long in circumference.
It can be easier to understand what is happening if you think square instead of round. Imagine 3 blocks of metal one that is 2″x2″x1″, one 1″x1″x1″ and the final one 2″x2″x1″ with a 1″x1″ hole in the middle of the 2″x2″ side. All when measured at x degrees. Now heat all three until the solid large cube has grown my 4 thousandths on the long sides and 2 thou on the short side. The 1″ cube will grow 2 thou on each side. Meanwhile the hole in the other large cube will grow by 2 thou in each dimension, just like 1″ cube that is there inside of the solid cube.
Thank you I was able to get the point after only reading it twice. And I actually passed math classes Algebra, trigonometry, and calculus in high school. It is true use it or lose it.
Glad to help. It took me a while until I was able to wrap my head around what is actually happening that makes the hole larger when it expands. Imagining what happens to the “not a hole” in the middle of a solid is what finally made it click for me.
I’ve inflated plenty of tubes while fixing flats as someone into bikes since I was a kid. The tube grows in every direction including along the circumference, so the inner hole gets larger.
That is not my experience when I inflate and put on my water wings at the pool. The more I inflate the tighter it gets king of like a blood pressure cuff
If you have eg a ring of metal, and heat it up, the hole in the middle expands at exactly the same rate as if there was material there.
Otherwise if you heated a solid object up, it would crack as the inside tried to expand quicker (or slower) than the outside.
For example, if you have a 10cm bit of metal, and it expands by 1cm per hundred degrees of heat, then took a larger piece of the same metal, with a 10cm hole in it, the hole would also expand at 1cm per hundred degrees.
The only thing I’d be cautious about with heating a gear up to 400 is potentially weakening any heat-treating that it had gone through during manufacturing
400F isn’t nearly hot enough to affect heat treatment of steels. That temperature is barely getting into the range of tempering the hardened steel. It’s an understandable concern, but heat treating steel requires temps more like 800C and up.
Eh, that actually depends. Steels with chromium and molybdenum can actually be embrittled at low-tempering temperature.
And 41xx steels are really common in cars. Including flywheel gears!
https://www.pmpa.org/blue-brittleness-temper-embrittlement-400-500-degree-c-embrittlement-and-more/
Huh, I guess I learned something today. Fair to say that 400F is usually not hot enough to affect heat treatment of steels except for certain high strength low alloy steels.
So embiggening embrittles? How embarrassing.
Is this is why lugging rather than welding steel bike frames was the way until the 1980s?
Probably! 41xx series steels require heat treating both before and after welding
Fine by me. I greatly prefer the aesthetics of lugs over welds.
Eh, for my money, I feel like welds would be less vulnerable to corrosion
I don’t think so especially given the poor quality of the welds on some modern bikes. If the quality of the welds are that bad I don’t imagine the quality of paint covering them is that great either.
A properly brazed frame wouldn’t be any more subject to corrosion as the voids are filled with the brazing metal. There are plenty of bike frames over 100 years old or even from the 19th century that are still around. I’ve never seen corrosion being an issue due to lugs.
I think that was more to do with better access to precision tube cutting equipment and TIG welding which allowed using light high grade tubing unlike old Schwinns made by stick welding. Also air hardening alloys like Reynolds 631 and 853 made for stronger TIG welded frames and finally aluminum and titanium were generally TIG welded. Ironically custom carbon fiber frames often use lugs, but are assembled with epoxy.
MTB came along and said: Hey we can’t use those lugs or angles, we need more tire clearance and larger (stiffer) diameter tubing. Then they took technology too far while chasing sales and now E-MTB are nearly motorcross bikes and cost $10,000.
My favorite personal bike is a singlespeed MTB. I got tired of wrenching on everyone else’s bikes to work on my own.
I’m not sure that’s correct since steel road bikes and even city bikes moved to welds at the same time. Also ATBs were already using oversized (for the time) tubing sets with lugs. Some of those were even DB Reynolds 531/501 tubesets like the Trek 830/850/890, some Stump jumpers, etc. Those early to mid 80s fully lugged ATBs are on my shortest of short lists, especially with DB tubing. Fortunately they don’t seem to be on too many other collector’s lists, except for the Stump jumpers.
Maybe marketers just took advantage of welds as a marketing ploy to further distinguish their fancy new MTBs from the surplus of leftover bike boom products that nobody was buying.
My favorite personal bike is a mid 80s Shogun Prairie Breaker I, which is, as far as I can tell, a clone of the Stumpjumper Sport right down to the open biplane fork. Without a geometry table or a Stump jumper to measure it’s impossible to know for sure but it sure looks like a clone.
Oh, I was generalizing and painting with a very wide brush. I remember all the early MTB.
I’ve built lugged steel bikes and TIG welded bikes. Both can be strong. Lugged has advantages in some areas since you can heat up the lugs and remove and replace a dented tube. TIG allows for angles that are not available in the cast lug format. There is a whole world of custom bicycle builders that do both styles to a high degree of art and functional design. Lugged was easy to mass produce until TIG welding became more cost effective. There were some traditional builders in England and other places that would set up a lugged frame and literally stick half of it into a giant oven/forge thing to melt braze together. It’s usually done with a torch, one joint at a time. Fillet brazing is another method that doesn’t melt or damage the tubing. Welding vs. brazing has a lot of interesting techniques and arguments.
Thanks for the expert insight. I’m nowhere near the build my own frame level of enthusiast but I greatly admire those who do.
One of my dream projects is to convert a fully lugged ATB from cantilever brakes to roller cam. Why? Because I like the aesthetic of lugs and the stopping performance of well set up roller cams is next level AND is period correct. Plus it seems easier than full on frame building.
I did manage to find a solid biplane fork on Ebay with roller cam posts like this one:
https://sheldonbrown.com/images/Roller_Cam_Bicycle_Brake_Front_crop.JPG
AND I have an ’86 Peugeot Orient Express with chain stay roller cam brakes so that seemed to be an easy solution but unfortunately the steering tube of the fork was cut slightly too short to fit that frame.
I know its possible to extend steering tubes by inserting a machined section from a donor fork and welding it in but that sounds even trickier than moving brake posts.
You could get the steerer tube replaced. My 1912 Iver Johnson (which has internal lugs, BTW, so it looks like a welded frame without any weld beads at the joints) has a fork that was replaced very early in its life (I think it’s from a Peerless as I’ve seen them on those bikes, so I imagine that’s what it’s from and it frankly looks nicer than the simpler IJ unit, plus it’s a neat bit of history and Peerless was cool, as well) and the steerer had been cut down and tack brazed with brass in four spots to put it back together (!). Obviously not ideal and it broke, luckily just after I sat on it and started to move, so I brought it to a place that deals with antique bikes and he replaced just the steerer. I could have tried to source an original, but the the bike is in excellent original condition with some scars that tell a story and finding a Special Racer fork would be expensive and take a while. Also, as they were nickel plated, it would be unlikely to match the patina of the bike unless I got into re-plating everything including the head tube (a Special Racer thing).
That could be an option. It would be easier than grafting in an extension and be cleaner too.
Cerberus is correct. Can be done. Steel is very forgiving.
Take a framebuilding class with a local builder or go to United Bicycle Institute. You’ll leave with a frame you can paint and ride. Or help your local builder fix that fork.
Lugging started in the 19th century as welding was not common prior to WW1. It prevailed well afterwards as a way to build frames quickly with lower skilled labor. No need for precision cutting, measuring, and jigs, just simple casting, cut tube to length, insert tube, braze. Foundries would have been more common back then, too, and welding was both a relatively primitive science, not something likely readily available to bike companies, and a rare skill. As welding got better and cheaper, the versatility offered in geometry changes and probably a marketable “modern cleaner look” prevailed. IMO, neither is inherently better, it’s a matter of best matching the particular need of the builder and their customers.
From a purely strength perspective you are probably right (I lack the experience to say for sure). Welding is probably lighter maybe even cheaper now so all else being equal it is *better*.
Aesthetically however lugs are much nicer to my eyes than welds, especially when decorated with pin striping, chrome accents and providing a basis for a natural two tone paint scheme. In contrast welds tend to look coldly industrial, sterile even. They’re just…there. Sure they do their job of keeping things together but only that. Lugs do it with style.
And I should clarify traditional lugs, not the internal lugs used on some Schwinns. Those are the cleanest looking of all but are a bit plain to my eyes.
I love the look of a lugged frame with cutouts and pin striping but I also appreciate “stack of dimes” tig welds. Both have their places.
Mmm….cutouts…
Forgot about the cutouts. A very nice touch when present.
Unless someone is getting paid to race, I think the small weight trade off is worth it for the aesthetics. Once I’m rolling, I rarely notice any weight penalty on my heavier bikes with the exception of the custom Sears Spaceliner that feels heavier than it is, but that’s a gas pipe middleweight cruiser from 1964 with a SA 3-speed IGH.
I agree, especially since I stick to the flats ;). The only time I really notice weight is when I have my panieers filled with stuff.
On the topic of thermal expansion, I know objects typically expand fairly uniformly in all three dimensions. However is it possible to engineer reliefs, voids, or vary the materials (in a 3D printed object) to manipulate this?
For people who haven’t been following F1 during the offseason, this is why I’m asking such a seemingly random question:
https://youtu.be/hLzto55W3RU?si=Pk-CqGsDKqb3lyZN
I’m convinced F1 designers are freaking wizards…
One time I was having a hard time getting the wheels off a jeep while I was in the garage. So I pushed it outside into the subzero weather and I left it out there overnight. It was so cold. It froze my nuts off.
Dry ice in a cooler is a great go-to as well. Just be sure to wear gloves cause instant frostbite awaits.
Not a great idea if small children or pets are nearby, since cold CO2 will sink to the ground.
There have been cases where people throw dry ice into pools to create fog, and then suffocate because the CO2 displaces all the air close to the water
A couple of dumb-but-honest questions:
1. When using this freeze-and-heat technique, how much time does one have before the parts cool off enough and they “jam” again? Seconds? Tens of seconds? Minutes?
2. If halfway through slipping parts together the temp differential changes and the parts “jam” before being properly seated, what do you do to fix this? (Punch them out? More heat?)
While working on my cars, I’ve been in situations where heating/cooling parts is directed to fit parts together. My fear of “not finishing in time” (as reflected by my questions) makes me go “hmm, better call the shop and have them do this.” Any hints/comments may save me some time and money the next time!
In my experience, seconds at best. It also probably depends on the mass/thermal capacity of the parts. Regardless, I would imagine that even with larger parts, once the mating surfaces touch, the temperatures will equalize at the interface pretty quickly.
Thanks for the response.
Hmmm… Seconds… Makes me feel better about having the experts take care of these kinds of things in the past.
It depends on the surface area-to-volume ratio, and the temperature differential.
For example, when blacksmithing, a 1/2″ square steel bar heated up to 2100F can cool down to 1500F (no longer glowing) in about a minute
Thanks for the response.
2100F is way beyond my ability, but this is really cool info to know. Again, thanks!
Not dumb at all. My son and I just try it and learn as we go. The others are correct, you need to work quickly, but it generally goes together with less fuss. Having a small handheld gas canister torch comes in handy. You’d be surprised how much heat you can direct into a part while not bothering the neighboring parts. Just be mindful of fluids, rubber seals and other things. Sometimes some parts lube may ignite, just blow it out and keep at it! Of course, we also have extra vehicles we can drive during these operations. That is a huge privilege.
I’ve often used an electric griddle to change bearings, when up a wind turbine I don’t like open flames, so an electric hot plate worked well. Plus afterwards easy way to make some lunch.
^^ Wind turbine? Someone interview this guy! ^^
I have never had to heat one part and cool another to fit them together, I have frozen bearings to slide them in place and used heat plenty to release rusted parts, but this is a clever combo!
I just did this with a Ford 8.8.
Heated the ring gear in a cast iron pan on the grill until about 220 – slid right onto the differential carrier without issue. Folks who use the bolts to pull it on can easily strip out the threaded holes.
Same deal with the inner pinion bearing in the pinion shaft – a heated bearing slides onto a frozen pinion pretty well.
Just needed a little press to bottom it out.