
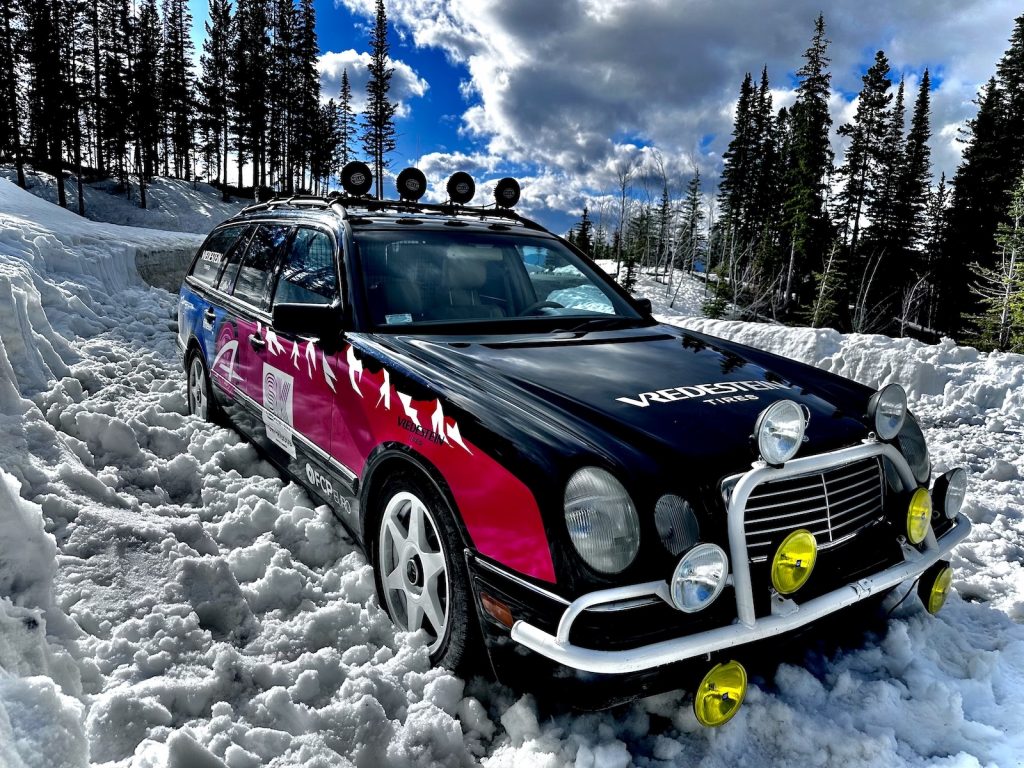
It’s here. It’s finally here. Months of wrenching, testing, and breaking things has resulted in the ultimate apres ski machine made from a humble Mercedes wagon. Behold: The Ski-Klasse. A play on the E-Class on which it’s based, the vehicle is robust enough to tackle deep snowy passes and also, equally as important, to enjoy some post-ski downtime with friends. Featuring a handbrake made of a vintage cell phone and a literal disco ball, it’s as wacky as it is capable of crushing powder.
As a reminder, Matt and The Autopian team purchased a late ’90s Mercedes wagon with the dream of turning it into a ski wagon that was capable of climbing up a mountain and then throwing a big party when it arrived. The goal was to find out if this common Mercedes platform could be a potential future classic by turning it into something that’s as at home at a rallycross as it is at a music festival. Beyond that, they had no real idea other than to hand it over to me to try and make their hilarious sketches come true.
[Editor’s Note: Jason and I aren’t exactly huge Mercedes-Benz people, but when Matt told us that a Mercedes wagon build would allow us to work with brand partners like FCP Euro, Hella, and Vredestein, we said let’s go for it — The Autopian’s first sponsored build, how exciting! Now after seeing the incredible results at the hands of legendary rally driver Bill Caswell, we are glad we went ahead with it. Read the story below and you’ll see what we mean. -DT].

After a bunch of maintenance at FCP Euro and a fresh set of Fifteen52 wheels and Vredestein tires, I finally got to the point where I could cut, weld, and modify our wagon! There was just one problem. Where to start? I had so many ideas. Below, you’ll see what made the cut (literally) and what Matt suggested we save for Phase II of the project.
[Ed note: We teamed up the legendary Bill Caswell, who famously raced a $500 Craigslist BMW to a podium at Rally Mexico, with Vredestein Tires, Hella and FCP Euro to turn an S210 E-Classe into a ski car we call Ski-Klasse (get it?). – MH]
When I heard “Ski-Klasse,” I thought we might actually get to ski a car down a mountain [Ed note: This is true, and it’s something I know Bill is going to end up doing with the wagon eventually – MH]. I somehow missed the rhyme with E-Class until I heard we were working with Vredestein’s Wintrac Pro snow tires and realized I might get to drive up a mountain instead! But this project was all happening pretty fast. So we got on a call.
I was nervous, but I knew it would be fun and I couldn’t wish for better partners. Snow tires, lights, wheels, and parts. I was told to have fun! Build something awesome! This is why I love The Autopian. They know my madness. It’s not like this was entirely my idea: Their original project sketches were so cool. Kind of like a rally wagon with all the lights. We even talked about entering some winter rallies which would be hysterical in a 16′ long wagon. It would fill a two lane road when sideways! So I had a general idea of what to build. (This is where I should have kept my mouth shut.)
Instead, I asked about cutting the roof off. Not the whole roof, just the front seat area. A Targa Wagon! With big piece of glass to seal in the rear seats from the weather — like those old cars where the chauffeur was outside. Almost like a carriage. My second concept was less weird, but it was suggested that I stay away from the sawzall…
So I brought the car back to Chicago and guess what I did first? I got out the sawzall and cut the front off the car!

I needed to get rid of the flimsy substructure for the radiator and replace it with steel tubing and a quarter-inch aluminum skid plate. Plus the oil pan is on the front of the engine and sat much lower than I would have expected. It’s not nearly as bad as a BMW E30 (the rally car that made me a bit of a household name about a decade ago on Jalopnik), but I want this car to be able to take some abuse and not come apart. As you can tell by now, this isn’t your standard build story. Normally I build a car for a race or a specific event. There are rules I have to follow. But this build is wide open. I can do anything I want! Except cut the roof off. [Stage two, Bill, stage two! – MH]
You should also know that this article is almost as fun to write as the car was to build, because no one has seen the wagon yet! You are learning about Ski-Klasse at the same time as The Autopian. I would occasionally text Matt closeups of random fabrication, or a video of me cutting into their car for no apparent reason, or a disco ball install with zero explanation. I believe the team has seen the pictures by now, but for the most part, you are learning about this build at the same time they are! I hope you like your new car, but if not, please fire me in the comments. [Editor’s Note: Holy crap. -DT].
I’ll do my best to explain how I did things, so you can learn along the way, but let me know if I miss something. I’m still frustrated with the Mercedes design team and I never want to see another vacuum line in my life, but I love that The Autopian gave me their first car to build. I don’t care how many times you’ve turned a wrench, it feels special when your friends trust you with their car. Let’s get started!
Step Zero: Install New Wheels And Tires
Vredestein Tires was the original backer/believer in this project and we didn’t get started until we were already deep into winter (extremely Autopian) so swapping the older all-seasons for a set of Wintrac Pros was an obvious move. Matt and I went up to VIP Tires & Service in Vermont to do the swap, which was a lot of fun:
What we didn’t capture on video is the older tires immediately losing traction when we were, ahem, testing them in the parking lot. Then we swapped in the new tires and did the same test again. The Wintrac Pros bit so hard the back-end barely shuffled. This would come in handy when I finally got the wagon up into snow and set up the photo a few paragraphs above. I was positive I’d get the heavy wagon stuck in the snow, but the Vredestein tires are legit great and the car took right off. Check it out:
The tire design is by Giorgetto Giugiaro (yes, that Giugiaro) and the sidewall design is literally the coolest I’ve ever seen on a tire a normal person can buy. We went back-and-forth a lot on what wheel would match the car and tires and ended up on these DTM-inspired Tarmac Pros from Fifteen52 in white. The tire-and-wheel combo made this otherwise stock wagon already look a million times better.

Step One: Measure One, Cut Twice
Why cut the front off? Well: If you don’t, one jump or big compression will crush the radiator. And slightly further back is a massive oil pan. I doubt this is a problem for most owners, but we are going to have fun with this car and will need a skid plate. Any nose dive or off track excursion will smash it. Plus Mercedes, the awesome writer, not the car, is a regular at Gambler and Hooptie-X events and the stock wagon wouldn’t survive.
So I cut everything out but the frame rails. I left the upper radiator support because it helps locate the hood locks and secondary hood release – which no longer exists by the way. I broke it. (FYI Matt + Team: If you pull the hood release at 60mph, the hood is going to open. So don’t open the hood on the highway.)
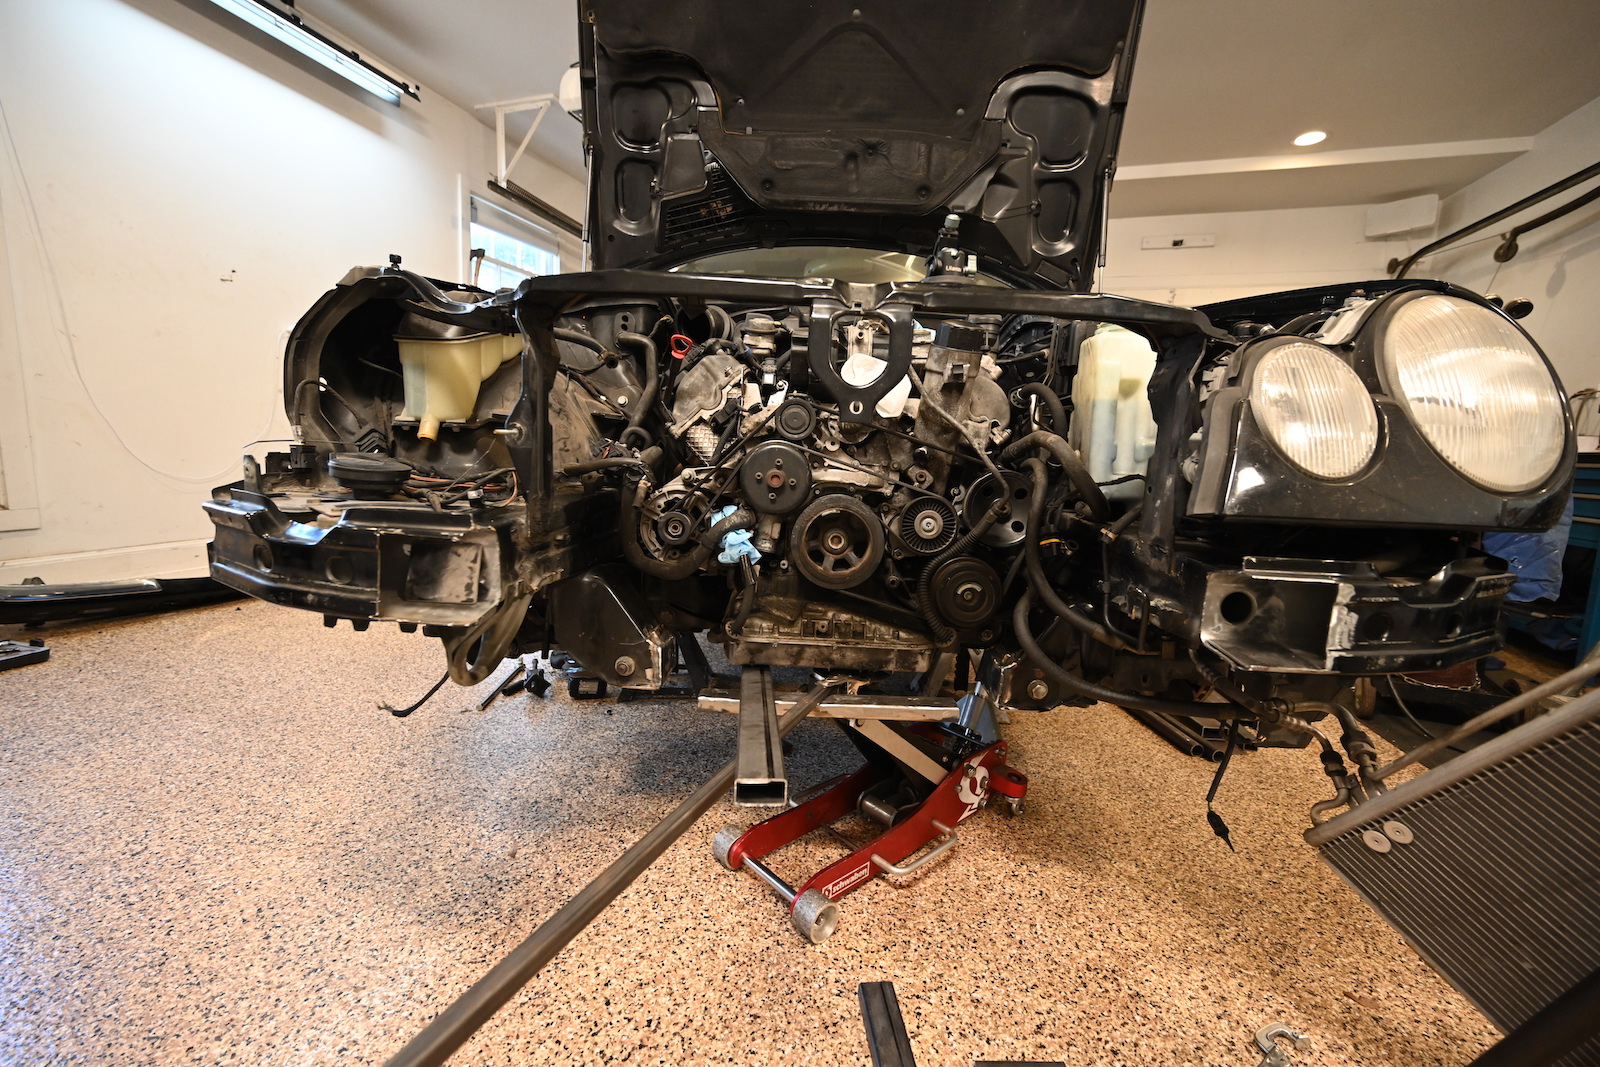
Ideally I would install an aluminum radiator from one of the top brands you see in racing, fit it with a brushless Spal fan, and move on. But we’re not racing Ski-Klasse, and that gets expensive fast. Especially because there’s a transmission cooler inside the radiator, which means I would need two coolers to replace the factory setup. There’s also that old saying “if it’s not broken, don’t fix it!” I should have listened. There’s a possibility that I broke the cooling system by relocating the radiator. I moved it so far back that it’s right up against the engine. I wanted to see what I could do with the stock parts before upgrading, and I might have pushed it a little too far. We’ll find out soon enough.
The front end will be protected by a skid plate, but I still needed to relocate the radiator. There are faster and better ways to mount a custom radiator, but we’re keeping the original one, so we might as keep the original mount. So I cut out the flimsy sheet metal support and added a thick plate across the bottom. It only needs to hold the radiator, but I know how this goes. No matter how much you reinforce a unibody car, it’s going to move on you, so I tried to let the substructures survive on their own as much as possible without modifying them. This means the radiator support only holds the radiator and I didn’t use it to try to reinforce the skidplate.

I also gained a ton of ground clearance as I moved the radiator back because of the slope of the hood — the farther back I pushed it, the more room I would get for the skid plate! So I moved it waaaay back. So far back that I had to cut out some of the hood support. I also needed to shim the auxiliary fan a bit forward into its shroud. It was just a little too close to the pulley on the front of the water pump. I never once heard the auxiliary fan come on, so why not push it? I did check the fan to make sure it worked before reinstalling in its new location, just in case it was broken.

Once I relocated the radiator, I had to make new coolant lines using hose connectors and clamps. It’s not pretty, but it works. If we like this engine setup, I’ll make a more factory looking system. I definitely pushed the radiator too far back. The lower coolant line would need some funky bends to clear everything, so I took the radiator back out and cut up the subframe to make room. You can save money reusing the OEM parts, but it’s going to cost you one way or another.

My solution cost me time, and the patch I made didn’t even come close to fitting the hole I cut in the subframe! Before welding, I refitted the coolant hose and realized I needed to remove even more room in the subframe. No way I was remaking that plate. I just added a smaller plate and welded it all together. It’s stronger than the supporting metal, and once painted, who cares? It’s just a subframe [Ed Note: Subframes see lots of loads, to be sure. -DT]. Same with my somewhat crude attempt to cut the radiator support off the frame rails. It gets covered when the new, stronger support goes back in.
Step Two: Add A Skid Plate Strong Enough To Survive Whatever The Autopian Writers Plan To Do To This Car
After pushing the cooling system back, I started welding in tubes to hold the skid plate, which I made from quarter-inch thick, 5052 aluminum. I would have preferred 6061, but my local supply had 5052 1/4″ scrap and they’re similar enough for our purposes. I can’t bend 1/4 aluminum, so I made it into two rather narrow sections. The radiator is so far back and up that we’re just trying to protect the oil pan at this point, and a narrow plate will be harder to collapse anyway given our tubing setup.
By moving the radiator back, I gained five-to-six inches of ground clearance. This meant that I could move the skid plate up and hide the whole thing behind the factory’s front spoiler. Unless you’re looking under the car, you’ll miss it. A good hit will take the plastic off, but that reinforced aluminum plate will deflect a lot of damage. I didn’t plate the transmission oil pan because it’s tucked up there pretty well. Hopefully it won’t get smashed; plus, there’s been talk of a manual swap in the car’s future, anyway. I figured I’d wait and see which comes first. Here’s a better look; ignore the wires, as it’s a lot of work to wire 16 lights onto a car and I wasn’t done yet!

Step Three: Build Places To Put All These Lights
We gave Hella a wishlist of lights assuming we’d get some of them. We got all of them. Hella sent us so many lights that I was a little concerned. Mostly about the alternator, but as I unpacked them, my concern changed to where am I going to put them? A bunch of the lights were for the roof and my original plan was to make a super cool light bar, but after playing with the factory Mercedes roof rack, I decided to try their cross bars first. They’re lighter than anything I would make and they come off with the twist of two knobs. If I could hide the wire harnesses, I could make the roof lights removable in minutes.
See those blue sunglasses? They were a gift from FCP Euro, but we’re going to need them by the end of the this!

Even with eight lights on the roof, that still leaves another eight for the front and that doesn’t even include the little Black Magics. I like the retro looking rally lights, so we’re going with those, but see those smaller square lights up front? Those are the Black Magics and Hella’s newest technology. They’re crazy bright for their size so I want to find room for those as well. That means 12 lights on the front of Ski-Klasse. There was really only one option.
I made a giant brush guard like you see on the old Safari Rally cars to hold as many lights as possible. Normally, you would mount it far enough forward to protect the car and lights in case you hit something, but our wagon is already 16 feet long. No way I was making it longer, so I tucked it as close to the bodywork as I could. Maybe too close–I’ll explain in a bit.
The brush guard bolts into the frame rails though these machined tube connectors. The machined pieces take the load and the bolts just locate them. You can pull the whole brush guard off with all eight lights still attached by removing just four bolts — it only takes a few minutes. It’s why I wanted to hide the skid plate and use the factory roof racks. With the brush guard and all the lights removed, it might look like a stock Mercedes–if you can ignore the graphics which look awesome in person! I doubt we’ll ever want to pull all the lights off, but if we want store the car long term or ship it somewhere, we can strip it down and have it converted back to a mostly regular E-Klasse in minutes.
I call it a brush guard because it’s only meant to protect the car while holding the lights. This isn’t for ramming barricades in a zombie apocalypse. I can make that too, but it would require a lot more reinforcement to the frame and more attachment points. Much like the skid plate, there is limit with unibodies until you cage them and run tubes forward to support everything. I did my best to strengthen the front end but didn’t want to overdo it either. This will see some track time, but it’s also going to be driven long distances and I wanted to retain much of the safety designed into the crumple zones.
See how nicely the brush guard fits along the bumper? I forgot to insert the trim pieces when measuring. When I was done, I realized the trim pieces are curved and stick out from the bumper. Instead of looking super clean, I had to cut the trim to slide it in behind the tubing.

The next part of the brush guard would block the hood from opening. See how the grill is attached to the hood? It moves up with the hood and would hit the brush guard immediately, so I cut the grill out. That meant I needed to cut the lower trim off the hood too so I could mount the whole assembly to the bumper instead. I made two cuts in the hood similar to the cuts between the two headlights on each side. Later, I noticed Mercedes did the same thing with next E-Class, the W211. The grill still opens with the hood on the next model, but trim stays with the bumper. Our cuts in the hood are really similar!
Step Four: Add Enough Hella Lights To Blind God
It might look like I stuck the lights anywhere they fit, but there is a method to the madness. The long range spots go on the roof where they’ll cover the most distance. I put a yellow set down low with a wide spread for fog and another set slightly higher. All four fogs might be more effective below the bar, but it looks better this way. I put two white spots on the top part of the brush guard to use as driving lights and used the final two to light up the sides of the road for deer. With all these lights, we are going to freeze animals in their tracks if they enter the road. At the very least I’ll be able to see them before they run in front of the car.

The newer LED lights came with their own wiring harness, but I had to make new ones for the eight lights on the brush guard, so I wired each set of lights independently. If we don’t like the way I grouped them, it’s easy to change at the switches. But even with the groupings, that’s five switches I need to find room for: one for the forward roof lights, one for the rear roof lights, then fog, driving, and my deer lights.
I thought about mounting a switch panel below the dash, but this isn’t a plow truck. The interior is so clean and with the ability to hide all our modifications outside the car, I might as well hide the switches, too. So I started taking apart the dash and was shocked how much room Mercedes left back there. I was able to covert the center compartment below the radio into a switch panel and have the door come down to hide it!

I really wanted a sixth switch that would trigger all selected lights to work off the high beam switch, but choose to install a little volt meter instead. It’s wild watching the numbers drop as I turn on more lights! Especially at idle, where the alternator’s output it limited. There are companies that will rewind your alternator or sell you a modified one that puts out, say, 180 amps, but they’re kind of expensive. I believe they’re used for huge car stereo systems like you see in those competitions, but they work well for a ton of lights, too. We might need one in the future or find a way to mount a larger alternator from a different Mercedes. But for now, we have lights!

Step Five: Dial #180 For Rotation
All the lights may make Ski-Klasse look like a rally wagon, but I decided this car needs a hydraulic handbrake, especially because the Mercedes parking brake is a foot pedal, so we couldn’t even pull on the parking brake like it’s a rental. The car is also, as I’ve mentioned, a whopping 16 feet long. If we want to navigate hairpins on snow, we are going to need the car to rotate rapidly at low speeds.
You can’t transfer enough weight fast enough on loose surfaces to make the car rotate without one. You can clutch dump a manual, and with enough engine compression, lock the tires on ice. But our Vredestein Wintrac Pros have a lot of grip in snow and our car is an automatic, so a proper hydraulic handbrake is our only option. I wasn’t going to mount a second set of rear calipers like a pro drift car. Instead, I just ran the rear brakes through the handbrake and installed a switch to disable the ABS. Ideally, I would disable the ABS with a strain gauge switch mounted to the handbrake handle much like ignition cut on a sequential gear box, but that’s a bit fancy, even for a car named Ski-Klassse.
The only problem left was where to mount it. Most rally cars bolt their hand brake to the transmission tunnel. This would be the easiest solution, but with every other modification hidden or easily removable, why mount a big racing handbrake in plain sight? So I started taking apart the center console and realized I could hide the entire system under the factory interior. I even found another compartment that I never noticed. I was trying to take it apart when the lid slid open! A perfect spot for the handle.
I modified the handbrake so I could remove the handle and hide it separately. Then I could close the lid and hide the rest of the system. But why stop there? I decided I could hide the handbrake handle in plain sight if I used an old Mercedes cell phone.

I found the exact model that was originally sold with this car. I took it apart and changed the LED screen to our Ski-Klasse logo. I also welded a flat bar to the handbrake handle and JB-Welded the whole thing inside the phone so it’s solid. With a bit more time, I could drop a Bluetooth cell phone thing inside and pair it to a modern cell phone. It wouldn’t be able to dial numbers, but you could answer calls with your handbrake.

Step Six: Eastbound And Down
While it would be cool to have a functioning old cell phone, I decided a CB radio would be more fun. I bought one off eBay for $20 and it works if you don’t mess with the power leads on the back. The connections are a little loose. But $20 is $20, so I installed it as is and mounted an antenna to the roof. Do truckers even use CB’s anymore? We’re going to find out! I hope they like our handle. “Ski-Klasse”
Just like the handbrake, I needed to find a way to hide the CB. Turns out the cavity behind the ashtray is huge. The whole CB radio slides right into the dash! I somehow managed to hide every modification in the center console.
Step Seven: Power Move
I kept draining the car’s battery during the build. I think it’s because the headlight switch doesn’t end with off. Turn the switch all the way to the left and it turns on a weird parking light on just one side of the car. Other mornings, I found a rear door slightly cracked so maybe the dome lights stayed on? I’m not entirely sure, but the tired NAPA battery was concerning. There’s nothing worse than being stranded for something that’s so easy to deal with ahead of time.
So I bought new battery. Ideally, I would use two batteries with a switch to select between them. I could have a battery for the starting and running the engine and then a deep cycle battery for running the lights and electronics with the engine off, but that gets heavy. So I bought an Optima Yellow Top which is supposed to be a deep cycle battery with enough cold cranking amps to start the car. Hopefully it’s the best of both worlds.

Step Eight: Shock And Awe

I tried really hard to like our suspension. It was soft and plush and floated on down the road. But Mercedes Streeter described it as “bouncy” and as much I tried to ignore the problem, she’s so right. It’s a bounce house on wheels. Our shocks were done. The original plan was to cut the springs, but that doesn’t solve the shock problem so I ordered an H&R kit for the wagon. Because of the rear self leveling suspension(SLS), they only offer springs, sway bars, and front shocks. The rear SLS shocks are integrated into the ride height adjustment. We could remove the whole system like people do with the old BMW 7 series, but the Mercedes parts aren’t that complicated or expensive and the rear rumble seat means we should keep the SLS.

I was able to get the H&R kit delivered the next day, but rear SLS shocks would take over a week from every supplier so I sort of skipped them. I was hoping the wagon was so long that I wouldn’t notice it bouncing up front. Especially with the new front shocks. My plan sort of worked and the car drives so well with the new suspension.
The turn-in is awesome. The front feels planted and I have yet to make it push. The back, on the other hand, is a mess. It sort of follows you until it doesn’t want to anymore. Then it starts starts bouncing so much that it almost unweights itself. There’s also the problem of 80mph speed limits out west — one bump at that speed and you’ll bounce for a mile. Hit another bump at the wrong oscillation from the first bump, and things might get interesting. Panic stop at that speed with no rebound in the rear shocks and it’s going to lift right up and want to go somewhere… (I should have ordered the rear shocks for the first part of the build)
Step Nine: Face/Off
This is the first car that I’ve built for someone else, and I’ve only ever sold two of my cars. I still own all my work. But this car will leave my garage at some point and might not come back. So I should sign it. But how does a builder sign his work? I’ve seen special edition chassis plates like on the Cecotto E30 M3 or special edition Shelby models, but that doesn’t really feel like me.
I tried to hire an airbrush artist like you find at amusement parks to paint the underside of the hood, but it was all taking too long. So I modded the gear shifter with my face! I popped the plastic out and sanded the back coating off leaving only the recessed Mercedes logo. After polishing the sanding marks off using Novus plastic polish, I stuck my face in there. I will ride shotgun forever!

Step Ten: Pimp My Ride
What would you do to car if you didn’t have to live with it? I was told to make it awesome, just don’t cut the roof off! (Well not yet). I considered Pimping Their Ride. Mostly because I keep hearing Xzibit whenever I start flipping the switches for the Hella’s! “I hear you like lights… So we put lights on your lights!”
I also thought about mounting giant horns on each fender, but the front of the car looked so cool with all the lights that I held off. Unfortunately, I already bought the train horns and they’re so awesome that I’ll find a way to include them at some point.
On my last trip to the parts store, I walked through all the aisles looking for weird stuff I could stick on the car for fun. And the moment I saw that super cheap window tint, I had to try it! I’ve always wondered how it looks, but never wanted to try on MY car. So I bought a two boxes of limo tint and their special application spray and tinted the wagon part!
It turned out much better than I would have ever expected. I tried to make the other side even more perfect, but I tried to hard and overlapped the window seals. This caused the bottom edge to not adhere to the glass that well. But the tint is so cheap and easy to cut that I’ll redo it when I get annoyed with how it looks. In the meantime, no one can see any gear stored in the back which is nice.

Step 11: Bring Da’ Noise
I’ve always wanted an exhaust cutout, but never had a reason to install one. I’ve thought about using one on a race car where sounds limit are a problem. It’s not really legal, but it’s a cool idea. Instead of removing the muffler, you would add it back where they test your exhaust.
Our Mercedes is the opposite. It’s so quiet that I can barely hear the engine with the windows down. I assumed it was because of the four-foot wide muffler under the bottom of the rumble seats. it’s huge. It spans the width of the car. I was tempted to just cut it out and drop the weight, but this car is going to cover a lot of miles and there’s nothing worse than an obnoxious exhaust drone for a 3,000 mile road trip.
I was tempted to use a throttle body like I did on Hoonigan’s “Shit Car” but I wouldn’t have time to mount a motor and a pull cable would be a mess running to the back of the wagon, so I bought the cheapest exhaust cutout that Summit Racing sells. It’s pretty nice actually and a super quick install if you can weld. I went with a 2.5″ because it would be easy to drill a hole in the exhaust and weld a slightly smaller pipe onto it. It’s not like we’re running a turbo and need more exhaust flow. I just want it to sound awesome. But not on the highway while roadtripping to music and podcasts.
The cut-out sounds cool when opened up, but I expected a lot more. I wanted it rumble at idle and roar at redline! Instead, it sounds like stock Mustang. I could mount the cut-out farther up, but now that I realize how useless the rear muffler is, I’ll probably just cut the whole thing out. Then I can lower the foot box for the rumble seats to house adults while cutting some overhang weight. The wagon has rear self-leveling suspension so it handles the weight well, but weight is weight, and less is better.
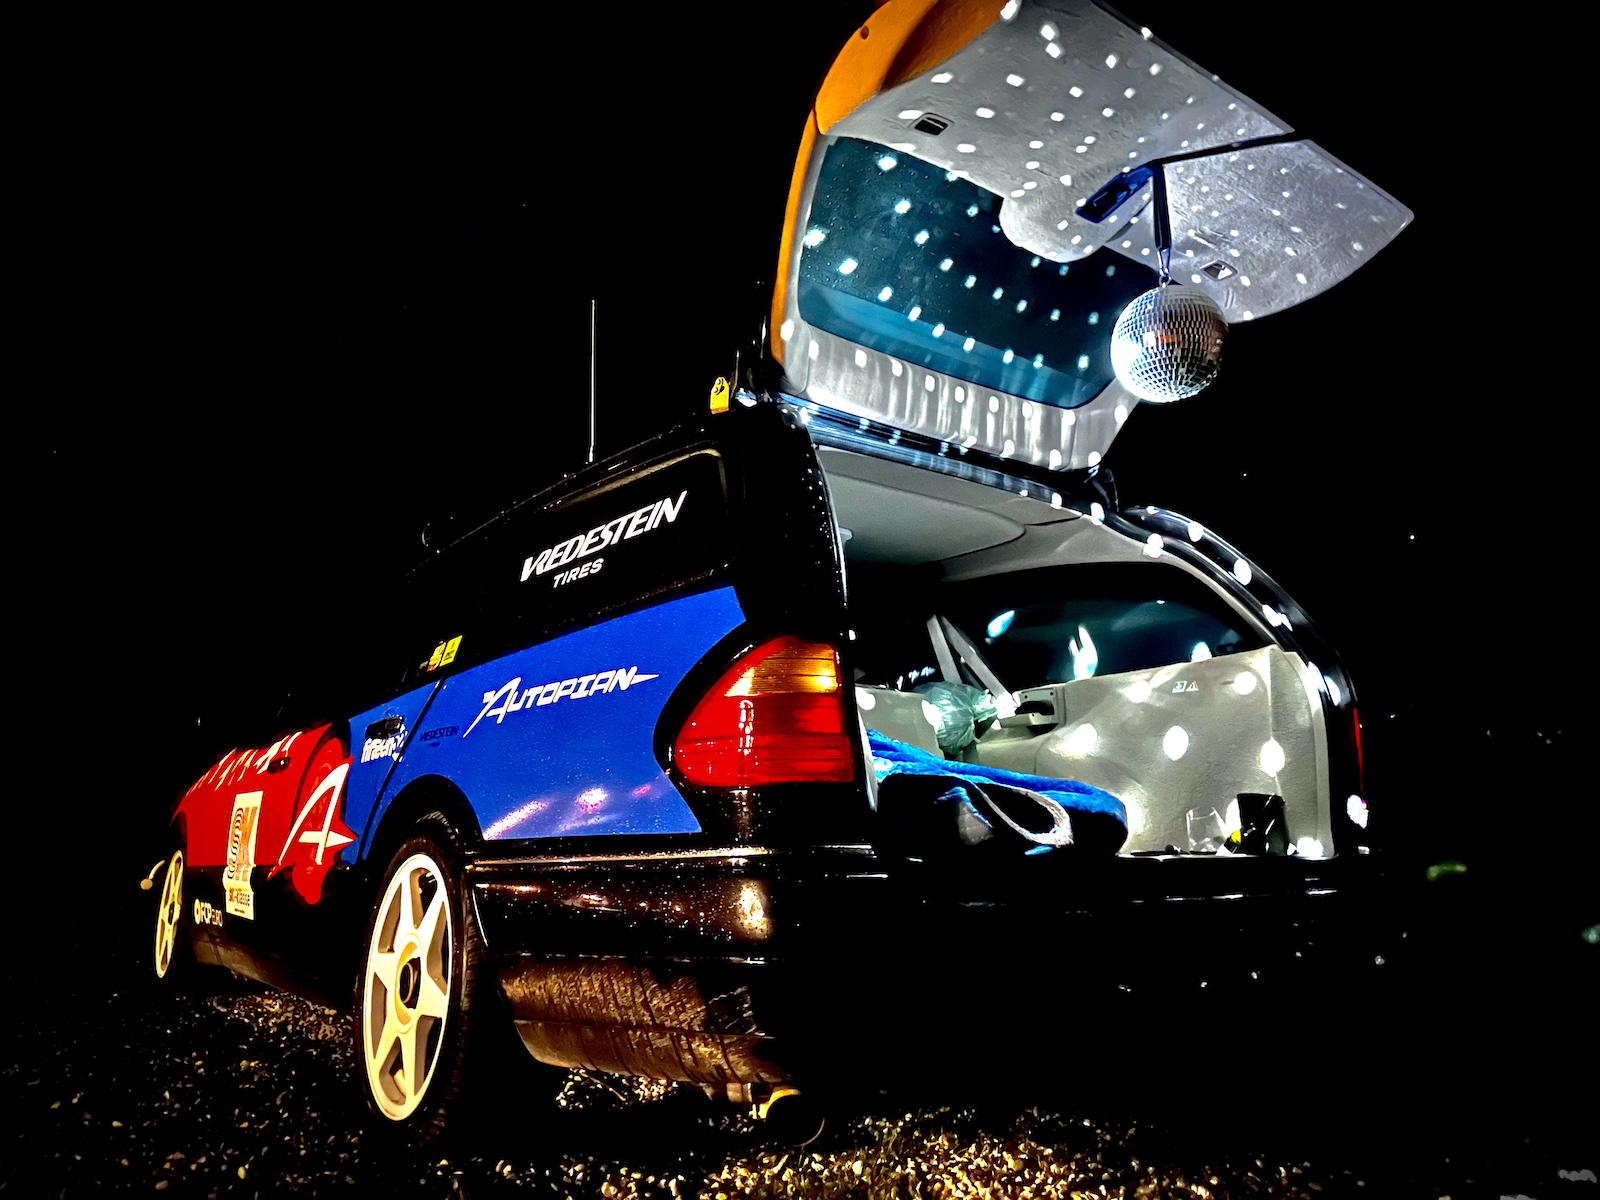
Step 12: Disco Ball Time
Disco balls weigh nothing and they make everything awesome! It’s so fun to sit in the back and watch the lights while listening to music. I love it so much that I’m expanding this concept. I want to use the Hella Black Magic lights to disco ball an entire parking lot. They should be bright enough. We might need sunglasses to sit back there, but look how good this looks! More cars should have disco balls.
I also rebadged our E-Class into SKI-KLASSE. It looks a lot better at ten feet. Promise. I tried so hard to line them up with tape but there is no way to make it perfect. I should order a custom badge, but when I saw they had enough letters at my local parts store to spell Ski-Klasse, I had to try!
![]()
So, there we go. I made a car for someone else. It’s not perfect, but neither is anything about this site. The next installments will run through some of the specific upgrades in detail. Then we’ll go into the testing phase. I want to hand it over to The Autopian staff to see how they drive it, what can stand up to their driving, and what doesn’t work. Will my cooling system upgrades measure up to David’s standards? We might even throw some Pinza A/Ts on it and take it off-roading or rally-crossing. The sky is the limit. But we’re not dropping the disco ball. Never.
It took a little longer than I hoped and so I had to drive extremely far to get a picture of it in the snow and found maybe the best road no one talks about, but that’s for a future story. For now, check out our Ski-Klasse and let us know what you think. [Ed note: I think it’s awesome and can’t wait to drive it now that it’s (mostly) done! – MH]


Rubs hands together…
Time to see if an old Mercedes can beat a Jeep Renegade in a time trial.
You’re not that old.
That’s a dinosaur of a joke.
And I just hit it out of Jurassic Park.
Perfect with the user name. Thanks for the laugh.
I’m adding two more support bars to the skid plate tomorrow! I built it strong. But Im totally nervous now!
Just got to read the whole thing, bravo Bill! I nearly woke up my partner when I saw your custom shifter design haha, WITNESSED
Simply phenomenal. Bravo, Bill!
It took me a few days to find time to read this whole thing at once. So worth it. What an awesome job and great article. I’m so jealous!!