
A couple of weeks ago I launched a project to restore the 1972 Yamaha U7E motorcycle that’s been sitting in my garage for years. I’ve finally started tearing it down and examining how much work that I have ahead of me. I have good news and I have bad news. The good is that I found an interesting alternative to carburetor cleaner. The bad? Not even Yamaha knows about this motorcycle’s history.
When I started this project I promised weekly updates. I do apologize for missing my own deadline. Between the holiday and a press trip I’ve rarely been home. But I am now, and that means we’re going to be turning some wrenches!
More On Its History

After I wrote my introduction to this project I reached out to Yamaha. Usually, the manufacturer of a vehicle will have something on hand, be it advertising materials, press materials, manuals, or perhaps even just images. For example, Volkswagen was able to give me service manuals for the Phaeton that I used to own. ZF was able to lend its knowledge for my RTS bus’ transmission. But for whatever reason, Yamaha doesn’t seem to have much of any records on the U7E. My contact with Yamaha searched the archives and even had his Japanese counterpart search the archives. They found nothing.
But we do know that the Yamaha U7E was definitely a thing since Yamaha printed service manuals for the motorcycle. Unfortunately, I may never know how many of these were sold, why it was given the name that it has, or why it was such a short-lived motorcycle. It also means that from here on out, my service manual for it is practically my bible.
Inspection Time

Back when I repaired old motorcycles for fun, I always started with the carburetor. I’ve found that hearing that engine run, if even just for a few seconds, will motivate me to move forward on a project. So I actually try to get a vehicle running before I do anything else.
For this Yamaha, I started with removing the leg shield. If you’re not a motorcyclist and you’re wondering what this is for, it’s to keep the rider clean. Motorcycle tires kick up some dirty stuff from oil, water, rocks, or anything else on the road. Part of the appeal of these kinds of small motorcycles is that the rider can commute to work–perhaps even wearing a business suit–and be relatively protected from debris.

The shield is held on with six bolts. In my case, they were barely finger-tight. Perhaps most importantly, I found no rust on them or in their threads.
However, upon removal of the leg shield I did discover that the motorcycle’s frame is a smidge rusty. This doesn’t look too bad and I think a visit from the wire wheel will clear this up. On the other side there’s just bare metal that hadn’t yet started to rust. If I had to wager a guess, the leg shield probably rubbed the paint off in this area over time.
At any rate, there’s also the carburetor in all of its adorable glory. There’s supposed to be a Mikuni VM15SC here, but in 2014 a motorcycle shop installed a Dellorto equivalent.

Removing the carb is easy. I started by opening the airbox and pulling the stiff intake hose off of the carb. Then I loosened the clamp holding on the carb and it came off with only nearly bloodying my knuckles.
When I bought this motorcycle, its owner told me that it wasn’t ridden after the visit to the shop. So the fuel in the tank and the carb has varnished. The fuel had not just varnished, but it wasn’t even a liquid anymore. And once I further exposed the carburetor to air the smell was pungent.

Admittedly, this fuel system is a bit worse than I’m used to. I’ve owned 20 to 30 motorcycle projects in my life, but I was careful in choosing each one. I usually went for the ones with dry tanks, missing carbs, or fuel systems that didn’t seem too far gone. When it came to getting those motorcycles on the road, getting them started was sometimes as easy as spraying a bunch of carb cleaner into the carbs without even taking them off. Other times, I removed the carbs and threw them into a bucket of carb cleaner.
This is a little too far clogged up for easy operation like those. I long thought that this motorcycle didn’t have a throttle cable, but the truth is more awful than that. This motorcycle does have a throttle cable, but it was jammed from the throttle valve essentially being glued in place by varnished fuel.

It took a lot of prying with a screwdriver to free it. That’s when I realized that this carburetor was going to need more than a few sprays of carb cleaner.
Moving on, I decided that since the leg shield is off I should remove the mudguard. I have a replacement at home that’s in great shape and would make the motorcycle look a million times better. It looks like four screws hold it on. Two came out easily, but these two are a bit of a pain.

They could be removed with a wrench, or if I’m willing enough, I could remove it with a socket if I remove the wheel first. I will probably have to remove the wheel, anyway, considering that the tires are likely a decade or more old. I decided that I’ll get back to that at a later date.
Out back, I popped open the seat and looked into the oil injection system’s tank and the fuel tank for the first time.

The oil injection system is completely dry. I expected that, since the last service record noted that the system was inoperable.
Sadly, the tank doesn’t look as clean. There appears to be a mix of rust and varnished fuel in here. But the metal seems to be solid, so this might just be a case of cleaning all of that crap out of there.

My plan for this is to remove the tank, tape it up, then fill it with vinegar and metal bb pellets. Then I’ll give it a good shaking. A part of me is thinking to just tie to something that turns and just let it rip for a few hours. I’m taking suggestions here on what to do. I’ve never actually removed this kind of stuff from a tank before. Usually I just covered it up with fuel filters. But I want to do this right.
Since I was already there, I removed the side covers. I have fresh ones waiting at home in the correct color.
Back at home base, I decided to first tackle the carburetor by giving it a cleaning. To start, I disassembled a carb for maybe the third time in my life.

The floats were stuck and old fuel coated the whole thing. Each jet was definitely plugged. But thankfully, it wasn’t nearly as bad as the gas tank.
I don’t have any carburetor cleaner on me, but I do have a gallon of pure acetone for some reason. So I took my fiancée’s unused coffee mug, filled it with acetone, then dropped the carburetor into it.

[Sheryl’s Note: Oh, well I guess I don’t have a mug anymore.]
I’ve read that using acetone is a good way to clean a carburetor. Using acetone overnight will supposedly even remove the tarnish!
Well, after a night of cooking in acetone the tarnish wasn’t gone. But the acetone did break down the hardened fuel. The jets are now freed up and the float now works. The jets look no different than when they went in, but they’re no longer clogged!

And the leftover ruined fuel was removed with just a hint of a scrubbing. I’ll probably end up buying a jet kit (or maybe a whole new carb) at some point, but I’m happy with the result. I put the carb back into the acetone bath to see what letting it stay in a little longer will do.
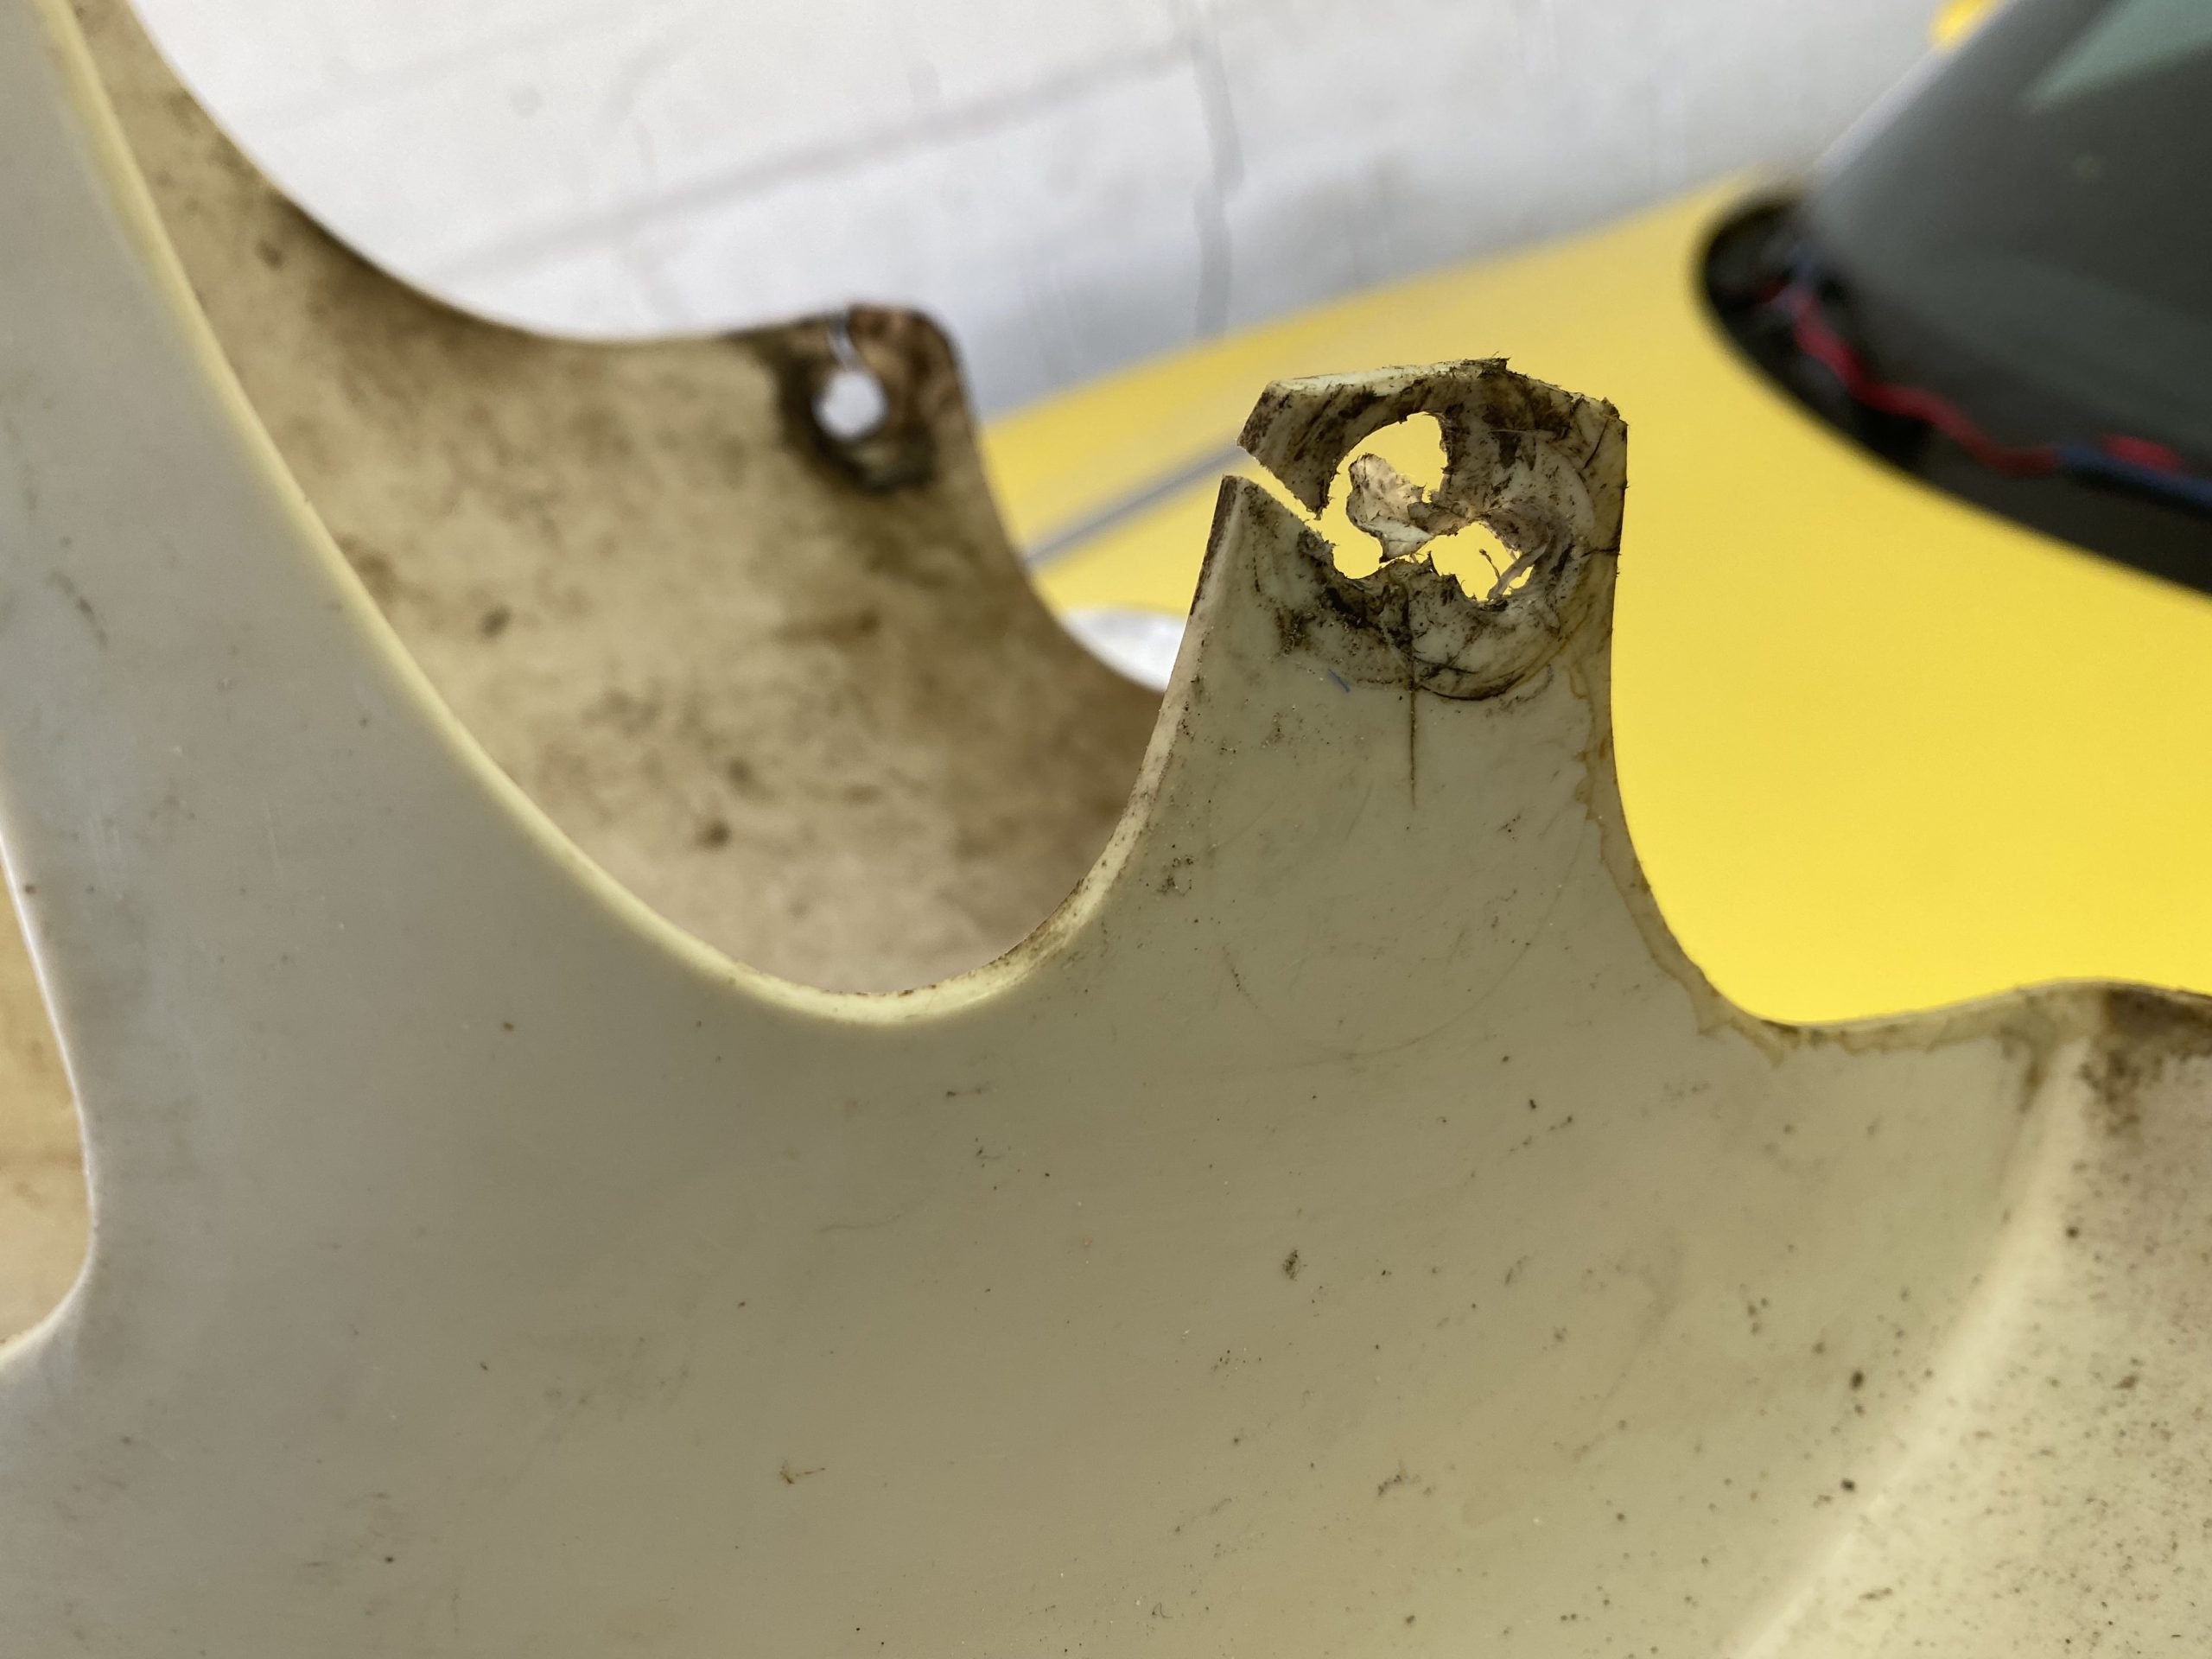
Oh, one more thing. The leg shield looks to be in pretty good condition. Check this out:

But I don’t like how the mounts for it look. I have an idea to fix this using resin…maybe? I’m not sure how to go about this. Maybe use some fender washers then send it? No, there has to be a way to reinforce this.
I’m also looking for ideas for this, too.
Next week, I plan to tackle the fuel tank. Then, with luck, I’ll put some fuel in it and maybe, just maybe, it’ll fire for us. Will this motorcycle sing for the first time in over eight years? I sure hope it will!
(All photo credits to the author.)


Don’t know how I missed this earlier!
That lead picture took me down-way down-memory lane. The third time we lived in Japan was from ‘77-‘80 in Nagasaki. We lived on a fairly steep mountain overlooking the bay where Dad worked at the Fuji shipyard, and there were little 50 & 75cc bikes everywhere. The delivery guys were all over on them.
The memory is of the 1 time it actually snowed there- about a 1/2”-and I was walking down to a shop when I heard a familiar ( I’m from the Midwest ) sound: someone just letting it eat. Went the other way, and peered down-and I do mean DOWN- the steep road. Some poor delivery guy with the familiar 3-tiered rack of soup bowls suspended from a tall rod behind him was having a tough time: just sliding the rear back-and-forth and not doing well. I ran/slid down to him and tried to tell him to let up ( “skoshi yo!” ? -I don’t remember much Japanese now ), and started pushing. I yelled at a couple guys gawking ( Gambatémasho! !) and shamed them into helping. With 3-4 of us helping we made it to the top to effusive thanks.
I managed to convey to him that he should NOT ride down that hill in the snow: ‘ I am Gaijin. I know snow ( yuki )! You will hurt hard!’
No one will read this missive, but I sure enjoyed the trip. Thanks!
-formerly Recovering Gaijin over at that German lighting site
The Sheryl’s note made me smile. Hats off to the partners of motorheads everywhere. We have caused them so much pain and they still love us.
One of the most therapeutic things of my life was rebuilding a Concours rack of Carbs.
(Editors note: Please for the love of Chrysler put me out of my misery -DT’s Jeeps)
Hello I just got one just like it. I need some help on battery info. Hopping to get it running soon.
I think the bike looks a lot better without the leg shield. My Honda Monkey doesn’t kick up a lot of road schmutz, and that appears to have about as much protection as the u7e without the shield. Why not leave it off?
So acetone worked on the varnished fuel. Great! But what inquiring minds really want to know is did the acetone clean the coffee stains from Sheryl’s mug?
I just put straight dishwasher detergent in mine with some hot water- comes out beautiful
Mercedes – Listen to me good here
Buy an ultrasound cleaner on eBay/Amazon/whatever
https://www.amazon.com/VEVOR-Commercial-Ultrasonic-Capacity-Solution/dp/B083LNXKJK/
Listening to them run is annoying, but you get most of the bulk crap off with a spray, you drop it in your favorite solvent, then you put it in the cleaner and you leave it alone for half an hour and you’re done.
You don’t have to fill the entire basin with solvent either, you can fill a jar or whatever with your parts and cleaner of choice, then fill the rest of the basin with water. 100% game changer for small to medium parts.
Those things are fantastic. I clean carbs, my mountain bike drivetrain, and basically anything else I can fit in it. I have a gallon jug of orange Zep degreaser (careful with the color, purple will ruin the finish on aluminum parts) that I dilute into water (not the whole gallon, I shoot for about 1:10). It works well enough that I haven’t really messed with anything stronger.
I will say that even the orange degreaser will discolor some parts if you leave them in too long. I once ran the cleaner on a PCV valve and didn’t get back to take it out until the next morning and it had turned pretty black. It still rattles like it’s supposed to and I only kept it as a backup in case of emergency so I don’t care that much, but it’s something to be aware of.
A good start, Mercedes. But I second the “run pre-mixed fuel until you are certain the oil injection system is working” and the “coat the fuel tank properly after cleaning” advice provided by others.
I’m surprised not to see a mention of Kreem fuel tank liner. That’s been the go-to product in the motorcycle world since the stone ages.
Put some BBs in the tank (I always used pea gravel), wash it good with detergent, heat it until bone dry, and then treat it with Kreem. You’ll never have an issue again.
I’m not sure what’s compatible, but new carbs start at about $30 on Amazon. Since it’s not original anyway, I wouldn’t have even bothered to unstick a little thing like that, much less take the trouble to clean it. You’ll might even be in more than more than $10 in solvents and gaskets by the time you’re done.
Holy shit, I just checked… …carburetors start at under $15. Almost unbelievable. It’s a crazy world for small engines right now.
I have found that a lot of times you get what you pay for with those cheap knockoff carbs though. I’m batting about .500 with them – my trimmer and one snowblower have them and work great. I bought one for another snowblower and a lawn tractor and they both had serious problems (one had a janky float that I suspect was the wrong one for that carb, the other made the engine hunt no matter how I adjusted it). In both cases I used a couple of parts off the bad new carb to rebuild the old carb and made it work, but if I wanted to do that I could have just bought a rebuild kit.
[Sheryl’s Note: Oh, well I guess I don’t have a mug anymore.]
Nah. Shake it out and run it through the dishwasher. It’ll be good as new.
At the shop if I had a valuable tank I’d use a dawn solution, The stainless steel pins they use in tumble polishers and an old paint mixer I rigged to run slow. There’s a bunch of ways to do it, but you have the toxic waste issue if you do it at home.
have used evaporust, and small nuts and bolts in an old 8HP Briggs from a generator.
Made an upscaled rock tumbler where that tank was clamped between two plywood disks using some allthread rods
Very noisy, but bery clean. I like the more robust cleaning, as if there is a weak spot, I want to find it while cleaning, than a year or two later when it fails.
After all that, soda blast the outside, and then use that fuel tank sealer on the inside and then repaint.
Better than new.
My first bike was the 50cc version of this model in blue, V50 was the model, there was a V70 and V90 all three speed manual with centrifugal clutch and a two speed automatic. I wrote it off under a car after three days! After acquiring a second hand frame,forks and front wheel it was resurrected and became my back up bike when my British motorcycles weren’t on the road! So how does your U75 differ from the V models,perhaps it’s an import?
Since it’s a 2 stroke you’re gonna want to be sure the oil injection is working. It would be a good idea to premix fuel for the first gas tank or 2 as you watch that the oil tank is going down at an appropriate rate. Yes, this will result in oil rich operation but that won’t hurt much other than maybe fouling the plugs some. Better safe than sorry.
With the plastic mud guard, find someone who owns a plastic welder and rebuild the damaged area. I have one here in Southeast Kansas. Easy-peasy!
Have to find out what kind of plastic it is, first. Could be something like a thermoset polyurethane that won’t plastic-weld.
I was replacing the lifters (hydraulic lash actuators, if you want to be pedantic) in the Miata yesterday, and the new ones I got showed up seized. No action at all, couldn’t get ’em to move even by blowing air into their oil passages at 150 psi. This, after I’d left them soaking in oil for a solid week.
So, after a bit of Googling, I boiled them in motor oil. I got my backpacking pot out (not wanting to use good cookware), put the offending lifters in it, covered them in 10W-30, and heated them to 250°F on the stove. Using a meat thermometer, I held them at that temperature until air bubbles stopped coming out. I then let them cool down, observed that they were now nice and sproingy with lots of travel, and installed them.
Lifter tick: fixed.
I just went thru this with the Wife’s Honda Elite 80. I bought a new carb though. All I had to do was adjust the idle. $45.00 on Amazon. Then the vacum petcock failed. Another $10.00 Rinsed out the bad gas. Ran great, Sold it.
If you can get a cheap carb for it don’t bother cleaning what you have. You might still have a bit of varnish in the jets. Time vs Money
Rest in peace Sheryl’s coffee mug. Thank you for you sacrifice towards getting a cool old bike back on the road.
Sheryl’s coffee mug took one for the team here. Seems like Sheryl deserves a really nice coffee mug to remember and honor her previous, cherished, now relegated to the garage, coffee mug.
I usually use glass or metal containers for stuff like this. Ceramic is relatively porous, but with glass and metal you can just clean it real good and it’s like nothing ever happened. Metal pots get a scouring, glass doesn’t even need that.
https://www.amazon.com/Berryman-Products-0996-Arm-Chemical-Fluid_Ounces/dp/B077Y1YSZ5
I’ve done the vinegar/BB trick on an old Honda CB125 tank that was rusted out. Worked really well actually, just took a decent amount of time.
After loading it up with the BBs and vinegar, I’d give it a good shake, and then just let it sit for half n hour or so. Walk by, shake again, sit. Repeat over the course of a day or two, and it was pristine on the inside…..Ok maybe not pristine, but miles better than before, and no flaking rust was left, just a bit of pitting and surface that I couldn’t reach.
After flushing it fully with some gas, I think I ran through a couple of fuel filters after the first one caught the remaining particulate that I couldn’t flush out, but otherwise it was perfect for the few years I had it afterwards.
My son works with jewelry and he tumbles some stuff. I was looking at his media and was just thinking it would be great for nasty car parts. It’s something like “stainless tumbling media” and it is a mix of shapes that look like it will clean anything up.
Head over to polyvance.com ( they used to be known as Urethane Supply Company ) they have all sorts of tips on repairing plastics including identifying WHAT you are trying to repair and helpful tips on carrying out the repair.
I have one of their Mini-Weld Model 6 Airless Plastic Welder 5600HT and it is worth its weight on gold, ( its been replaced by the Model 7 5700HT ), especially once you figure out you can make custom welding tips from regular brass bolts.
[Sheryl’s Note: Oh, well I guess I don’t have a mug anymore.]
Or Now you are going to have a new one
Now I want editors notes from all the partners of the authors. We can sub DTs with ones from his mom or something.
Maybe his jeeps have something to say?