
Autopia! I, Charles, the Last Defender of the Knights of the Terrible Van, have returned from my glorious voyage of conquest (by which I mean silly robots in Las Vegas) with tales of triumph (no, not that Triumph). No, I can’t tell you if I won or not. You’ll have to catch the new season of Battlebots starting Jan. 5th on Discovery Channel. But what I can tell you about is the story of how I installed an all-eBay and Amazon twin-turbo system in the least likely vehicle possible: a derelict 1990 Ford Econoline with the much celebrated (or maligned) International Harvester 7.3-liter diesel.
The Internet of Cars really loves to perk up whenever they hear twin-turbo anything… until they see what it is and how I did it.
[Ed Note: Read our intro on Charles here: “I’m An MIT Enginerd And Battlebots Geek And This Is My Weird Van Collection.” -DT]

I approached this mockery of automotive engineering knowing slightly more than nothing about turbocharging and walked away with an abject abomination that looks like serial murder and sounds like a freight train on a takeoff roll at Hartsfield.
The Trifecta of Terrible: A Turbodiesel Ford Econoline
In 1983, the year of the Video Game Crash, Ford introduced the 6.9-liter Navistar International IDI diesel engine for the F-series pickup trucks and Econoline vans. It was touted as an ideal towing and heavy load engine with better fuel economy than the comparable gas engines of the time (the 5.8-liter Windsor engine and 7.5L 385-series big block, specifically).

Descended from the finest American tractors produced by International Harvester, the IDI promised such whimsical fantasies as “Having 26 more horsepower than its competitor”, presumably the 6.2-liter Detroit Diesel sold in General Motors products.

They don’t even bother with the 3-speed automatic figures. It’s too embarrassing.
Oh, to openly publish an incredible 20-second 0-60 time again. What an age of humanity!
With Powerstrokes and Duramaxes and Cummins (oh my!) today pushing 1000+ ft-lbs of torque and hurtling 3500 class trucks to highway speeds in seconds, it’s easy to forget: back then, diesel cars and trucks were extremely slow by nature and this was okay.
Now, diesel engines are inherently bigger and heavier than their similar-displacement gasoline brethren. The additional block material, larger diameter bearings, thicker cylinder walls, etc. needed to survive much higher compression ratios and pressures inevitably contribute to engines that could weigh a literal ton for how much power they produce.
For example, the Ford 460 big block gas engine of a similar year weighed 720 pounds dry. The 6.9 IDI tipped the scales at 880 pounds. Add in accessory drives such as a vacuum pump (as diesel engines don’t produce manifold vacuum), glow plug wiring, steel injector lines, and the requirement for two batteries instead of one, and things get stuffy fast. In the already legendarily unserviceable Econoline engine bay, it takes up practically the entire volume under the engine cover (aka “doghouse.”)
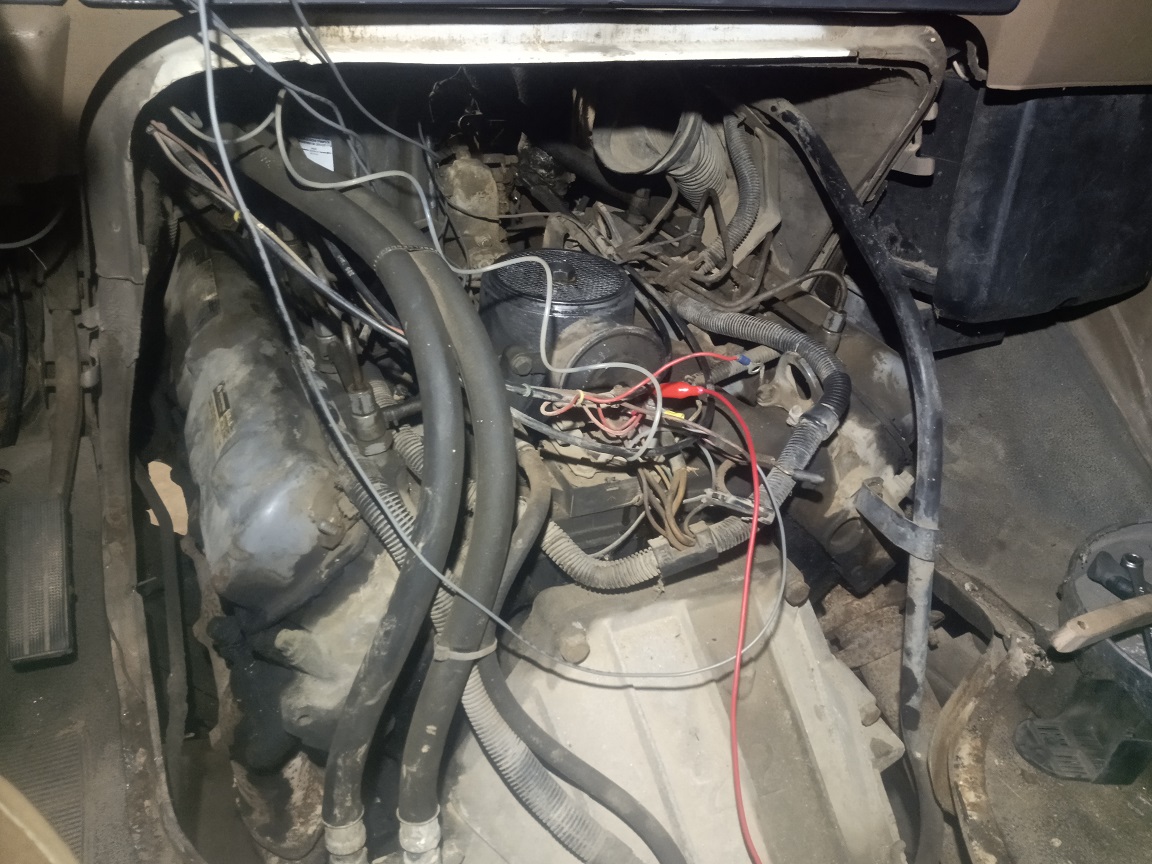
Having adopted my first IDI van in 2020, I became convinced you weren’t ever supposed to service these — just operate them for your fleet for 50-60,000 miles and junk them at the first sign of a problem. The air cleaner pressed up against the fiberglass batting insulation on the ceiling of the engine cave. The fuel filter seemed to require removing the air conditioning compressor to get to it. Replacing the glow plugs needed some kind of Olympic-tier contortion and a Ratchet of Many U-Joints.
I came to enjoy the right lane on the Interstate, with the van’s C6 three-speed non-overdrive automatic transmission basically maxing out around 65 mph. The adage around the IDI community is definitely true: it’ll tow or haul anything you want, anywhere. Eventually.
When I adopted my second IDI van (and second Centurion vantruck) Spool Bus, one of its touted features was a turbo system. Aftermarket turbocharger setups were extremely popular before the age of factory turbocharging for light truck diesels in the 1990s, and with its history as a hotshot delivery truck, I can certainly see the upsides. The IDI is known to tolerate moderate boost well without any modifications, benefitting the fuel economy department significantly (as the additional air charge helps complete combustion of fuel), and giving you that ever so valuable extra herd of horses.
What I didn’t expect (remember, I bought it practically sight unseen) was how the aftermarket turbos fit in the van chassis:
There’s a great explanation here on the minutiae of different van turbo kits, but the bottom line is they all use the only remaining volume in the engine hole: Immediately above the transmission bell housing adapter and under the cigarette lighter. Maintenance and service become even more impossible as the turbo and piping need to be removed to access the injectors and glow plugs. No amount of heat shields and blankets will prevent the Abyss of Misplaced Paperwork in the doghouse from being able to cook hot dogs as you drive. Trust me here: I’ve done it.
Not to mention, to install these kits all sorts of “Cut This, Move That” have to be performed, such as drilling holes in valve covers and arcane rerouting of hoses, all to accommodate the awkward placement of the turbo. And finally, without any meaningful space left to run charge air back and forth, all of the kits are non-intercooled and non-wastegated, which limits their potential as the turbo has to be sized carefully to not overboost.
So there you have it. Three reasons why a turbodiesel Ford Econoline is the absolute worst thing on the planet:
- The IDI and its support gear fill up the entire underhood and engine cave volume
- Adding a turbo on the top side makes any service practically impossible
- And then it’s still slow

The key to working on a van is being able to “wrench by proprioception” – out of your line of sight with only your mental model of the area to guide you and knowing exactly what shearing the bolt head off feels like.
As time drew onward and I became accustomed to how Spool Bus drove (I even got adventurous and turned the fueling up just a little), I began to think about ways I want to change the status quo. I was basically using these two IDI vans to build up experience working on them before attempting to swap the perennially-dying 460 gas engine out of the white Centurion.
I found the idea of just buying or imitating the Banks/ATS style “above-board” van turbo setup patently unacceptable. Having messed with enough Econolines by now, I know there are some unused pockets of space under the cab, around the back of the engine. So then if you invoke the “Every part in a Ford Econoline is 0.25 inch away from every other part” design mantra of the original engineers, there was an opportunity to put two smaller turbochargers in this space and just join their outputs together.
And so, without an agenda of wanting to produce the fastest this or coolest that, my nature took over: How do I build up a turbo IDI van in the most incorrect and cringiest way possible?
The goals of the experiment were set:
- Explore twin low-mounted turbochargers for the 6.9/7.3 IDI vans using the space between the engine and transmission and frame rails
- Design for “minimal invasiveness” installation. I think I’ve identified areas where I can improve on tapping into existing oil feed and return spots, air hose routings, and whatnot
- Make maximum use of what I call “commoditized” parts. No brand-name systems and catalogs here! I’m going full Amazon flea market tier, only stuff of questionable quality and uncertain provenance
The Vanchurian Candidate
Having sold the first IDI van I bought to a local Atlanta artisanal urban gardening startup late in 2020, I was on the hunt again for the perfect experimental subject. It had to have an odd combination of traits. I needed it to be used up enough that I wouldn’t try to just fix it up and sell it (They have a strong following with apocalypse people because the IDI can run off just about anything greasy, like many old all-mechanical diesels), but it had to be plausibly driveable. So, no literal wrecks and salvage yard specials either.
These needs greatly constrained the choice, because they’re rare to begin with and ones you can find on the Zuckernet will be either very well kept or…

…stored under a tree for a decade in someone’s yard. I found my perfect subject all the way over by Lexington, Kentucky. For a mere 500 dollars and a half hour spent chasing hornets with brake cleaner spray, I made someone else’s life a lot lighter and mine far, far worse.
This was a 1991 van, the last year of the “bullnose” 1980s Ford body style. By 1988, the 6.9-liter IDI had grown to 7.3 liters but was fundamentally the same on the outside. It was clearly a beater farm truck for years as the undercarriage and much of the engine was completely coated in a composite material of dirt, oil leaks, and plant matter. Hay and animal hairs covered the interior, and I found no less than four snake skins in the engine bay and around the cabin. I was, in fact, very scared of imminently finding the snake. For all of its traits and flaws, this van was codenamed Snekvan.
A/R, Inducer, Exducer, Trim… What Do The Numbers Mean?!
I was ready to dig in and start ordering parts, but then I remembered that I know nothing about turbocharging.
You heard that right — my very first turbo project and it’s going to be a twin setup on what’s basically a family-friendly tractor. I found that most of my networkable knowledge (“car people” friends and The Internet™) was only applicable to gas engines, and a lot of people professed to not knowing how it would translate to diesel. I was on my own.
I found a great resource in Garrett’s Turbo Basics tutorials and also read more about IDI turbo systems on IDIOnline. Browsing diesel owner’s forums provided some more trivia nuggets about specific turbo models and setups. Although much of it was anecdotal and bordered on “Carburetor Guy” advice, it still fed my converging model of the design space.
Basically, I gleaned the following:
- A/R (Area-by-Radius) Factor: How tight the snail’s shell is; dictating the shape of the turbine or compressor housing and how quickly it tapers larger and smaller. Primarily dictates the maximum flow capacity of the turbine or compressor housing.
- Inducer and Exducer Diameter: The size of the two ends of the compressor or turbine rotors. For the compressor side, the exducer is larger, and for the turbine side, the exducer is smaller.
- Trim: A conveniently packaged way to describe the Inducer to Exducer size ratio, such that you can quickly compare two turbos of the same size class. Along with the A/R ratio, dictates where in an engine’s powerband the turbo is most efficient.
- Compressor Map: A visualization of the effects of the above variables allowing you to determine if your engine’s airflow and boost pressure needs will land in a favorable operating zone for that model turbo.
Garrett also offered a Boost Advisor tool where you could input your engine’s parameters and presumably it’ll spit out part numbers you can buy. The problem is, I could never actually get it to work.

Maybe my needs are just that nonsensical. Nonetheless, the airflow and pressure ratio (how many times higher than atmospheric pressure you’re boosting to) numbers seemed to be valid. I decided to try and find some compressor maps for common turbo sizes and plot those numbers.

Using ½ of my “corrected airflow” value (since there will be two of them!) and the pressure ratio that the Garrett Boost Advisor gave me, I found out that using the “Average eBay Turbo” my operating regime seemed to fall in a very conservative zone. Ideally, the right “X” will be more towards the upper right of the curved lines. I figured for a product of completely unknown provenance, taking it easy was the better idea.
Speaking of the “Average eBay Turbo”, I was also doing a market survey at the same time.

There’s a long-time informal heuristic I’ve followed which I term the “Law of Chinese Product Packaging Inertia” – that is, if the Chinese product ad looks about the same as any other, chances are it’s actually the same product and the truth is a weighted average of all of the specifications. I gathered that the majority of nameless eBay turbochargers were a knockoff of the Garrett T3 and T4 sizes, with the compressor side being from a T4 size and the turbine from a T3 size.

What? Alright, I don’t claim to know why they settled on this “hybrid turbo” (their words, not mine) as the product to genericize. Some of my friends speculated it was so stance kids could claim to hit massive boost numbers for a brief glorious moment before their VQs launched their heads across the In-n-Out parking lot.
I next activated my second law of Chinese product purchasing: Never buy the cheapest option, always the second cheapest. You don’t want to know what the cheapest one is made of, but chances are the next one up is a real gem!

This is what came in the mail. A pair of “TURBONE” (really?) units, 100% identical to the product listing. Most of those listings have brand names or badges scrubbed off, presumably so the same product can be sold in many markets and listings.
And there were two! These were $125 a piece from the eBay House of Speed. You can find these things for sale varying up to $200-300 per unit. For all I know, those are the exact same products, but maybe with a one-room U.S.-based stocking and support operation.
I definitely noticed some manufacturing shortcuts with these. They didn’t come with a gasket between the wastegate housing and the turbine (I was under the impression there should be a stainless steel or layered graphite gasket there). The aluminum compressor housing casting had some extraneous material, like a chunk of the sand mold fell off. The casting holes were also not very well aligned with the profiles, making the sections all sit a little off center from each other. When I took it apart, though, everything seemed to be well finished on the rotors and shafts, with no play in the bearings.
You know what? I love them. That I could buy a couple of brown rocks and cups of oil from the other side of the world that had been lovingly crafted into precision turbomachinery for $125 a pop is already a testament to Man’s Hubris. Enjoy it while we still have “natural resources”, because it won’t be forever.
Building the House of Snails

My first episodic challenge was making sure these things could fit where I thought they would. On the driver’s side, things were actually quite pleasant. You see, the IDI exhaust manifold exits straight downward here, and there is a (relatively) expansive cavity between the frame rail and the oil pan.

The only issue was that I’d need to make the exhaust perform an awkward U-turn because the compressor occupies the space of the oil filter in the exhaust-back orientation. It was the easiest side to start on anyways, so I decided to go ahead and practice making the adapter. I could come back to it later if I had a bright idea or two.
I purchased a 2.25-inch “ball flange” pipe, which is what joins the manifold to the OEM downpipe, and cut it to a length that seemed right. I also bought a steel T3 exhaust flange (the thick steel plate on top) that bolts to the turbo. To fit the round peg into the square hole, I machined the 2.25-inch pipe cutout in a rectangular piece of steel and stuffed it in, then welded all around it.
It was then that I found out that people make and sell things called “transition flanges”, which is the square thing with a round hole already made for me.

Oh well. Better luck next time, I suppose. “Not knowing what the Car Part is called and making it from scratch accidentally” is going to be a recurring theme of this build.
The passenger side was going to be a little trickier. The whole powertrain in Ford trucks and vans is displaced towards the passenger side a few inches, so this side is the tightest. The exhaust manifold exits almost straight backward instead of downwards to skip over a frame rail.

There was space I could use immediately next to the transmission. It was going to be a tight turn to get the exhaust downpipe into the turbo (I have a small chunk of pipe posed here to illustrate).

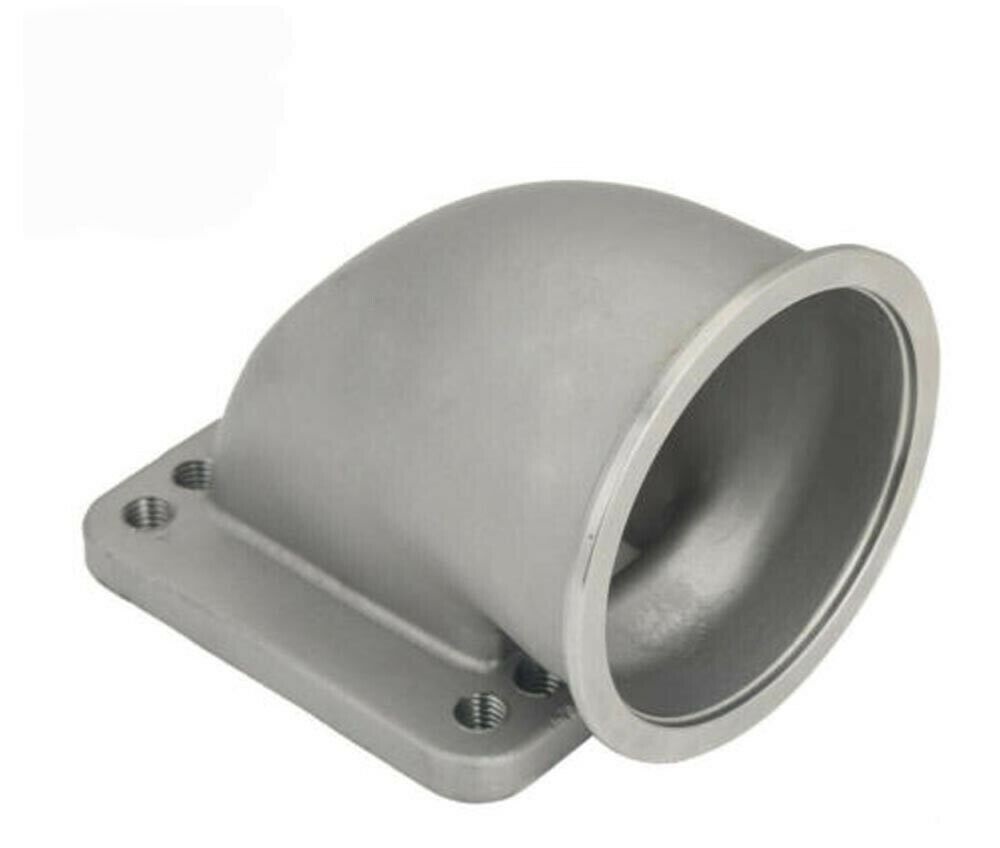
To do this, I went to the hardware store and picked up a 90-degree two-inch pipe elbow, cut it down, and welded another steel round-to-square adapter plate to it, along with a 2.5-to-2.25″ adapter to couple to the OEM exhaust diameter.
This time, I was aware of the “buy it” solution, called a right-angle V-band adapter.
I didn’t think I would have the space to use a V-band coupling here, but I could always have just bought that and cut the V-band off in order to use the much tighter turn. Plus, mine wasn’t actually airtight — I obviously couldn’t weld around the bottom of the pipe where it was almost touching the flange. This became food for future thought. Burnouts now, good ideas later!

The right-hand downpipe also needed to be welded in an awkward orientation – 30 degrees from the vertical. You can rotate the compressor housing to exit whichever way is convenient, as long as the turbo bearing housing faces downwards so the oil can drain.
Here’s what the final downpipes looked like!

Notice the weld stripes on the right-hand downpipe. This was my attempt at doing “pie cuts”, a technique to make exhaust bends when you don’t have a bender or want to attempt an impossible radius. However, I got lazy and wondered what would happen if you don’t separate the pie slices and just cut the chunks out. The answer was no, this was really dumb and I should feel bad.
The reason for this was that I had to shift the turbo about half an inch closer to the frame rail; once the ball flange tightened down on the manifold, it tended to pull the turbo into the transmission.

Here they are installed in place, with some generic canister filters attached to them. For now, I decided an underbody intake was just fine. I’ll avoid the big puddles, and these vans are fairly high off the ground to start with. In the final product for the Centurion, I’m going to run intake hoses “upstairs” (as I started calling it) to proper filters.
Not What You Had In Mind When You Hear “Hosiery”
I had completed the interesting mechanical problem: where to mount the turbos and how to run the exhaust to them. I was now entering the “Being nickel-and-dimed to death by hoses, fittings, and nipples” part of the project.
To carry boost (charge air), most people default to those nice SEMA-looking colored silicone elbows and aluminum pipes. That would have cost me a fortune with how many turns I would have to make, so I began searching for other solutions.
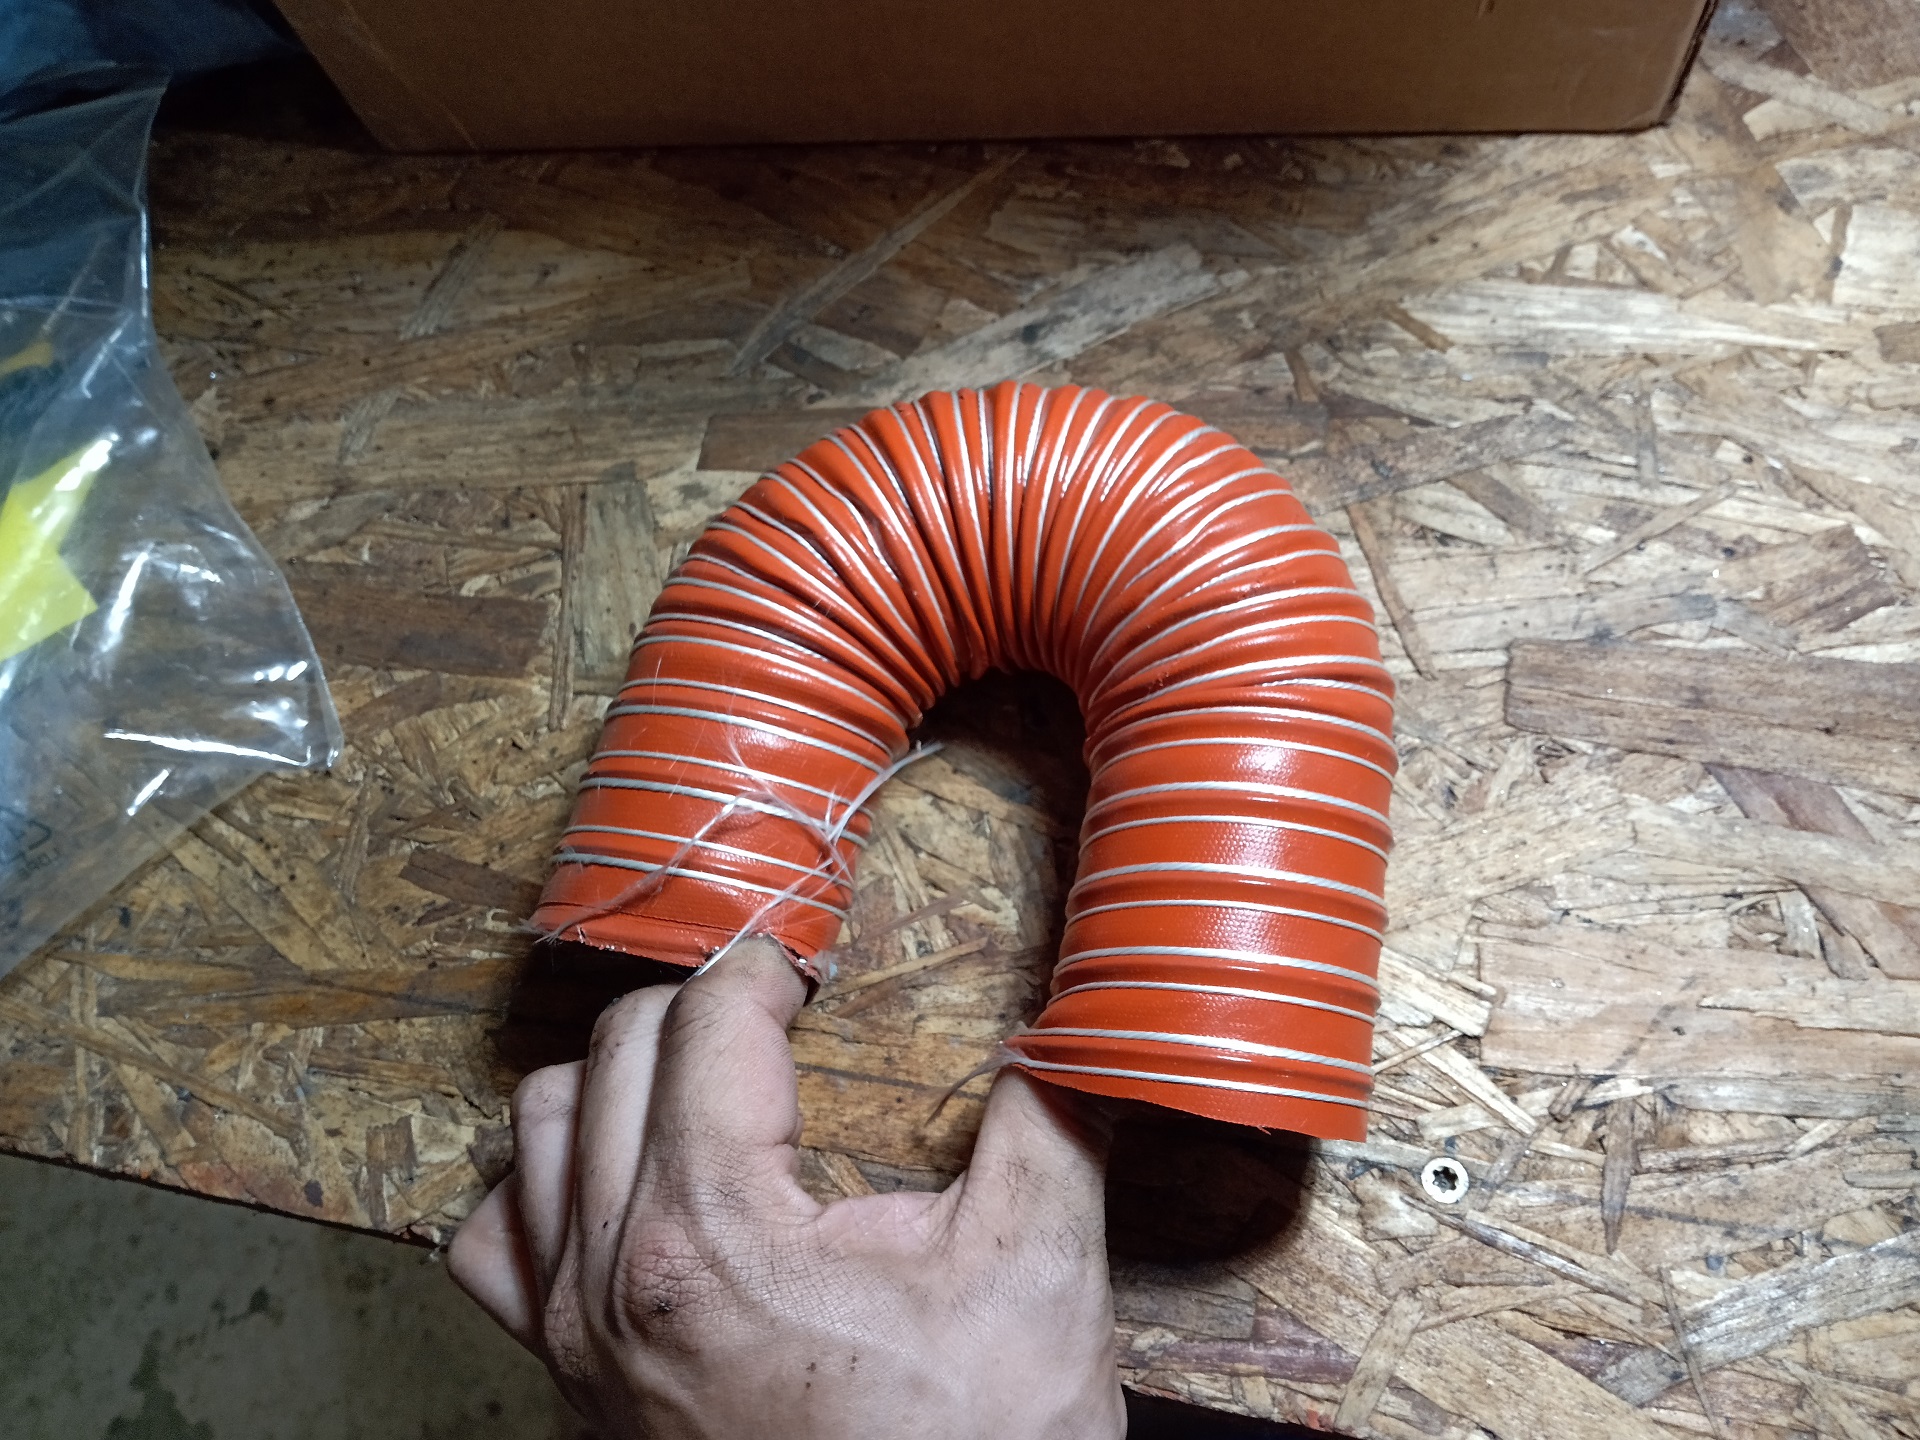
I found a candidate for a product I call “Boingy Hose.” It’s a silicone rubber-impregnated fiberglass cloth that’s wound into a hose with a steel spring sandwiched within, so it tends to remain straight unless constrained to something to make it bend. It’s highly flexible otherwise, and an outer fiberglass cord wraps around the whole show to keep it together. It was even rated to 25 PSI!
Some of you, as it turns out, know this stuff as “Brake Duct Hose”, a name that I, once again, found out about only after buying it and showing my friends. “Oh, you’re gonna put boost through brake duct hose? Damn dude, let us know how it does” they said. “It’s called what?” I mused back.
I knew it as a “High-Temperature Flexible Duct Hose for Fumes” because I found it on my favorite industrial supplier:
I basically searched by the specifications I needed. It has to be 2 inches in diameter, carry hot air, be flexible, and be pressure-rated. Mildly. That’s what the website served me up, and this is how I keep ending up using robot parts as car parts. I don’t care what you all call it, I will forever call it “Boingy Hose.”
Boingy Hoses will go upstairs from the turbos into a manifold adapter that mounts in place of the air cleaner. Surveying the marketplace, there are products specifically for this made by IDI enthusiasts such as R&D Performance and Classic Diesel Designs. There were also generic intake hat adapters for 4-barrel carburetor air cleaners I could buy.
By this point, though, I was getting cocky, and “….I could buy” became synonymous with “well how about I just GIVE UP?”, and I decided to design my own dual intake adapter. Lacking a five-inch diameter pipe of some kind, and really any ability to fabricate tubing well, I decided on the next most eyebrow-raising option.

We’re going to 3D print it. This is carbon fiber reinforced nylon material, produced on one of my Markforged machines, and I absolutely trust it to hold the pressure at the temperatures I think I’ll hit in the engine bay. You definitely don’t need a $10,000 machine to make something like this, as high-temperature fiber-filled automotive plastics are available on the hobbyist market now! 3D printing car parts is one of the very active frontiers for hobbyists right now.

The part was designed in Autodesk Inventor (AND SO CAN YOU! with the likes of Onshape and Fusion 360). I started with a hemisphere for favorable stress distribution, basically assuming that under boost it’ll act like the end of a pressure vessel. I patterned two tubes to point roughly where I thought the Boingy Hose would approach it. Then I added features like the vertical air cleaner hold-down bolt and a bung connection for the wastegates.
Next up for Van Hosiery, I had to hook up oil feed and return lines to the turbos.

Oil feed was quite simple. I bought fittings to tap an oil gallery on the left-hand side of the crankcase, where the aftermarket turbos also draw their oil from. A tee fitting splits it into two lines (the silver braided hoses). The turbos came with AN fittings for oil feed, and the Internet provided many options for them.

I also had to evacuate the oil coming out of the turbo bearings. In most applications, the turbo oil return simply drains into the crankcase. But I’ll be mounting these basically below the crankcase level, so it has to be actively pumped.
I pressed a spare Facet Cube solenoid fuel pump into service because they advertise having all-metal internal parts which could stand up to the temperatures of hot post-turbo oil. All of the barb fittings came from Amazon, and the drain hose is some ⅝” fuel hose – big enough diameter to act as a sump so the oil volume from above the turbo has a place to drain to when the engine isn’t running.
Where’s all the oil going to go, though? The usual strategies include drilling a hole in the valve covers or punching a hole through the intake manifold gasket (that covers the area between the heads, sometimes called a “valley pan”). I decided to route the oil return hose all the way up front to a removable service cover for the injection pump.

I took this cover off and drilled a hole through it for a flange-mount hose fitting. Technically this still counts as “Having to drill a hole into something”. In my defense, this is a part you can remove from right under the hood without disturbing anything, so I consider it minimally invasive.
The last Van Hosiery challenge was re-routing the PCV (positive crankcase ventilation) system such that it wasn’t exposed to boost pressure. Typically, PCV valves in gasoline cars are the size of your thumb, but diesel engines make very little meaningful vacuum, so they need pretty big ones — this part is often called the “tuna can” by enthusiasts.

This valve is a source of frustration with most of the aftermarket kits supplying a custom-fabricated adapter. Recall the photo of Spool Bus’s engine bay up top — the PCV valve has been tucked in the very upper left of the engine cave. Other kits get super creative with mounting it to a valve cover or in even more remote locations.

I chose instead to just turn it around, seal off the hole to the intake manifold with an expanding pipe plug, and securely sandwich it with a steel plate. This steel plate also traps a short length of hose that I’ll use as a connector to another hose that will be routed into one of the intakes. This part doesn’t need to withstand boost pressure – rather, it might be under a slight vacuum.
I then gave Snekvan the “Best Exhaust $120 at O’Reilly Could Buy.” First, we start off with what I call the Trombone of Shame:

This is for the driver’s side, of course, which needs to make the Awkward U-Turn. I bought a regular 2.5″ U-bend pipe, but it was too wide so I cut a section out of the middle. That turned out to be too narrow after I welded the V-band adapter on for a fitment test (it hit the compressor housing). So, I had to weld a section back in the middle again.
I could have just bought a slightly tighter U-bend. The more you know.gif
Everything else was very straightforward and just banged together from muffler clamps and generic hanger straps. I basically made a very crude set of lake pipes!

Turning Everything up to Eleven
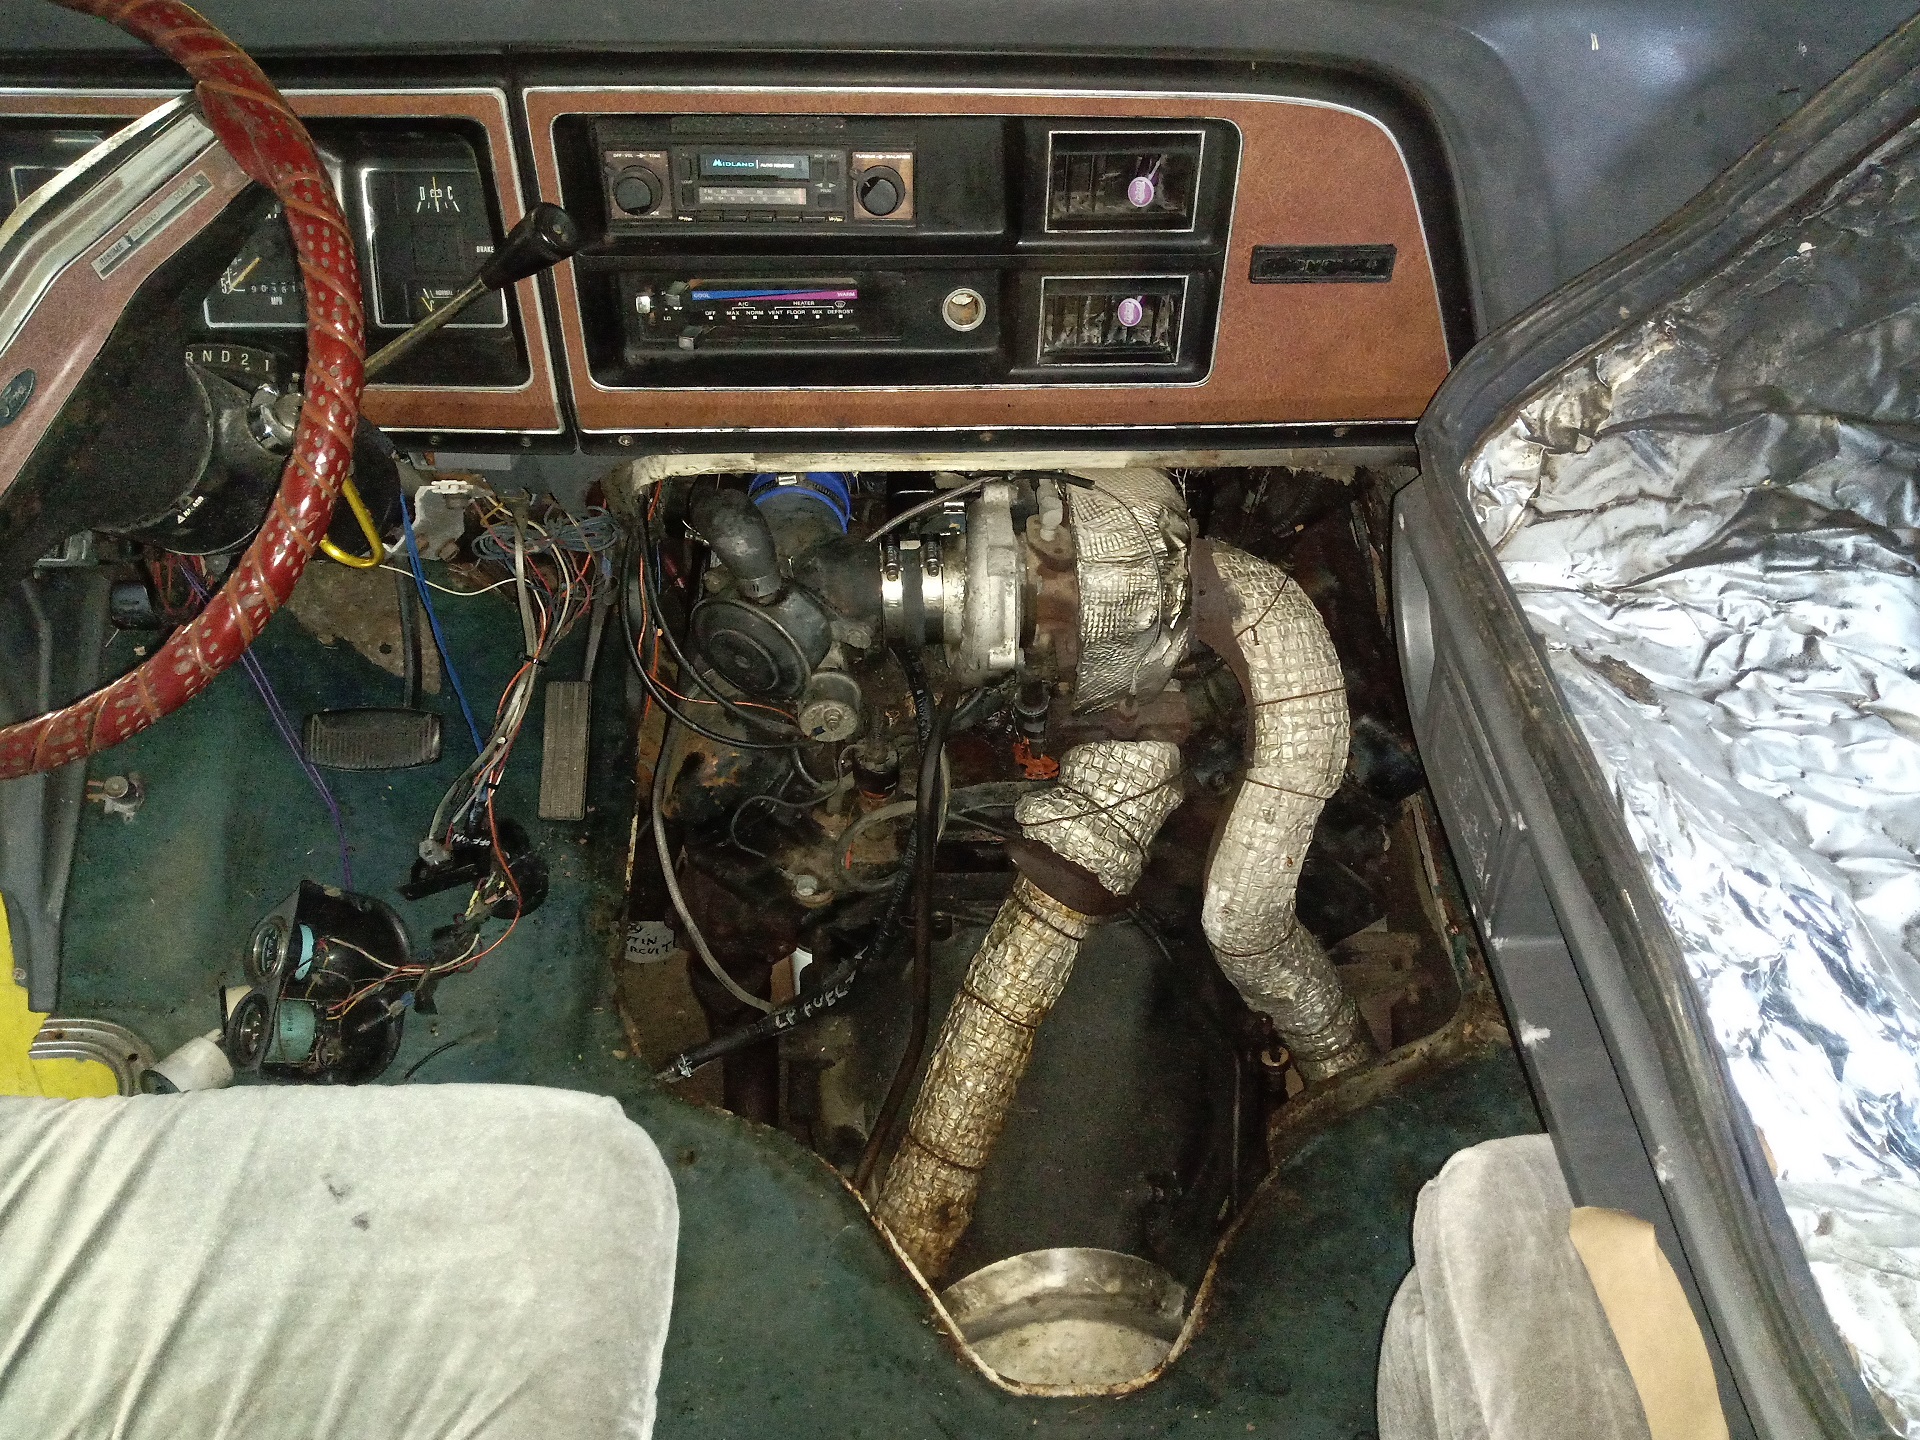
Once all was said and done, the “upstairs” integration looked like this:

Note the copious orange silicone helping seal the 3D printed intake adapter and the free-routing of the Boingy Hose by just coercing it with cable ties.
I drove the van around for a couple of days to heat cycle everything and in particular, make sure the oil feed and return systems were working. At this point, I hadn’t increased the fueling yet, so besides making hehe snail sounds it didn’t really drive any differently.

Like every mechanical diesel engine, there’s a Magic Screw to set how much fuel the injection pump will distribute to the cylinders. The usual advice says to adjust it “one flat at a time”, referring to the 60-degree faces of a hex-head screw, but I’d gathered enough anecdata™ now that I decided to just give it a half crank (180 degrees, or “three flats.”)
Now things started getting exciting. In fact, so exciting I decided to add some gauges before I actually became the subject of a WSB Traffic Red Alert for causing a vehicle fire on I-285.

I basically bought the crappiest boost and exhaust gas temperature gauges Amazon had to offer. Boost and EGT tell you basically all you need to know about an old diesel engine since the only dimensions of tuning are Moar Fuel and Moar Air.
With feedback showing me that EGTs were nowhere near the danger zone of ~600 Celsius and the boost only hitting about 8 PSI, I decided to go full send and tightened the Magic Screw of Fuel Dispensing all the way (I think it ended up being like 1.5 turns) and cranked the adjustment spring on the wastegates until they showed 15 PSI being fed by my air compressor.
And that is how I ended up terrorizing Atlanta’s Christmas morning traffic with my private flying freight train:
Lessons Learned, and Where to Go Next?

I personally considered the Snekvan experiment a resounding success. Over about 2 months, I put roughly 1000 miles on the system. Yes, I tried daily-ing it… it was terrible, like absolutely terrible to drive. Most of the miles came from observational test drives around the highways and going to meets and shows. I even brought it to Caffeine and Octane, the monthly come-all gathering.
Things that I managed to prove with this build included:
- Boingy Hose was a success, and I never had problems with it. I’m glad I found it, and am morbidly curious if Amazon-tier brake ducting will be anywhere near as good.
- The 3D-printed intake manifold adapter was somehow one of the most reliable parts of the whole system.
- A little solenoid pump was sufficient to keep two turbos mounted well below the oil level in the crankcase fully cleared.
- The upstairs integration left all the injectors and glow plugs accessible, and even the fuel filter.
- Better yet, it did NOT require any changes to the glow plug wire harness. The glow plug controller was simply moved to a bracket, placing it a few inches lower.
- I drilled one hole in an access panel to run the oil return hose, and it’s one that is easily removed from the front of the vehicle to do the job elsewhere.
The story of Snekvan ended officially on New Year’s Eve, 2021, when I spent the day dismantling everything and rang in the new year by pulling the IDI out! No, I have no friends, why do you ask?

Yes, it comes out through the front, not the top. #JustVanThings
I would spend much of 2022 on and off pulling the IDI apart and performing a rebuild, putting in some “stage 1” bulletproofing mods such as high-tensile strength head studs and stiffer valve springs. I only have a few small design changes in mind for the turbo system when I build it up again for the Centurion swap. These include turning that left-hand turbo around to avoid the Awkward U-Turn and a better way to secure the PCV valve. Hell, I even have ideas on where to stick the intercooler.
In all, this was an excellent crash course in a domain of the automotive world I’ve never been through before. I’m quite happy I was able to use my existing general engineering and fabrication knowledge to catastrophically pinball my way around, and yet end up with something that was functional and boundary-pushing. Maybe even “assumption challenging”. Hopefully, this means the Centurion build will turn it into the machine it’s always deserved to be, but couldn’t because it was saddled with that old analog emissions-laden 460.

Did you know that you have to spoon the Harbor Freight engine crane and engine stand to transfer the engine in question between the two? Took me a while to realize this.

Read more on The Autopian
- The Dodge Spirit R/T Was The Fastest Sedan Built In America And Nearly As Quick As A BMW M5: Holy Grails
- Holy Grails: The MG ZT-T 260 Is A Super Rare British Wagon With A Ford V8 Heart
- Holy Grails: The South African BMW 745i Is The M7 BMW Never Gave The Rest Of The World
- Holy Grails: The Mercury Tracer LTS Was An Underrated Performer With The Body Of A Practical Sedan
Want to write for The Autopian? Pitch us here. Or check out the stories on our homepage.


“I’m going full Amazon flea market tier, only stuff of questionable quality and uncertain provenance ”
So, Ebay?
Excellent article, really hits the spot for me. I can really sense the feeling of innocent joy that must have suffused the offer as he cheerfully barged into that engine bay armed with a 3D printer, an eBay account, and a length of interesting hose that he did not know the real name for. A smashing success!
Epic!
I now feel inadequate about slapping a turbo on my MX5 using some some parts from other cars and some scrap pulled out of a bin.
Blue looks awesome! The 2nd time will be easier and better. Can’t wait. Please leave the patina on the outside.
This was one of the funniest and best articles I’ve read relating to cars or spooky candy vans in a long time, kudos! Great project, it reminds me very much of vintage Car Craft magazine kinda stuff, there are some hilarious quips and spicy comments lol
Holy balls, the patina on this bad boy is just mint. Never wash it. Ever.
Great to see your byline again, Charles!
Reading this, it occurred to me you are trying to turn GM’s ethos on its head: they have a history of (often very) poor execution of good ideas. You did a (reasonably) good job executing a bad idea-and wrote about it entertainingly. Keep them coming: we like bad ideas done well
Great writeup! I found it to be really interesting!
HELL YES.
I mean, I can appreciate watching Singer do their magic, but this, this is much, much closer to home for 99% of Autopians. Plus, the writing made me laugh out loud several times. Really laugh, not text lol.
The sheer joy of reading about someone who went ‘Is this a good idea? Probably not, but screw it.’ can’t be beat. Expertise? Don’t need that, just wing it. Can’t wait for the next installment.
Yikes. I think this is why people like the 7.3s.
Turbone is actually a very good and excellent name. It’s almost worth installing one to say, “Yeah, I’ve got a turbone on my _______. I call it the Turbone-ator.”
HVAC nerd-note: Trane package units (the big, sorta pea green boxes on commercial roofs) use a Turbulator to, uh, promote turbulence in the combustion air inside their heat-exchangers (gas heat). Not near as cool as Turbone, but still makes me smile seeing it in their instructions every time I change one out.
Never mind: carry on
My favorite HVAC-related part name is the Taco Valve. Sadly though, it does not dispense a stream of tacos when opened.
Huh. I’ve installed many fan coil units, but had never heard of a Taco valve. Thanks for that. Yeah, no taco-ey goodness if opened, just (likely nasty, smelly) hot or cold water/glycol mix. And, often, sludge.
Was wondering where the van updates were! This is a very cool build, gives me hope that I can turbo my project Tiburon one day soon, after I finish all my other projects….
How about if i have to put up with streaking i prefer to hear it from a tire? I mean a streaking tire.
The ATS added a whopping … “checks wiki notes” …. 5 hp.
I’d bet you got at least 7 hp here.
Worth it.
Disputed. It’s *at least* 11 more. It feels *at least* as fast as a Great Value Cream Cheese Mitsubishi Mirage.
I had a Banks on my F250, and I’ve driven the non-turbo before. It may not result in substantially more HP – but it really is a massive improvement for drivability.
Charles, you need to drop this motor into Overhaul. I doubt those pesky Brazilians and New Zealanders will have an answer for that.
How about if i have to put up with streaking i prefer to hear it from a tire?
As a self employed business owner who has owned and driven several vans/box trucks i enjoyed this read. It gave me several ideas comments, and quesfions;
1. Column idea write about the failings and possible solutions to the 5.4L popcorn spark plugs.
2. In the videos of the test drives obviously the video was taken from a secondary vehicle. Was it that loud or was the audio taken from the snakvan?
3. I believe Turbos are the attempt of forcing more air into the system to allow more fuel combustion? Has anyone tried putting a device at the end of the fuel system before the exhaust system that sucks air through the system faster rather than force feeding air at the front of the system?
4. The bleed off oil i seem to remember a recall mentioned on this site that bled off excess oil through a tube and just let it bleed off to the ground. It is a bad idea for 100,000 vehicles but maybe okay for one, or just a little reservoir to hold and reuse it.
5. Chinese parts are mostly junk check for a reliable brand and weight for shipping. Most chinese crap is made with cheap pot metal. Make sure your cheap part weighs what it should.
6. For next rebuild write about it in steps. What and how allow readers to opine in and give suggestions so you dont recreate and rebuild an existing part. Really check out the supplier so a cheap part doesnt fail and ruin the build. Invest in a hose and bucket and wash the damn thing. A clean vehicle is far easier to work on
One last important idea/ comment. I like the boingy tag. But it is not capable of being copywrited. Use booingy, or some other misspelled name. Do a copyright like Jello. Promote it among car sites and car clubs and car part suppliers. Create the main name it is known by and afterwards you have three choices;
1. Sell the copywrited name to an auto part supplier as an exclusive naming convention
2. Sell the use of the spelling to car part suppliers as a regular small funding source for the site.
3. Create a DIY kit for people to design what they need or a custom manufacturer to sell after the site builds interest.
I can answer 3:
Turbocharging is completely separate from the fuel system.
The way turbocharging gets more air in the cylinder is by compressing it. By making it a higher pressure it’s increasing the density, letting you fit more (by mass) in the same sized cylinder. This lets you also shove more fuel into the cylinder and still maintain a proper fuel:air ratio for a clean and efficient burn.
Sucking would pull a vacuum and decrease the amount of air, plus only affect the cylinders when the exhaust valves were open.
If I misinterpreted your question, generically it doesn’t help much to increase velocity (this happens anyways when you increase rpm), and if you’re talking about adding air to the fuel prior to injection that would be a negligible amount of air and make it really hard to inject the right amount of fuel.
P71 – What you’ve said is only correct for a 4-stroke.
Most two stroke motorcycle engines post ~’68 use expansion chambers (which use tuned resonance chambers) to use harmonic pulses to scavenge the cylinder, using the induced vacuum to pull more air/fuel mixture into the cylinder. That’s the source of the expression “coming on the pipe”.
For two stroke diesels, a similar concept is used, scavenge pumps, like the Roots type scavenge pump, which pull the exhaust from the cylinders, also pulling in fresh air. When removed from the diesel engines, became Roots type blowers, the stereotypical supercharger that comes to mind when one thinks of a hot rod with a supercharger sticking through the hood. Top fuel dragsters also use Roots type blowers. The -71 series blowers, most commonly the 6-71, refers to the Detroit diesel engines they were taken from.
To better answer Dave’s question: they don’t suck air though the engine because in a 4t engine, both the intake and exhaust valves would have to be open at the same time for that to work, which would be bad for emissions (more unburnt fuel would go through) and also bad for power, because you’d have to specifically time the closing of the exhaust valve to keep it from sucking the “good” air through. This could potentially work in a direct injection motor, but isn’t something likely to be researched, because there likely isn’t going to be much ICE research in the future.
Something that is similar to your idea, however, is using Helmholtz resonance (basically tuning things for specific frequencies) to make the air flow more quickly into the intake manifold, sort of creating a small supercharging effect using tuned intake runner length to achieve a desired amount of power at certain frequencies. Many cars that have multiple intake runners/systems that lengthen or shorten their runners are using this concept to make more power/increase volumetric efficiency/broaden torque curves.
It really is that loud. The filming vehicle was a hatchback and the videographer was strapped down with the hatch open while someone else drove.
TIL proprioception is a very cool alternative word for kinesthesia. Thanks!
I love everything about this article, but I really want to spoon with these two sentences:
“How do I build up a turbo IDI van in the most incorrect and cringiest way possible?”
“Not knowing what the Car Part is called and making it from scratch accidentally” is going to be a recurring theme of this build.”
I would rather read about this kind of stuff all day over obscure tail lights and crappy camping trailers.
Just some honest feedback.
It’s a website with something for everybody.
Hey, now, there’s no need for any gatekeeping of any sort. If you don’t like an article, just skip over that & move on to the next one. That’s the appeal of this website, where else would one find articles ranging from ones with ontological musings about the linguistics of classifying engine placement to ones with near-obsessive wrenching on morbidly moribund utes on the other side of the globe in *one* place??
While the 3rd sentence is too long for a shirt or bumper sticker, it ought to be a major heading in this site’s mission statement. COTD for me for sure.
Feedback is important. I don’t click or read those articles, I click and read and comment on the ones that interest me, and I think its important to let those in charge know. Considering there’s no fewer than like 5 comments on this article of people saying “more of this kind of stuff please” I’d say others feel the same way.
Some excellent content
How are the rotating assemblies on the turbos after 1k miles? I bought a ko3 with a new (probably ebay-quality because i bought it on eBay) rotating assy for like 4x the cost of one of those and after 4k miles it’s already whining and waiting until 5k rpm to start making boost.
When I took them out, they didn’t seem to have much play. Also, they’re currently living in Econocrane (the black former-ambulance-tow-truck-whatever) so the whole system has ~1600 miles on it so far.
I suspect the unusual longevity is coming from the thing I touched on – that they’re really not being stressed in this application. I’m okay with maintaining that state.
Whew, that’s a relief,
But it’s truly Cotd worthy
This was supposed to be a reply to DT’s employee disqualification comment
Spoon the damned things to get them to fit better…. I’ll be damned. That alone was worth the read.
I know you love these particular “unloved” engines, but I really want to see what you’d do with a Ford 4.9L I6
THIS IS THE CONTENT I LIKE.
Not to pimp out another website here or anything but if you really want to look at all the gore and the sausage-making, my website has a very extensive backlog of probably ~40K words on this build. In fact, distilling it down to only ~5K and keeping any continuity whatsoever was a monumental effort. The link is https://www.etotheipiplusone.net/?cat=140 under “Operation IDIocracy”
WOW! I get why your site has 40,000 words on the subject. You used over 100 where 40 would do the job better. If your site rambles on like this hire an editor to trim it to specifics. Tbey say a picture is worth a 1000 words. Not all of those words are relevant. In my 30 years working in the newspaper field we called this puking words. And given your comment you are puking up words.
It’s pretty much all the same as here – photos and a blurb. I just tend to take many many photos of every step of doing something.
“Burnouts now, good ideas later!”
I think we may need this on a t-shirt, yes?
This
COTD
There’s one rule about COTD: Autopian employees cannot win it.
But can they create a shirt?
Shh, now someone’s just going to copy and past Patrick’s comment. lol
I don’t feel guilty stealing from criminals (OK more like civil infraction violators.)
Hey DT What is the sites opinion on creatively renaming body parts to breasts, wings, thighs, and legs to get more hits when people search these terms? Doing it as a spoof could avoid complaints. Lol
Peak autopian! This should be the the first shirt that pops up when you click on the store!